oVirt相关
Ovirt Just make some notes: # need net qemu-kvm -m 1024 -localtime -M pc -smp 2 -drive file=ovirt.qcow2,cache=writeback,boot=on -boot d -name kvm-ovirt,process=ovirt -usb -usbdevice tablet Ovirt provided a fedora.iso with node in it. Ao is building the engine.
on virtfan spicec -h localhost -p 5910
node应该是自动加入engine的,结果是现在能加入,但是不能安装 nmap后engine确实是有8443,node只有22,安装过程是交互的(node通过外网获取安装包,返回状态到engine)
改变端口为443,按照troubleshooting更改engine上的nfs服务。f17上nfs默认建立服务为v4,要改为v3,并且添加group和user id分别为36的vdsm与kvm,用提供的脚本测试下。 Troubleshooting_NFS_Storage_Issues
ok,等明天加入节点就可以了。
Building ovirt from source with cmdline within an ide install jboss maven plugin on eclipse
here's the engine arch 
and here's the engine-core arch 
运行engine-manage-domain需要ipa-server,类似windows的ActiveDirectory,需要不同于engine的主机上安装ipa 安装ipa-server
title: "Add nat to ovirt via vdsm hooks" date: 2014-05-04 categories: - "cloud-infra"
OK, I do not like control group very much for now.
Comment device section in control group config, sorry for my laziness...
mount { cpuset = /cgroup/cpuset; cpu = /cgroup/cpu; cpuacct = /cgroup/cpuacct; memory = /cgroup/memory;
devices = /cgroup/devices;
1 | |
net_cls = /cgroup/net_cls;
1 | |
}
Enable ip forward
net.ipv4.ip_forward = 1
Reboot the host
Connect to virsh to enable libvirt's default virbr0(NAT)
If you don't know the password for your account, just use command below to create one.
saslpasswd2 -a libvirt root
Create a nat network.
nat b42e377d-e849-4c36-bd98-3d090def5ecc
virsh net-create /etc/libvirt/qemu/networks/nat.xml
virsh net-autostart nat
virsh net-start nat
Create tun device and add it to virbr0
UPDATE: This could be ignored if you use extnet.py
tunctl -t nat0 -u qemu
brctl addif virbr1 nat0
Add hook file to vdsm
UPDATE: use extnet from github with a little modification (Only the first vNIC will be NAT, the second one still keeps its way).
1 2 3 4 5 6 7 8 9 10 11 12 13 14 15 16 17 18 19 20 21 22 23 24 25 26 27 28 29 30 31 32 33 34 35 36 37 38 39 40 41 42 43 44 | |
QEMU-CMD way:
1 2 3 4 5 6 7 8 9 10 11 12 13 14 15 16 17 18 19 20 21 22 23 24 25 26 27 28 29 30 31 32 33 34 35 36 37 38 39 40 41 42 43 44 45 46 47 48 49 | |
Then you should start the vm WITHOUT ANY NIC if you are using nat.py.
title: "Migrate vm from ESXi to oVirt" date: 2014-04-25 categories: - "cloud-infra"
oVirt: v3.3, CentOS, 192.168.1.111 ESXi: 5.x, 192.168.1.135
For Windows vm, do this http://pve.proxmox.com/wiki/Migration_of_servers_to_Proxmox_VE#VMware_to_Proxmox_VE_.28KVM.29 Before you begin make a copy of the VMware image. Remove VMware tools Start the Windows virtual machine on VMware and remove the VMware tools via the Windows control panel. Reboot. Enable IDE Start the Windows virtual machine on VMware and execute the mergeide.reg (File:Mergeide). Now the registry is changed that your Windows can boot from IDE, necessary for KVM. Make sure Atapi.sys, Intelide.sys, Pciide.sys, and Pciidex.sys are in the %SystemRoot%\System32\Drivers folder. If any are missing they can be extracted from %SystemRoot%\Driver Cache\I386\Driver.cab which can be opened in Windows file Exlorer like a directory and then the missing files can be copied out. see Microsoft KB article for details. Shutdown Windows.
- Create a nfs export domain on your oVirt datacenter.
/vdsm/export 0.0.0.0/0.0.0.0(rw)
- Install virt-v2v on CentOS and add authentication.
yum install virt-v2v
machine 192.168.1.135 login root password 1234567
Change permission of .netrc as saying of manual or you will get a warning with wrong permission.
chmod 600 ~/.netrc
- Import myvm. Make sure that your vm in ESXi is powered off.
virt-v2v -ic esx://192.168.1.135/?no_verify=1 -o rhev -os 192.168.1.111:/virtfan/export --network mgmtnet myvm
myvm_myvm: 100% [====================================================]D 0h04m48s
virt-v2v: myvm configured with virtio drivers.
- Import myvm from export domain to data domain.
Import.
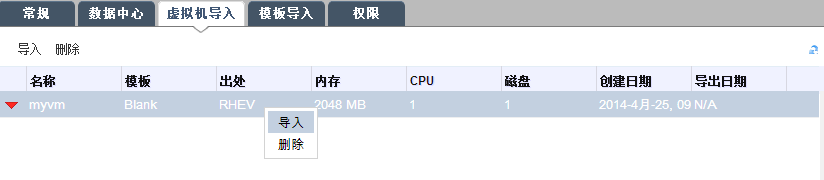
Run.

"VDSM" "2012-10-29"
不喜欢java,就是不喜欢。。但还是要干的。。 4000多个文件构建UML图的话有点困难,都是小类,看了些tools的代码,然后转到vdsm内容,通讯方式是xml-rpc,当初我猜对了。
vdsm是oVirt的节点代理,功能可订制,也可移植到其他管理平台,基于KVM,储存VM各种暂态数据 vdsm提供的api通过xmlrpc使用,架构如下
1 2 3 4 5 6 7 8 9 10 11 | |
主要包括vdsm,vdsm_cli,vds_bootstrap,vdsm_reg,vdsm_hooks 其中lifecycle hooks有针对vdsm和vm在before和after期间 bootstrap用于验证兼容性,包括网络,cpu,认证等,目前只支持RH自家产品