QEMU相关
创建一个“虚拟”显示适配器,适用于那些“你知道你想干什么并且在干什么”的人。 原文参考 http://www.geeks3d.com/20091230/vga-hack-how-to-make-a-vga-dummy-plug/ http://blog.zorinaq.com/?e=11
手头有两块ATI显卡,而且都有这个DVI-I接口,并且目前我的状况是两个显示器都接到了两个主板显示(集显)接口。  原文说需要一个75欧姆的电阻,我手里暂时只有100欧姆的,而且不多,如果强烈按照原作者的意思的话效果可能会有所不同,参考现有任意款VGA控制器原理。 [连接示意图] 来自第一个链接
  [效果图] 请无视我的背景,如果有人好奇的话,那是上篇文章的eZ430以及一包十块白沙。
 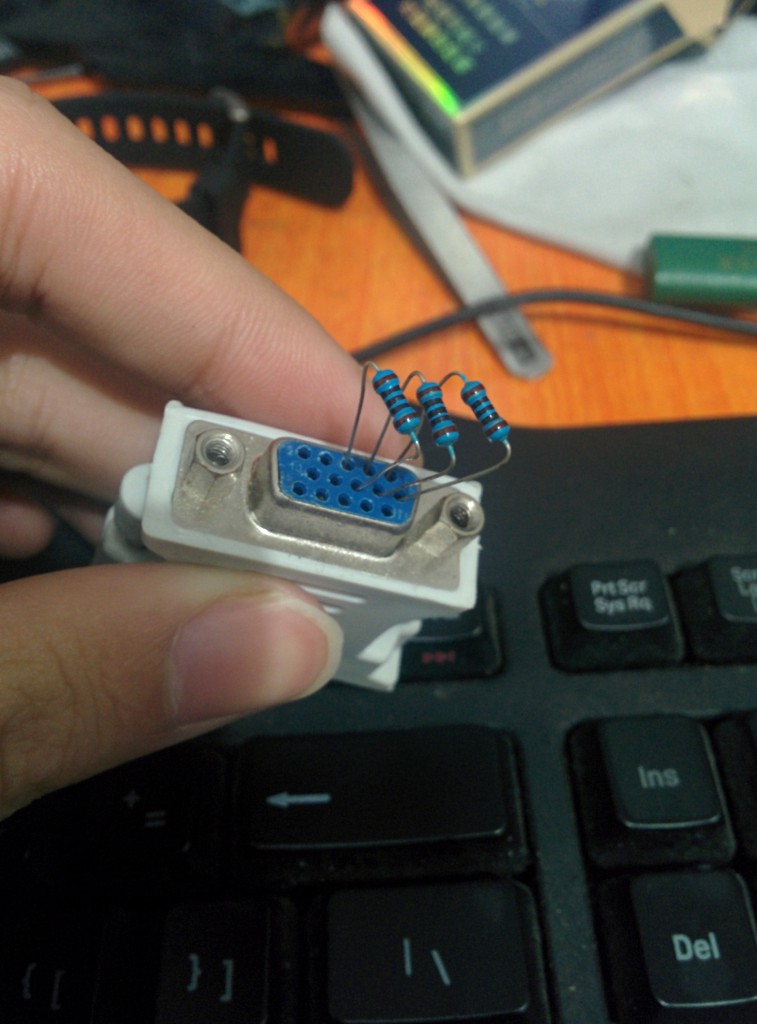 [结果]
[结果] 
看见第3个显示器没? 就是它了,你可以拿它做很多事,比如你有多块显卡,并且你想充分利用其性能,参考lucid mvp,效果上类似吧。--- title: "Gpu Passthrough in Xen" date: 2013-07-22 categories: - "cloud-infra"
Considering that Xen's gpu passthrough is about one year ahead of kvm, so let us try that. The process is something like kvm one as I wrote before. KVM GPU-Passthrough, VGA-Passthrough
Result: I failed in trying passthrough the graphic card to Win7 or XP. Now I'm try some patchs and re-compile Xen with my graphic card bios.bin.
HOST: CPU: i5-3470 GPU: ATI Radeon HD 7850 OS: openSuse 12.3 KDE
0. Disable Radeon Driver
echo "blacklist radeon" >> /etc/modprobe.d/modprobe.conf
mkinitrd
1. Install Xen-utils
Install Xen and its utilities via Yast.
2. Modify grub.cfg
... echo 'Loading Xen 4.3.0_06-1.3 ...' multiboot /xen-4.3.0_06-1.3.gz placeholder iommu=1 echo 'Loading Linux 3.10.1-3.g0cd5432-xen ...' module /vmlinuz-3.10.1-3.g0cd5432-xen placeholder root=UUID=da6ac064-2a5e-48c7-8834-307cbcb551c3 ro resume=/dev/disk/by-id/ata-ST500DM002-1BD142_Z3THR3V3-part3 splash=silent quiet showopts xen-pciback.hide=(00:00.0)(01:00.1) echo 'Loading initial ramdisk ...' module /initrd-3.10.1-3.g0cd5432-xen ...
Then reboot the host.
3. Bind the device
Using Scripts
File: bind_lib.sh
#!/bin/bash # # License: GPLv2 # Author: Peter Maloney # # Script to bind devices to pciback (or pci-stub)
find_new_id() { device="\(1" len=\) if [ "\(len" -eq 12 \]; then device="\)" fi lspci -n | grep "${device}" | cut -d' ' -f3 | sed -r "s/:/ /" }
bindstub() { device="$1" echo "binddevice $device"
1 2 3 4 5 6 7 8 9 10 11 12 13 14 15 16 17 18 19 20 21 22 23 24 25 26 27 28 | |
}
bindback() { device="$1" echo "binddevice $device"
1 2 3 4 5 6 7 8 9 10 11 12 13 14 15 16 17 18 19 20 21 22 23 24 25 26 27 | |
}
source bind_lib.sh
modprobe xen-pciback
bindback "0000:01:00.0"
bindback "0000:01:00.1"
Using xen-tools
xl pci-assignable-add 01:00.0
xl pci-assignable-add 01:00.1
xl pci-attach Domain-0 01:00.0
xl pci-attach Domain-0 01:00.1
4. Create VM
File: win7
name="win77" description="None" uuid="db64c1a6-1f84-4eff-48df-53c4b03b389e" memory=2048 maxmem=2048 vcpus=4 on_poweroff="destroy" on_reboot="destroy" on_crash="destroy" localtime=1
builder="hvm" device_model="/usr/lib/xen/bin/qemu-dm" kernel="/usr/lib/xen/boot/hvmloader" boot="dc" disk=[ 'file:/var/lib/xen//blog/images/windowsvistax64/disk0.raw,hda,w','file:/home/lofyer/Driver.iso,hdc:cdrom,r' ]
vif=[ 'bridge=virbr0, mac=00:12:3e:6c:2f:02, model=rtl8139' ]
stdvga=1 vnc=1 vnclisten="0.0.0.0" vncconsole=0
vncunused=1
soundhw="all"
monitor=1 viridian=1 sdl=0
usb=1
acpi=1 apic=1 pae=1
usbdevice='tablet'
serial="pty"
Add by lofyer
device_model_version = "qemu-xen-traditional" gfx_passthru=0 pci_power_mgmt=1 xen_platform_pci=1 pci_msitranslate=1 hap=1 pci = [ '01:00.0' , '01:00.1' ]
xl create win7 # remote-viewer vnc://localhost:5900
Then you should see Windows boot logo in vnc for few seconds, after that it will switch to the second monitor that attached to your ATI card.
gfx_gpupassthru
As Xen wiki said:
When you specify "gfx_passthru=1" the passthru graphics card will be made the primary graphics card in the VM, and the Xen Qemu-dm emulated Cirrus graphics card is disabled. If you use "gfx_passthru=0", or don't have gfx_passthru= option at all, then the Xen Qemu-dm emulated Cirrus graphics card will be the primary in the VM, and the passthru graphics card will be secondary.
So, alter gfx_passthru to 1.
title: "mingw编译remoteviewer" date: 2012-11-17 categories: - "cloud-infra"
UPDATE 2015.3.18 fedora 21中编译: # yum install mingw* libtool* auto-buildrequires intltool glib2-devel icoutils msitools # ./autogen.sh # mingw64-configure # mingw64-make -j4 # rpmbuild -bb mingw-virt-viewer.spec 编译msi过程中,可能会提示缺少storageencryption.rng,从以下地址下载即可。 https://raw.githubusercontent.com/wido/libvirt/master/docs/schemas/storageencryption.rng
在fedora环境中,需要的有spice-gtk,libusbx,usbredir,remote-review,全部下载最新git源 spice-gtk,usbredir http://cgit.freedesktop.org/spice libusbx git://github.com/libusbx/libusbx.git remote-viewer git.fedorahosted.org/git/virt-viewer.git
libusbx和usbredir:
mingw32-configure;mingw32-make;mingw32-make install
spice-gtk: mingw32-configure --with-sasl=no --with-audio=gstreamer --enable-smartcard=no --with-gtk=2.0 --without-python 因为virtviewer要gtk2.0的,所以这也就2.0的;mingw32下没找到pygtk,图省事儿就不要python了,其他的缺啥下啥
mingw32-make mingw32-make install
virt-viewer:
mingw32-configure mingw32-make mingw32-make install
生成remote viewer.exe
安装包 运行nsiswrapper生成windows安装包
nsiswrapper --run --name "Virt-Viewer" --outfile "Virt-Viewer-for-Windows.exe" --with-gtk /usr/i686-pc-mingw32/sys-root/mingw/bin/virt-viewer.exe
缺少的dll从网上下或者windows环境中安装的virtviewer加到$PATH中 这样会缺少三个xml文件,在virtviewer/src里,直接copy过去
export PATH=$PATH:/usr/i686-pc-mingw32/sys-root/mingw/bin:.
windows client中使用usbredir: 需要libwdi或者zadig或者usbclerk 链接
todo: 只有libvirt不是最新的了,可是目前来看没影响
title: "NVIDIA GRID vGPU and KVMGT for KVM" date: 2017-10-25 categories: - "cloud-infra"
This article will tell you how to use NVIDIA vGPU and KVMGT in KVM hypervisor with mdev. I'll use NVIDIA M60 and RHEL 7.4 for testing.
1. NVIDIA vGPU
1.1. Prepare drivers and utilities
1.2. Create vGPU with command line
1.3. Passthrough vGPU to vm
2. KVMGT
2.1. Prepare drivers and utilities
2.2. Create vGPU with command line
2.3. Passthrough vGPU to vm
3. AMD vGPU
3.1. Prepare drivers and utilities
3.2. Create vGPU with command line
3.3. Passthrough vGPU to vm
Ref:
https://www.kraxel.org/blog/tag/vgpu/
title: "QEMU 3D" date: 2016-12-29 categories: - "cloud-infra"
Except from virgl(virtio-vga), KVMGT/XenGT, CUDA vGPU, I will introduce you another way of using 3D app in QEMU, c'est la XQEMU
Download prebuilt EmuCR-XQEMU-20170109
As you can see, this is a emulator forked from QEMU to let you playing XBOX games in PC.(not interested though...)
Get XQEMU
git clone https://github.com/espes/xqemu.git
Compile XQEMU
For Mac OS X
./configure --cc=clang --enable-opengl --disable-vnc --disable-user --target-list=xbox-softmmu --extra-cflags="-march=native" --enable-debug make
For Windows
- Install MSYS2 x86_64: Follow all the steps on http://msys2.github.io/
-
Open the "MinGW-w64 Win64 Shell" and run:
pacman -S git python2 make autoconf automake-wrapper mingw-w64-x86_64-libtool mingw-w64-x86_64-gcc mingw-w64-x86_64-pkg-config mingw-w64-x86_64-glib2 mingw-w64-x86_64-glew mingw-w64-x86_64-SDL git clone https://github.com/espes/xqemu cd xqemu git submodule update --init pixman
./configure --cc=gcc --python=python2 --enable-opengl --disable-vnc --disable-user --target-list=xbox-softmmu --extra-cflags="-march=native" --enable-debug make
There's a bug with timers on Windows that makes it run much slower than it should. YOU should fix it for me.
For Linux
Requirements:
- Everything QEMU requires
- OpenGL with GLX and GLEW
For Debian most build dependencies can be installed by running:
apt-get build-dep qemu apt-get install libglew-dev libtxc-dxtn-s2tc0
Building:
./configure --python=python2 --enable-opengl --disable-vnc --disable-user --enable-kvm --disable-xen --audio-drv-list=alsa --target-list=xbox-softmmu --extra-cflags="-march=native" --disable-werror --enable-debug make
Run XQEMU
XQEMU is a Low-Level Emulator, so you need to find a copy of the stuff the Xbox runs when it turns on:
Xbox MCP-X boot rom
MD5 (mcpx_1.0.bin) = d49c52a4102f6df7bcf8d0617ac475ed
If your mcpx dump has an MD5 of 196a5f59a13382c185636e691d6c323d you dumped it badly and it's a couple bytes off. It should start with 0x33 0xC0 and end with 0x02 0xEE.
Xbox 1.0 compatible bios (cromwell, 3944, 4034, 4036, ...)
You can use a retail bios or a modified 'debug' bios. Just like a real xbox, running a retail bios will not boot unofficial software.
Debug BIOS
People have reported success with the 'COMPLEX 4627' modified debug bios. It's convenient to note that this bios does not necessarily require a populated hard disk image to load an application from DVD (though an empty drive still needs to be attached), so you can skip the next step in some cases.
v1.0.2 1M dump: MD5 (Complex_4627Debug.bin) = 19b5c6d3d42a707bba620634fe6d4baf
or sometimes
1MB dump: MD5 (complex_4627debug.bin) = e8dd61cc6abdbd06aac185e371312dc1
Retail BIOS
1M dump: MD5 (3944.bin) = e8b39b98cf775496c1c76e4f7756e6ed
or sometimes
256k dump: MD5 (3944.bin) = 542c62cb976a4993c8c5027dff9638ce
Xbox dashboard files on a hard disk image
Create an Xbox hard-disk image, using xboxhdm or otherwise:
- Create an xboxhdm cd-rom with the dashboard files
- Create a blank hard-disk file:
qemu-img create -f qcow2 xbox_harddisk.qcow2 8G - Run xboxhdm with qemu or something:
i386-softmmu/qemu-system-i386 -hda xbox_harddisk.qcow2 -cdrom linux.iso
Launch XQEMU with something like...
xbox-softmmu/qemu-system-xbox -cpu pentium3 -machine xbox,bootrom=mcpx_rom.bin -m 64 -drive file=xbox_harddisk.qcow2,index=0,media=disk,locked=on -drive index=1,media=cdrom -bios xbox_bios.bin -usb -device usb-hub,bus=usb-bus.0,port=3 -device usb-xbox-gamepad,bus=usb-bus.0,port=3.2
On Linux, you can use KVM by passing accel=kvm,kernel_irqchip=off to -machine. This is not yet recommended.
To skip the Xbox logo animation you can pass short_animation to the -machine option (Example: -machine xbox,short_animation,bootrom=mcpx_rom.bin).
To run a game from a Xbox DVD image you must specify a file for the DVD device
title: "qemu uefi" date: 2015-06-08 categories: - "cloud-infra"
Here's a collection of kinds of bioses.
https://www.kraxel.org/repos/jenkins/
Download edk2.git-ovmf-x64*.rpm, and extract it:
(root)# rpm2cpi edk2.git-ovmf-x64-0-20150606.b1038.g5d832d6.noarch.rpm|cpio -mvid ./usr/share/doc/edk2.git-ovmf-x64-0 ./usr/share/doc/edk2.git-ovmf-x64-0/License.txt ./usr/share/doc/edk2.git-ovmf-x64-0/README ./usr/share/edk2.git ./usr/share/edk2.git/ovmf-x64 ./usr/share/edk2.git/ovmf-x64/OVMF-pure-efi.fd ./usr/share/edk2.git/ovmf-x64/OVMF-with-csm.fd ./usr/share/edk2.git/ovmf-x64/OVMF_CODE-pure-efi.fd ./usr/share/edk2.git/ovmf-x64/OVMF_CODE-with-csm.fd ./usr/share/edk2.git/ovmf-x64/OVMF_VARS-pure-efi.fd ./usr/share/edk2.git/ovmf-x64/OVMF_VARS-with-csm.fd ./usr/share/edk2.git/ovmf-x64/UefiShell.iso 22227 blocks
Run qemu with these fd bios files like this:
qemu --boot loader_type=pflash,loader_ro=yes,loader=OVMF_CODE-pure-efi.fd,nvram_template=OVMF_VARS-pure-efi.fd XXX
or
qemu -bios OVMF-pure-efi.fd XXX
title: "Add usbdevice to libvirt by modifying cgroup" date: 2013-10-31 categories: - "cloud-infra" tags: - "Libvirt" - "Device Redirection"
CGROUP means Control group. In my case, usb-redir works fine while usb-host not. https://www.kernel.org/doc/Documentation/cgroups/devices.txt
Just do it
sed -i 's/devices /#devices /'
reboot
Add fine control list
Review the rules to libvirt, and leave all the character device to it
cgget libvirt
To remove "c" device
echo c > /sys/fs/cgroup/libvirt/devices.deny
To add all the "c" devices
echo "c *:* rwm" > /sys/fs/cgroup/libvirt/devices.allow
devices.deny/allow is something like end-point.
About hierarchy
A child will not have more permission than its parent.
title: "Intel iGVT-g vGPU in KVM - KVMGT howto" date: 2015-01-22 categories: - "cloud-infra"
As previous article says, this is a vGPU solution in KVM by Intel.(All these genius)
https://01.org/zh/kvm/blogs/albcamus/2014/kvmgt-first-release
CPU: i5-4460 OS: Ubuntu 14.04 Desktop
title: "KVMGT in Linux 4.10 - 流媒体服务器、游戏、车载大屏等场景的应用技术预研" date: 2017-04-12 categories: - "cloud-infra"
UPDATE: 2018-04,现在KVMGT相关upstream基本已全部进入master,可以参考GVTg_Setup_Guide或者GVTd_Setup_Guide,如果需要本地显示参考DMA_BUF User Guide。
UPDATE: 2017-08-08,Intel有了X系列处理器i9,这个核数肯定适合跑桌面了。
UPDATE:鉴于KVMGT的产品化集成难度较之前有所降低,所以最近有很多人都打算搞搞集成,那我先来集成一把吧。
果不其然,直接并进内核了(书要改吗。。当然不,本文简单增补即可。。)
4.10非常具有的代表性即是添加了Mediated Device(vfio-mdev),Intel有自家方案,nVidia也要支持,但Linux社区说你俩给个统一框架吧,要不太乱,于是就有了它。如此以来,N家的显卡便可以很快开发出对应的驱动(不要相信他们家销售说的话,14年偶尔问了一下说要支持的,都过去80年啦),可以看看N家去年(2016.9)放的PPT,02x03-Neo_Jia_and_Kirti_Wankhede-vGPU_on_KVM-A_VFIO_based_Framework。
相较于之前的文章intel-igvt-g-vgpu-in-kvm-kvmgt-howto,这次的并入减少了我们的不少工作。
4.10 ChangeLog:https://kernelnewbies.org/Linux_4.10
参考https://github.com/01org/gvt-linux/wiki/GVTg_Setup_Guide
另外,RHEL 7.4也已加入了KVMGT/XenGT,可以试用一下。
来看看支持哪些CPU吧:
As a long-standing member of the open source community, Intel works upstream to ensure that full, open source implementations of Intel® GVT exist for open source virtualization hypervisors, KVM* and Xen*, known respectively as KVMGT and XenGT. KVMGT and XenGT deliver excellent virtual GPU performance in VMs across 5th and 6th generation Intel® Core™ processors (Intel® Core™ i3, Intel® Core™ i5, and Intel® Core™ i7 processors) with Intel Processor Graphics as well as Intel® Xeon® processors E3 v4 family with Intel Processor Graphics.
首先安装并编译4.10的内核:
$ git clone https://github.com/01org/gvt-linux $ sudo yum install openssl-devel ncurses-devel $ cd gvt-linux $ git checkout gvt-stable-4.10 $ echo ""|make oldconfig $ make menuconfig
搜索关键字kvmgt, mdev,vfio-iommu-type1,并将其标记为“M”。 模块标记完成后,进行编译安装。
$ make -j4 $ sudo make modules_install $ sudo make install $ sudo grub2-mkconfig -o /boot/grub2/grub.cfg
从elrepo安装的缺少模块和编译环境。
rpm --import https://www.elrepo.org/RPM-GPG-KEY-elrepo.org
rpm -Uvh http://www.elrepo.org/elrepo-release-7.0-2.el7.elrepo.noarch.rpm
yum --enablerepo=elrepo-kernel install kernel-ml kernel-ml-devel
然后修改grub文件:
menuentry 'CentOS Linux (4.10.10) 7 (Core)' --class centos --class gnu-linux --class gnu --class os --unrestricted \(menuentry\_id\_option 'gnulinux-3.10.0-514.10.2.el7.x86\_64-advanced-6a3987e2-9cb7-4b38-9a53-1642aefada46' { load\_video set gfxpayload=keep insmod gzio insmod part\_msdos insmod ext2 set root='hd0,msdos1' if \[ x\)feature_platform_search_hint = xy ]; then search --no-floppy --fs-uuid --set=root --hint-bios=hd0,msdos1 --hint-efi=hd0,msdos1 --hint-baremetal=ahci0,msdos1 --hint='hd0,msdos1' 3fc34ea6-30d7-491e-931d-d0941884fb6b else search --no-floppy --fs-uuid --set=root 3fc34ea6-30d7-491e-931d-d0941884fb6b fi linux16 /vmlinuz-4.10.10 root=/dev/mapper/cl-root ro rd.lvm.lv=cl/root rd.lvm.lv=cl/swap rhgb quiet LANG=en_US.UTF-8 i915.enable_gvt=1 kvm.ignore_msrs=1 initrd16 /initramfs-4.10.10.img }
为什么添加ignore_msrs呢?
Since some windows guest 3rd patry application / tools (like GPU-Z / Passmark9.0) will trigger MSR read / write directly, if it access the unhandled msr register, guest will trigger BSOD soon. So we added the "kvm.ignore_msrs=1" into grub for workaround.
然后继续编译QEMU,这次只要下载upstream的即可。
$ git clone git://git.qemu.org/qemu.git $ cd qemu $ git checkout v2.8.1 $ git submodule update --init roms/seabios $ ./configure --prefix=/usr \ --enable-kvm \ --disable-xen \ --enable-debug-info \ --enable-debug \ --enable-sdl \ --enable-vhost-net \ --enable-spice \ --disable-debug-tcg \ --target-list=x86_64-softmmu $ make -j4 $ cd roms/seabios $ make -j8 $ cd - $ sudo make install $ sudo cp roms/seabios/out/bios.bin /usr/bin/bios.bin
title: "Slic for qemu-kvm" date: 2013-12-25 categories: - "cloud-infra"
This article is a howto for activation-ready of Windows. SLIC 2.0 is for 2003 & XP, and 2.1 for Win7 & 2008 Original seabios reads slic table from exactly the host. However, if your motherboard(not OEM) happen to own none, you will most probably make one by your self.
Seabios
You could get the lastest code from here.
git clone git://git.seabios.org/seabios.git seabios
Or, you can download from here.
SLIC-BIN
Here's a collection of various slic table. SLIC 2.1 BINS
Seaslic patch
This is patch for seabios to make it slic table enabled. Download from here.
Seaslic.tar.xz, seabios-1.7.2 compatible Here's the patch content.
--- a/src/acpi.c 2013-01-19 06:44:54.000000000 +0600 +++ b/src/acpi.c 2013-05-07 01:16:30.000000000 +0600 @@ -214,6 +214,11 @@
#include "acpi-dsdt.hex"
+#define CONFIG_OEM_SLIC +#ifdef CONFIG_OEM_SLIC +#include "acpi-slic.hex" +#endif + static void build_header(struct acpi_table_header *h, u32 sig, int len, u8 rev) { @@ -226,6 +231,10 @@ h->oem_revision = cpu_to_le32(1); memcpy(h->asl_compiler_id, CONFIG_APPNAME4, 4); h->asl_compiler_revision = cpu_to_le32(1); + #ifdef CONFIG_OEM_SLIC + if (sig == RSDT_SIGNATURE) // only RSDT is checked by win7 & vista + memcpy(h->oem_id, ((struct acpi_table_header*)SLIC)->oem_id, 14); + #endif h->checksum -= checksum(h, len); }
@@ -827,6 +836,15 @@ ACPI_INIT_TABLE(build_srat()); if (pci->device == PCI_DEVICE_ID_INTEL_ICH9_LPC) ACPI_INIT_TABLE(build_mcfg_q35()); + #ifdef CONFIG_OEM_SLIC + void *buf = malloc_high(sizeof(SLIC)); + if (!buf) + warn_noalloc(); + else { + memcpy(buf, SLIC, sizeof(SLIC)); + ACPI_INIT_TABLE(buf); + } + #endif
1 | |
Compile
You don't have to apply the seaslic patch with patch.sh, you can do that by hand. Before you start, do this:
xxd -i /sys/firmware/acpi/tables/SLIC | grep -v len | sed 's/unsigned ch ar.*/static char SLIC[] = {/' > seabios.submodule/src/acpi-slic.hex
Or,
xxd -i DELL.BIN | grep -v len | sed 's/unsigned ch ar.*/static char SLIC[] = {/' > seabios.submodule/src/acpi-slic.hex
After applying the patch, you can compile the bios.bin, and copy that to /usr/share/qemu-kvm/my-bios.bin or rewrite bios.bin instead. Here's my bios.bin with Dell[DELL-QA09-NVDA]2.1.BIN from SLIC BIN
Qemu-cmd
qemu-kvm XXX -bios /usr/share/qemu-kvm/my-bios.bin -acpitable file=Dell[DELL-QA09-NVDA]2.1.BIN
In the guest, you could see that SLIC by /sys/firmware/acpi/tables/SLIC in Linux or SLIC_Toolkit in Windows.
title: "GPU Passthrough, VGA Passthrough in KVM" date: 2013-05-23 categories: - "cloud-infra" - "linux-admin"
To inspire you, I've got a video from someone else. Better mutt the volume by the way. Arch Linux KVM Crysis HD Gpu Passthrough Or you can download it to see. Download the video in HD
Here's the links I refer to: http://thread.gmane.org/gmane.comp.emulators.kvm.devel/71981 https://bbs.archlinux.org/viewtopic.php?id=162768 https://docs.google.com/document/d/1ef_nfl652L0HLn_wGvnpgjsBJd9LZzaV_-rIcEEoK8Y/edit?pli=1 http://www.linux-kvm.org/page/VGA_device_assignment http://www.linux-kvm.org/page/How_to_assign_devices_with_VT-d_in_KVM
Result: VGAPassthrough: success in host F19, guest Windows7 GPUPassthrough: success in Fedora-Rawhide
HOST: CPU: Core i5 3470 GPU: ATI HD Radeon 7850 OS: Fedora-Rawhide QEMU: qemu-1.5.1 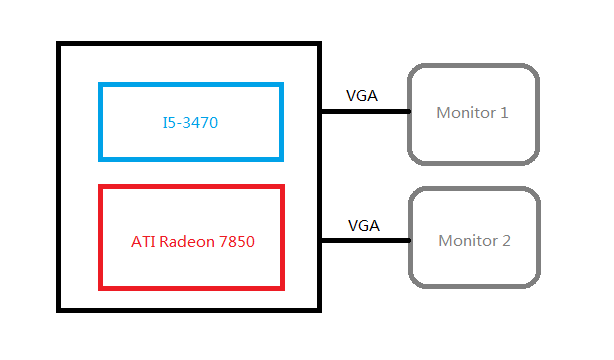 So, here's the steps
0. Enable the mainboard VxT, iommu and alter the video device to Intel HD
1. See what we have got now.
lspci;lspci -n
We have output below
... 01:00.0 VGA compatible controller: Advanced Micro Devices, Inc. [AMD/ATI] Pitcairn PRO [Radeon HD 7850] 01:00.1 Audio device: Advanced Micro Devices, Inc. [AMD/ATI] Cape Verde/Pitcairn HDMI Audio [Radeon HD 7700/7800 Series] ...
... 01:00.0 0300: 1002:6819 01:00.1 0403: 1002:aab0 ...
You can see the pci bus and vendor.
2. Modify the kernel parameter, morprobe.d and libvirt.conf
Add follow parameters to grub.conf
intel_iommu=on pci-stub.ids=1002:6819,1002:aab0,vfio_iommu_type1.allow_unsafe_interrupts=1
NOTE: If you have got an AMD cpu, please replace "interl_iommu=on" with "iommu=pt iommu=1" Add modprobe.conf to /etc/modprobe.d/ with this content:
blacklist radeon options kvm ignore_msrs=1 options kvm allow_unsafe_interrupts=1 options kvm-amd npt=0 options kvm_intel emulate_invalid_guest_state=0 options vfio_iommu_type1 allow_unsafe_interrupts=1
change the following options in /etc/libvirt/qemu.conf:
The user ID for QEMU processes run by the system instance.
user = "root"
The group ID for QEMU processes run by the system instance.
group = "root"
......
If clear_emulator_capabilities is enabled, libvirt will drop all
privileged capabilities of the QEmu/KVM emulator. This is enabled by
default.
Warning: Disabling this option means that a compromised guest can
exploit the privileges and possibly do damage to the host.
clear_emulator_capabilities = 0
Reboot.
3. Using scripts below
Version 1: VFIO-Passthrough
File: vfio-bind
!/bin/bash
modprobe vfio-pci for var in "\(@"; do for dev in \((ls /sys/bus/pci/devices/\)var/iommu\_group/devices); do vendor=\)(cat /sys/bus/pci/devices/\(dev/vendor) device=\)(cat /sys/bus/pci/devices/\(dev/device) if \[ -e /sys/bus/pci/devices/\)dev/driver ]; then echo \(dev > /sys/bus/pci/devices/\)dev/driver/unbind fi echo $vendor $device > /sys/bus/pci/drivers/vfio-pci/new_id done done
Bind the device
./vfio-bind 0000:01:00.0 0000:01:00.1
Start VM
!/bin/bash
sudo modprobe vfio-pci
sudo qemu-system-x86_64 -no-user-config -nodefaults -m 2048M -smp 4 -boot menu=on \ -net nic -net user -enable-kvm -monitor stdio -vga qxl -global qxl-vga.vram_size=67108864 \ -spice port=6000,ipv4,disable-ticketing \ -device intel-hda,id=sound0,bus=pcie.0,addr=0x4 -device hda-duplex,id=sound0-codec0,bus=sound0.0,cad=0 \ -drive file=Windows7.iso,if=none,id=drive-ide0-1-0,readonly=on,format=raw -device ide-cd,bus=ide.1,unit=0,drive=drive-ide0-1-0,id=ide0-1-0 \ -drive file=/home/lofyer/gpu_passthrough/f17.qcow2,if=none,id=drive-virtio-disk0,format=qcow2,cache=none,werror=stop,rerror=stop,aio=threads -device virtio-blk-pci,scsi=off,bus=pcie.0,addr=0x7,drive=drive-virtio-disk0,id=virtio-disk0,bootindex=1 \ -device virtio-balloon-pci,id=balloon0,bus=pcie.0,addr=0x8 \ -M q35 \ -device piix4-ide,bus=pcie.0 \ -device ioh3420,bus=pcie.0,addr=1c.0,multifunction=on,port=1,chassis=1,id=root.1 \ -device vfio-pci,host=01:00.0,bus=root.1,addr=00.0,multifunction=on,x-vga=on \ -device vfio-pci,host=01:00.1,bus=root.1,addr=00.1 \ -fda virtio.vfd
Version 2: PCI-Passthrough
Bind device
!/bin/bash
modprobe pci-stub for id in 6819 aab0; do echo 1002 $id > /sys/bus/pci/drivers/pci-stub/new_id done for pci in 0000:01:00.{0,1}; do echo \(pci > "/sys/bus/pci/devices/\)pci/driver/unbind" echo $pci > /sys/bus/pci/drivers/pci-stub/bind done
Start VM
!/bin/bash
qemu-system-x86_64 \ -hda ../f17.qcow2 \ -cdrom /run/media/lofyer/Cache/OS_ISO/cn_windows_7_ultimate_with_sp1_x64_dvd_u_677408.iso \ -m 2048 -balloon virtio -smp 4 -enable-kvm \ -device pci-assign,host=01:00.0
title: "kvm perfermance test, including periphery virtual device" date: 2013-09-14 categories: - "cloud-infra" - "linux-admin"
I mean test, not profiling.
To virtual server and virtual desktop, we should inspect them from different standards.
For an server: response time, throughput, concurrent, utilization For and desktop: response time, video/audio latency, utilization
Tools we can use to test
CPU:
SPEC(open, but not free) Unixbench Super PI Compile linux kernel pcmark(not open, not free, but cracked can be found..) ffmpeg convert
graphic:
3dmark
fs,hd:
hdparm iozone blogbench dbench
net:
iperf
ram
ramspeed
How to start
Initial host env: i5-3470, 8G, gentoo-linux-3.11+, qemu-1.6.0 Kernel para:
TBD