跳转至

2017

备份工具(迁云必备)

直接说结论吧,使用下来,UrBackup与Duplicati是较为合适的两个选择。

UrBackup采用传统的CS架构,对全平台提供支持,备份选项较为丰富,而且支持公网中继; Duplicati则是较为轻量级的选择,只要安装agent即可,支持备份目标地址较为丰富,除了传统接口外也支持AWS S3接口; Bacula与BareOS(前者变种)属于同一体系,但后者支持更好广泛些; Amanda除了硬盘文件备份,也多了一个MySQL数据库的备份产品; 最后一个KVMBackup则是一个脚本,限制比较多,适合单纯的KVM环境备份。

如果与ZStack对接,这俩都可以,备份存储地址可以选择FTP,这样就可以直接使用ZStack的ZStore镜像存储,格式使用raw,然后就直接启动了。

外汇学习笔记

早先把书的内容过了一遍,现在打算把书中的模型统统实现并做相应介绍。

Agent based modeling Strategy in forex trading market

PREFACE

Since I've tested S1, S2, and S3 from the DATANOTE. However, it was not so good or in other words, identical with expectation. It's time to make a change.

BASIC MODEL AND ARCHITECTURE

As you can see from my last articles, the architecture's infrastructure is about to go and the agent's protocol is well defined. Now what we should do is to combine them together.

In the first phase, the simulation will JUST be a Netlogo program. If the performance is just like S1-3, then it goes to phase 2 ---- treating the agents as the real from the data gained and strategy trained from the real world. And if NOT, less probable, the program must be corrected.

PRACTICAL GUIDE

1. FAKE WORLD, FAKE AGENT
2. REAL WORLD, FAKE AGENT
3. REAL WORLD, REAL AGENT

World3 Model is a choice.(System Dynamics)

https://insightmaker.com/insight/1954/The-World3-Model-A-Detailed-World-Forecaster

title: "Forex data collection and backtesting with python/netlogo" date: 2017-03-13 categories: - "signal-system"


These two sites provides free forex tick/time data. So before getting into backtesting, we must get data.

I provide two scripts for you to download and update these data daily.

OK, it's boring...

http://github.com/lofyer/forex-data

However, there's still some work to update our data every day/week.

Like this:

TBD

For the next, we'll try to apply basic strategy to backtest our data.

Like this:

Forex Data ML Relationship

Data Processing with ML

Data Overview: 1. Forex Index <-> Currency Rate Change 2. News -> Classification -> Weight <-> Currency Rate Change

Caution: Strict Time Based Data pipeline.

外汇常用技术指标算法(附Python量化分析教程)

公式不好写,写到DataNote里吧。

Bill Williams Indicators

Accelerator/Decelerator oscillator(AC)

Acceleration/Deceleration (AC) technical indicator signals the acceleration or deceleration of the current market driving force.

How to Use Acceleration/Deceleration

The indicator is fluctuating around a median 0.00 (zero) level which corresponds to a relative balance of the market driving force with the acceleration. Positive values signal a growing bullish trend, while negative values may be qualified as a bearish trend development. The indicator changes its direction before any actual trend reversals take place in the market therefore it serves as an early warning sign of probable trend direction changes. The indicator color changes alone are very important as the current green line (irrespectively of the value) warns against long positions the same way as the red one would against selling. To enter the market along with its driving force one needs to watch for both value and color. Two consecutive green columns above the zero level would suggest you to enter the market with a long position while at least two red columns below the zero level might be taken for a command to go short. Fake signals prevail in timeframes smaller than 4 hours.

Acceleration/Deceleration Oscillator Formula (Calculation)

AC bar chart is the difference between the value of 5/34 of the driving force bar chart and 5-period simple moving average, taken from that bar chart.

AO = SMA(median price, 5)-SMA(median price, 34) AC = AO-SMA(AO, 5)

--------------------------------------------------------------------------- Alligator

Alligator is an indicator designed to signal a trend absence, formation and direction. Bill Williams saw the alligator's behavior as an allegory of the market's one: the resting phase is turning into the price-hunting as the alligator awakes so that to come back to sleep after the feeding is over. The longer the alligator is sleeping the hungrier it gets and the stronger the market move will be.

How to Use Alligator Indicator

The Alligator indicator consists of 13-, 8- and 5-period smoothed moving averages shifted into the future by 8, 5 and 3 bars respectively which are colored blue, red and green representing the alligator’s jaw, teeth and lips. The Alligator is resting when the three averages are twisted together progressing in a narrow range. The more distant the averages become, the sooner the price move will happen. The averages continuing in an upward direction (green followed by red and blue) suggest an emerging uptrend which we interpret as a signal to buy. The averages following each other in the reversed order down the slope are a strong signal of an unfolding downtrend so selling at this point would be more than appropriate.

Alligator Indicator Formula (Calculation)

MEDIAN PRICE = (HIGH + LOW) / 2 ALLIGATORS JAW = SMMA (MEDEAN PRICE, 13, 8) ALLIGATORS TEETH = SMMA (MEDEAN PRICE, 8, 5) ALLIGATORS LIPS = SMMA (MEDEAN PRICE, 5, 3)

--------------------------------------------------------------------------- Awesome oscillator(AO)

Awesome Oscillator (AO) is a momentum indicator reflecting the precise changes in the market driving force which helps to identify the trend’s strength up to the points of formation and reversal.

How to Use Awesome Oscillator

There are three main signals which may be seen: Saucer - three consecutive columns above the nought line the first two of which must be colored red (the second one is lower than the first one) while the third one is colored green and higher than the previous (second) one. Such a formation would be a clear Buy signal whilst inverted and vertically flipped formation would serve as a Sell signal. Nought line crossing - the histogram crosses the naught line in an upward direction changing its values from negative to that of positive ones. In this situation we have a Buy signal. The Sell signal would be a reversed pattern. Two pikes - the indicator displays a Buy signal when the figure is formed by two consecutive pikes both of which are below the naught line and the later-formed pike is closer to the zero level than the earlier-formed one. The Sell signal would be given by the reverse formation.

Awesome Oscillator Trading Strategy

Awesome Oscillator Strategy includes 3 ways of trading. The first way is to open a sell position when the oscillator is below the zero line forming a peak, and open a buy position when the oscillator is above the zero line forming a gap. Another way is to open a sell position when the oscillator forms two peaks above the zero line, where the second high is lower than the previous one. And, conversely, traders watch to open a buy position when the oscillator forms to lows below the zero line with the last one not as low as the previous one. The third way is to account crossing the zero line. When the oscillator crosses it from up to down, it is time to open a sell position and when it crosses from down to up, it is time to open a buy position.

Awesome Oscillator Formula (Calculation)

Awesome Oscillator is a 34-period simple moving average, plotted through the central points of the bars (H+L)/2, and subtracted from the 5-period simple moving average, graphed across the central points of the bars (H+L)/2. MEDIAN PRICE = (HIGH+LOW)/2 AO = SMA(MEDIAN PRICE, 5)-SMA(MEDIAN PRICE, 34) where SMA — Simple Moving Average.

--------------------------------------------------------------------------- Fractal Indicator Definition

Fractals is an indicator highlighting the chart’s local heights and lows where the price movement had stopped and reversed. These reversal points are called respectively Highs and Lows. How to Use Fractal Indicator

Bill Williams' Fractals are formed around a group of five consecutive bars the first two of which are successively reaching higher (or diving deeper) and the last two descending lower (or growing higher) with the middle one being the highest (or the lowest) result in the group accordingly. Buy fractal is an arrow pointing to the top Sell fractal is an arrow pointing to the bottom -------------------------------------------------------------------------- Gator Oscillator Definition

The Gator Oscillator (GO) is a supplement to the Alligator indicator and is used alongside with it showing the absolute degree of convergence/divergence of the Alligator's three SMAs pointing at the Alligator's periods of slumber and awakeness (i.e. trending and non-trending market phases). How to Use Gator Oscillator

Being an oscillator in the form of two histograms built on either side of the naught line, the Gator Oscillator plots the absolute difference between the Alligator’s Jaw and Teeth (blue and red lines) in the positive area and the absolute difference between the Alligator’s Teeth and Lips (red and green lines) in the negative area. The histogram’s bars are colored green if exceeding the previous bar’s volume or red if falling short. The bars of the extreme values are in tune with the strong trend forces. The Alligator's activity periods are divided into the following four: Gator awakes - the bars on different sides of the naught line are colored differently. Gator eats - green bars on both sides of the naught line. Gator fills out - single red bar during the "eating" phase. Gator sleeps - the bars on both sides are red -------------------------------------------------------------------------- Market Facilitation Index Definition

The Market Facilitation Index is designed for evaluation the willingness of the market to move the price. The indicator's absolute values alone cannot provide any trading signals unlike it's dynamics in relation to the dynamics of the volume. How to Use Market Facilitation Index

The absolute values of the index are represented by the histogram's bars while the comparison of the index and volume dynamics are given in colors which are vital in terms of reading the indicator signs. Green bar - both MFI and volume are up. Increasing trading activity means market movement acceleration. We may join the trend. Blue bar - MFI indicator is up, volume is down. The movement is continuing although the volume has dropped. The trend will soon be reversing. Pink bar - MFI indicator is down, volume is up. The slowing down movement while volume is raising may indicate a possible break through, often a U-turn. Brown bar - both MFI and volume are down. The market is no longer interested in the current direction and is looking for signs of a future development. Market Facilitation Index Market Facilitation Index (BW MFI) Market Facilitation Index Formula (Calculation)

BW MFI = (HIGH-LOW)/VOLUME --------------------------------------------------------------------------

Oscilators

Trend Indicators

Volume Indicators

Accumulation/Distribution(AD)

Accumulation/Distribution is a volume-based technical analysis indicator designed to reflect cumulative inflows and outflows of money for an asset by comparing close prices with highs and lows and weighting the relation by trading volumes.

How to Use Accumulation/Distribution

The Accumulation/Distribution line is used for trend confirmation or possible turning points identification purposes. Trend confirmation: An uptrend in prices is confirmed if A/D line is rising; A downtrend in prices is confirmed if A/D line is falling. Divergence pattern analysis: Rising A/D line along with decreasing prices indicates the downtrend may be weakening to a bullish reversal; Falling A/D along with rising prices indicates the uptrend may be weakening to a bearish reversal.

Accumulation/Distribution Indicator Formula (Calculation)

A/D(t) = [((C – L) – (H – C)) / (H – L)] x Vol + A/D(t-1), where: A/D(t) – current Accumulation/Distribution value; A/D(t-1) – previous Accumulation/Distribution value; H – current high; L – current low; C – close price; Vol – volume.

---------------------------------------------------------------------------

Average Directional Movement Index(ADX)

Average Directional Index (ADX) is a technical indicator developed by Welles Wilder to estimate trend strength and determine probable further price movements by comparing the difference between two consecutive lows with the difference between the highs.

How to Use ADX Indicator

ADX is a complex indicator, which results from calculation of the Plus Directional Indicator (+DI – green line) and the Minus Directional Indicator (-DI – red line), but all of them may be used for trend analysis.

In general the indicator (bold line) move is believed to reflect current trend strength: Rising ADX (usually climbing above 25) suggests strengthening market trend – trend following indicators are becoming more useful; Falling ADX suggests the trend development is doubtful. ADX values below 20 may indicate neutral trend is present – oscillators are becoming more useful. Use of complex ADX trading system may require additional confirmation signals: Normally if +DI (green line) climbs above -DI (red line), a buy signal is generated; Normally if -DI climbs above +DI, a sell signal is generated. Average Directional Index Indicator - ADX Indicator Average Directional Index (ADX) Indicator

ADX Trading Strategy

ADX trading strategy aims to identify the strongest trends and distinguish between trending and non-trending conditions. ADX reading above 25 indicates trend strength, while when ADX is below 25, this shows trend weakness. Breakouts, which are not difficult to spot, also help to identify whether ADX is strong enough for the price to trend or not. Thus, when ADX rises from below 25 to above 25, trend is considered strong enough to continue in the direction of the breakout. It’s a common misperception that when ADX line starts falling this is a sign of trend reversal. Whereas, it only means that the trend strength is weakening. As long as ADX is above 25, it should be considered that a falling ADX line is simply less strong.

ADX Formula (Calculation)

ADX = MA [((+DI) – (-DI)) / ((+DI) + (-DI))] x 100; where: +DI – Plus Directional Indicator; -DI – Minus Directional Indicator.

---------------------------------------------------------------------------

Average True Range(ATR) --------------------------------------------------------------------------- Bears Power --------------------------------------------------------------------------- Bollinger Bands --------------------------------------------------------------------------- Bulls Power --------------------------------------------------------------------------- Commodity Channel Index(CCI) --------------------------------------------------------------------------- DeMarker --------------------------------------------------------------------------- Envelopes --------------------------------------------------------------------------- Force --------------------------------------------------------------------------- Fractals --------------------------------------------------------------------------- Gator oscillator --------------------------------------------------------------------------- Ichimoku Kinko Hyo --------------------------------------------------------------------------- Market Facilitation Index(BWMFI) --------------------------------------------------------------------------- Momentum --------------------------------------------------------------------------- Money Flow Index --------------------------------------------------------------------------- 移动平均线(Moving Average,MA)

MA=N日收市价之和/N 一般N可取短期5或10天,也可是30、65、200、280等中长期。

Moving Average is a technical analysis tool that shows average price over a given period of time, which is used to smoothen price fluctuations and therefore to determine trend direction and strength. Depending of the method of averaging, distinguish between simple moving average (SMA), smoothed moving average (SMMA) and exponential moving average (EMA).

Moving Average Trading Strategy

Moving average strategy is essentially a trend following means. Its objective is to signal the beginning of a new trend or a trend reversal. Herein, its main purpose is to track the progress of the trend and not to predict market action in the same sense that technical analysis attempts to do. By its nature, Moving Average is a follower; it follows the market telling that a new trend has begun or reversed only after the fact.

Moving Average Formula (Calculation)

SMA = Sum (Close (i), N) / N, where: Close (i) – current close price; N – period of averaging. EMA(t) = EMA(t-1) + (K x [Close(t) – EMA(t-1)]), where: t – current period; K = 2 / (N + 1), N – period of averaging.

How to Use Moving Average

Generally moving average curves analysis includes the following principles: Direction of moving average curve reflects prevailing trend over a period; Low-period averaging may give more false signals, while large-period averaging tend to be lagging; To increase (decrease) sensitivity of the curve one should decrease (increase) the period of averaging; Average curves are more useful in trending environment.

Comparing moving average with price movements: A strong buy (sell) signal arise if price crosses from below (from above) its rising (falling) moving average curve; A weak buy (sell) signal arise if price crosses from below (from above) its falling (rising) moving average curve. Comparing moving average curves of different periods: A rising (falling) lower-period curve crossing from below (above) another rising (falling) longer-period curve gives a strong buy (sell) signal; A rising (falling) lower-period curve crossing from below (above) another falling (rising) longer-period curve gives a weak buy (sell) signal. --------------------------------------------------------------------------- Moving Average of Oscillator --------------------------------------------------------------------------- 抛物线转向(Stop And Reverse)

SAR(n)=SAR(n-1)+AF*[EP(n-1)-SAR(n-1)]

其中:SAR(n)为第n日的SAR值,SAR(n-1)为第(n-1)日的值;AF为加速因子(或叫加速系数),EP为极点价(最高价或最低价)。

-*- coding: utf-8 -*-

""" http://virtualizedfrog.wordpress.com/ 2014

Translated from http://www.amibroker.com/library/detail.php?id=268 Requires pandas to load csv files, and matplotlib to chart the data

The main expects table.csv file. Valid files can be downloaded on Yahoo Finance eg: http://real-chart.finance.yahoo.com/table.csv?s=%5EGSPC&ignore=.csv """

import pandas as pd from datetime import datetime import matplotlib.pyplot as plt

def psar(barsdata, iaf = 0.02, maxaf = 0.2): length = len(barsdata) dates = list(barsdata['Date']) high = list(barsdata['High']) low = list(barsdata['Low']) close = list(barsdata['Close']) psar = close[0:len(close)] psarbull = [None] * length psarbear = [None] * length bull = True af = iaf ep = low[0] hp = high[0] lp = low[0]

 1
 2
 3
 4
 5
 6
 7
 8
 9
10
11
12
13
14
15
16
17
18
19
20
21
22
23
24
25
26
27
28
29
30
31
32
33
34
35
36
37
38
39
40
41
42
43
44
45
46
47
for i in range(2,length):
    if bull:
        psar\[i\] = psar\[i - 1\] + af \* (hp - psar\[i - 1\])
    else:
        psar\[i\] = psar\[i - 1\] + af \* (lp - psar\[i - 1\])

    reverse = False

    if bull:
        if low\[i\] < psar\[i\]:
            bull = False
            reverse = True
            psar\[i\] = hp
            lp = low\[i\]
            af = iaf
    else:
        if high\[i\] > psar\[i\]:
            bull = True
            reverse = True
            psar\[i\] = lp
            hp = high\[i\]
            af = iaf

    if not reverse:
        if bull:
            if high\[i\] > hp:
                hp = high\[i\]
                af = min(af + iaf, maxaf)
            if low\[i - 1\] < psar\[i\]:
                psar\[i\] = low\[i - 1\]
            if low\[i - 2\] < psar\[i\]:
                psar\[i\] = low\[i - 2\]
        else:
            if low\[i\] < lp:
                lp = low\[i\]
                af = min(af + iaf, maxaf)
            if high\[i - 1\] > psar\[i\]:
                psar\[i\] = high\[i - 1\]
            if high\[i - 2\] > psar\[i\]:
                psar\[i\] = high\[i - 2\]

    if bull:
        psarbull\[i\] = psar\[i\]
    else:
        psarbear\[i\] = psar\[i\]

return {dates:dates, high:high, low:low, close:close, psar:psar, psarbear:psarbear, psarbull:psarbull}

if __name__ == "__main__": import sys import os

 1
 2
 3
 4
 5
 6
 7
 8
 9
10
11
12
13
14
15
16
17
18
19
20
21
22
23
24
25
if len(sys.argv) < 2:
    sys.exit("Usage: %s datafile.csv" % sys.argv\[0\])
if not os.path.exists(sys.argv\[1\]):
    sys.exit("Error: can't open file '%s': No such file" % sys.argv\[1\])

barsdata = pd.read\_csv(sys.argv\[1\])
#Reindex the data: ascending dates are expected in the function
barsdata = barsdata.reindex(index=barsdata.index\[::-1\])
#Convert strings to actual timestamps
barsdata\['Date'\] = \[datetime.strptime(x, '%Y-%m-%d') for x in barsdata\['Date'\]\]

startidx = 0
endidx = len(barsdata)

result = psar(barsdata)
dates = result\['dates'\]\[startidx:endidx\]
close = result\['close'\]\[startidx:endidx\]
psarbear = result\['psarbear'\]\[startidx:endidx\]
psarbull = result\['psarbull'\]\[startidx:endidx\]

plt.plot(dates, close)
plt.plot(dates, psarbull)
plt.plot(dates, psarbear)
plt.grid()
plt.show()

动向指标(DMI) --------------------------------------------------------------------------- Moving Averages Convergence/Divergence(MACD) --------------------------------------------------------------------------- On Balance Volume(OBV) --------------------------------------------------------------------------- 相对强弱指标(Relative Strength Index,RSI) --------------------------------------------------------------------------- Relative Vigor Index(RVI) --------------------------------------------------------------------------- 漫步随机指标(Random Walk Index,RWI) --------------------------------------------------------------------------- Standard Deviation(StdDev) --------------------------------------------------------------------------- Stochastic Oscillator --------------------------------------------------------------------------- Larry Williams' Percent Range(WPR) --------------------------------------------------------------------------- Python量化分析中文

Get ready for forex

这个月书的样章要完结,还有一篇稿要写。

偶然看到高频交易,加上之前对股市的自动交易感兴趣,然后偶然看到外汇交易,metatrader,看到他们的交易策略,我就燃了。(亏)新手轻虐。

Scott E.Page是个好老师。

节奏要加快,再快,再快点。

基于外汇市场技术指标的ABM建模

本模型的最终模拟期望是随机,我想试试。

货币对作为agent,这样仅需要个位数以内;

货币对本身不拥有市场价值,初始值为此货币对相对于eurusd的比值;

agent拥有自己的技术指标,这个指标尽量在一定范围内震荡;

agent行动时,随之变化的指标会影响其他agent的行动;

patch横向分层,高中低区,agent的行动只在patch间行动;

云计算笔记


"Use dhcp or dnsmasq as DHCP server in libvirt-based environment" "2015-08-26"

Default dhcp and dnsmasq are conflict in a OS. Just change to another if one failed.

1
# yum install dhcp

/etc/sysconfig/dhcpd is no longer needed in RHEL-7. However, it is still working in other distributions. Just assign an IP to the interface which in the subnet you want dhcp serve.

 1
 2
 3
 4
 5
 6
 7
 8
 9
10
11
12
13
14
15
16
17
18
19
20
21
22
23
24
25
26
27
28
29
[root@localhost ~]# vi /etc/sysconfig/dhcpd
DHCPDARGS="eth0 eth1";

[root@localhost ~]# yum -y install dhcp
[root@localhost ~]# vi /etc/dhcp/dhcpd.conf
# create new
# specify domain name
option domain-name "example.com";
# specify name server's hostname or IP address
option domain-name-servers dhcp.example.com;
# default lease time
default-lease-time 600;
# max lease time
max-lease-time 7200;
# this DHCP server to be declared valid
authoritative;
# specify network address and subnet mask
subnet 10.0.0.0 netmask 255.255.255.0 {
    # specify the range of lease IP address
    range dynamic-bootp 10.0.0.200 10.0.0.254;
    # specify broadcast address
    option broadcast-address 10.0.0.255;
    # specify default gateway
    option routers 10.0.0.1;
    optiondomain-name-servers 192.168.188.11, 192.168.188.12
}
[root@localhost ~]# systemctl start dhcpd 
[root@localhost ~]# systemctl enable dhcpd 
ln -s '/usr/lib/systemd/system/dhcpd.service' '/etc/systemd/system/multi-user.target.wants/dhcpd.service'

Dnsmasq is very useful in libvirt/qemu/docker based environment. To bind 192.168.200.0/24 to interface br0(192.168.200.22-bridge2eth1):

1
2
#!/bin/bash
/usr/sbin/dnsmasq --strict-order --pid-file=/var/run/libvirt/network/br0--conf-file= --except-interface lo --bind-interfaces br0 --listen-address 192.168.200.22 --dhcp-range 192.168.200.2,192.168.200.254 --dhcp-leasefile=/var/lib/libvirt/dnsmasq/br0.leases --dhcp-lease-max=253 --dhcp-no-override --dhcp-hostsfile=/var/lib/libvirt/dnsmasq/br0.hostsfile --addn-hosts=/var/lib/libvirt/dnsmasq/br0.addnhosts

"《KVM私有云架构设计与实践》目录" "2015-09-18"

书籍目前已出版,购买链接在下文提供,也可直接联系作者购买,微信lofyer_org。

当当 亚马逊 京东


"OpenStack自动化部署与高可用虚拟控制节点设计" "2017-05-05"

为了大家的部署方便与维护着想,我决定把这俩东西再完善一下然后再把实现源码放出来,虽不能做到产品级但是也能对付很多场景了。

自动部署(类似mirantis但更友好) 0. livecd+独立配置分区 1. 环境配置 2. PXE安装 3. 自动化脚本

Hosted-crotroller(控制节点虚拟化) 1. etcd 2. 健康检查与评分 3. 脑裂防护 4. 使用Paxos写事务机制,如果时间差机制不工作的话。

下面给大家简单解释一Paxos和时间差机制的原理(解释的不够到位,有兴趣的看实现吧):

  1. Paxos,原文可参考https://www.quora.com/Distributed-Systems-What-is-a-simple-explanation-of-the-Paxos-algorithm

此场景实用于一写多。

两人结婚,牧师问他俩,“你们愿意吗?”,“我愿意”,“我愿意”。 那么OK,就结了。

这时候假如有一对姐妹同时喜欢一个男的,牧师问他仨,“你们愿意吗”,“我愿意”,“我愿意”,“我愿意”。 如果这样,那么男的就能娶俩,如果任何一个没回答,那抱歉了一个都娶不成。

在实现时,主节点问下面节点,我要给你们都写个东西,你们都准备好没?“好了”,“好了”,“好了”,“没好”。 75%(>50%)(Quorum)的人都准备好了,那么我就写了,没准备好的那个我记住你了。

  1. Paxos时间差机制(sanlock变种) 这个机制我设计成只针对这个场景的,要求时间同步至数秒级别(这要求已经极低了。。),多写一,也可以扩展。

控制节点要你们去存储上填个表格,你们现在都能写,对吧?“对”,“对”,“对”,“不能”。。 OK,不能的那个我记住你了,其他人都来写吧。

控制节点看看表,再看看这个地方之前记的时间,嗯,过去2分钟了,写一下,我在A身上跑着; 然后A看看表,再看看这个地方之前记的时间,嗯,还没过去2分钟,不写,之前体检合格,控制节点在我身上; 然后B看看表,再看看这个地方之前记的时间,嗯,过去2分钟了,签个到留个时间,体检优秀; 然后C看看表,再看看这个地方之前记的时间,嗯,过去2分钟了,签个到留个时间,体检合格;

然后控制节点每隔1分钟看一下,嗯,你们都很健康。 又过了3分钟,哎?那个C你没写啊,去跟D站一起。

忽然,大家在填表的时候发现,控制节点都过了3分钟没写了,B就启动一下控制节点。 A发现自己与外界失去联系,就把自己身上都控制节点关了,等待救援。

  1. 基于etcd的时间差机制 上述的简化版,填的表格更少,时间差一致 大家一起写etcd的那个地方。“好”,“好”,“好”。 哎?C你没写,再见。 哎?控制节点呢?来A你检查一下启一下控制节点,B现在状态不佳。 由于控制节点之前在你A上,它现在不行了,扣A个10分,现在分没B高啊。 A你清理下现场让B去启动吧。

试图设计一个任何场景都能应对的功能。

title: "Openstack 配置及其API的简单使用" date: 2013-07-18 categories: - "cloud-infra"


安装除Neutron(Quantum)以外所有东西

在开始之前,假设有三个NIC

禁用selinux,并修改网络配置/etc/sysconfig/network-scripts/ifcfg-ethX

Internal

DEVICE=eth0 TYPE=Ethernet BOOTPROTO=static IPADDR=192.168.1.11 NETMASK=255.255.255.0 GATEWAY=192.168.1.1 DNS1=192.168.1.1 DEFROUTE=yes ONBOOT=yes

External

DEVICE=eth1 TYPE=Ethernet BOOTPROTO=static IPADDR=192.168.1.12 NETMASK=255.255.255.0 DEFROUTE=yes ONBOOT=yes

Public Bridge

DEVICE=eth2 TYPE=Ethernet BOOTPROTO=static IPADDR=192.168.1.13 NETMASK=255.255.255.0 DEFROUTE=yes ONBOOT=yes

于Feodra18中安装Openstack,可参考文档,按照这个来的话对Openstack的设计理念将会有所了解 Getting started with OpenStack on Fedora 18 或者运行

/安装完成后管理员界面为http://localhost/dashboard用户名admin,密码secrete/

openstack-demo-install

以上两种方法把除了Neutron(quantum)其他的服务都配置好了,关于quantum的配置见文末

添加虚拟机实例

可参考文档 Getting started with OpenStack on Fedora 18 在终端操作之前需要设置环境变量,将它们两者之一写到一个文件,然后source一下

export OS_USERNAME=admin export OS_PASSWORD=secrete export OS_TENANT_NAME=admin export OS_AUTH_URL=http://127.0.0.1:5000/v2.0/

export ADMIN_TOKEN=\((openssl rand -hex 10) export SERVICE_ENDPOINT=http://127.0.0.1:35357/v2.0/ export SERVICE_TOKEN=\)ADMIN_TOKEN

source FileA

这个libvirt支持kvm以及xen虚拟化,所以支持的镜像也比较多,这里下载一个已经安装好的f17的qcow2镜像

axel -n 5 http://berrange.fedorapeople.org//blog/images/2012-11-15/f17-x86_64-openstack-sda.qcow2

/注册镜像/

glance add name=f17-jeos is_public=true disk_format=qcow2 container_format=bare < f17-x86_64-openstack-sda.qcow2

然后以demo用户进入dashboard,会看到添加进来的image,根据image启动实例,打开vnc界面(非localhost访问要改ip)。

安装操蛋的Neutron(quantum)服务

这东西刚改名,nova自带的有network服务,可这个可以虚拟L2 L3 switch,那就比较有意思了

/注册quantum/

keystone service-create --name quantum --type network --description 'OpenStack Networking Service'

keystone endpoint-create --region myregion --service-id 26a55b340e254ad5bb78c0b14391e153 --publicurl "http://192.168.1.11:9696/" --adminurl "http://192.168.1.11:9696/" --internalurl "http://192.168.1.11:9696/"

/(可选)添加quantum服务用户/ get_id.sh:

$ function get_id () { echo "$@" | awk '/ id / { print $4 }' }

ADMIN_ROLE=$(get_id keystone role-create --name=admin)

QUANTUM_USER=$(get_id keystone user-create --name=quantum --pass="servicepass" [email protected] --tenant-id service)

keystone user-role-add --user_id $QUANTUM_USER --role_id $ADMIN_ROLE --tenant_id service

/服务插件二选一,linuxbrideg和openvswitch,这里使用后者,先安装插件/

yum install openstack-quantum-openvswitch

/启动并添加服务/

quantum-server-setup --plugin openvswitch

quantum-node-setup --plugin openvswitch

service quantum-server start

chkconfig quantum-server on

service openvswitch start

chkconfig openvswitch on

ovs-vsctl add-br br-int

chkconfig quantum-openvswitch-agent on

service quantum-openvswitch-agent start

quantum-dhcp-setup --plugin openvswitch

chkconfig quantum-dhcp-agent on

service quantum-dhcp-agent start

ovs-vsctl add-br br-ex

ovs-vsctl add-port br-ex eth1

quantum-l3-setup --plugin openvswitch

chkconfig quantum-l3-agent on

service quantum-l3-agent start

chkconfig quantum-metadata-agent on

service quantum-metadata-agent start

修改并配置网络 /etc/sysconf/network-scripts/ifcfg-eth1,/etc/sysconf/network-scripts/ifcfg-br-ex

External

DEVICE=eth1 TYPE=Ethernet BOOTPROTO=none NM_CONTROLLED=no BRIDGE=br-ex ONBOOT=yes

Public Bridge

DEVICE=br-ex TYPE=Bridge BOOTPROTO=static IPADDR=192.168.2.11 NETMASK=255.255.255.0 NM_CONTROLLED=no ONBOOT=yes

ip addr del 10.0.0.9/24 dev eth1

ip addr add 10.0.0.9/24 dev br-ex

这里类似VPN的重写HEADER

echo 1 > /proc/sys/net/ipv4/conf/all/forwarding sysctl -w net.ipv4.ip_forward=1 iptables -A FORWARD -i eth0 -o br-ex -s 10.10.10.0/24 -m conntrack --ctstate NEW -j ACCEPT iptables -A FORWARD -m conntrack --ctstate ESTABLISHED,RELATED -j ACCEPT iptables -A POSTROUTING -s 10.10.10.0/24 -t nat -j MASQUERADE

最后重启机器即可

通过curl使用openstack api

参考这篇文章 注意区分token和固定id

获取可用镜像

curl -s http://10.199.0.250:8774/v2/51ad87714b86442d9a74537d6f890060/images -X GET -H "X-Auth-Project-Id: admin" -H "Accept: application/json" -H "X-Auth-Token: 6083193874684f38865b086a8a5f4b7b" | python -mjson.tool

创建虚拟机

curl -i http://10.199.0.250:8774/v2/51ad87714b86442d9a74537d6f890060/servers -X POST -H "X-Auth-Project-Id: admin" -H "Content-Type: application/json" -H "Accept: application/json" -H "X-Auth-Token: 6083193874684f38865b086a8a5f4b7b" -d '{"server": {"name": "instance1", "imageRef": "992f5732-af50-40fc-987f-25951cbce943", "key_name": "damion-flybook", "flavorRef": "3", "max_count": 1, "min_count": 1}}'


title: "A design of user frontend for kinds of Cloud with accounting." date: 2015-05-06 categories: - "cloud-infra" tags: - "Cloud Computing" - "TBD"


I like Linode.com very much, so I'd like to make a frontend with something like that in functions.

Here's the draft.

Untitled Page

更新一下,两年前的架构设计,终于在2017年的客户那用上了,而且上了人工干预的运行前调度器,哇哈哈。

title: "Cloud Init how to" date: 2015-03-10 categories: - "cloud-infra"


OS: CentOS 6

yum install -y cloud-init


title: "How to solve the 'boot storm' problem: BCACHE" date: 2013-05-27 categories: - "cloud-infra" - "linux-admin"


Some solutions Way 1. Add more cpus.(ABANDONED) Way 2. Add a SSD as "boot cache" Way 3. Sort the boot process

POC: Way 2: Sometimes we need cache the boot section of the OS into a SSD, since no SSD on hand, let's try to use a block device made in /dev/shm

Way 3: Considering that the parallelization of the "boot action", we have to predict the action in the near future

Experiment: Using BCACHE now...or flashcache

title: "A light-weighted VM webadmin" date: 2013-06-18 categories: - "cloud-infra" - "linux-admin"


The infrastructure of it: Management: Based on django, communicate with Agent Agent: A daemon, used for communicating with Management and managing the VMs

TO MAKE GREAT USE OF KVM. https://github.com/lofyer/webadmin

title: "MyIDC--Everything's traceable" date: 2013-12-11 categories: - "cloud-infra"


相关手册参考MyIDC_Book

细节索引: gluster hadoop(with ARM as an option) drbd/heartbeat foreman/puppet nagios ovirt openstack owncloud asterisk

配置细节参考: MyIDC Source

Infrastructure:

Board: x86小板 SBSA小板 Cabinet: 亚克力自制 网络: 电信拨号接入外网 SDN 资源分配: 高可用监视与控制服务(os1-2) 高可用存储(os3-n) 并行计算(os3-n) 高可用虚拟机服务(os1/2+os3-n) 独立外设接入设备 安全: 证书认证(在量子计算机面向大众之前这个还是很靠谱的) 应用商店: 社会工程学测试 leapmotion控制插件 语音控制插件 手机控制插件


title: "openvswitch howto" date: 2013-07-25 categories: - "linux-admin"


Here, I use kernel-3.4.58.

emerge =net-misc/openvswitch-1.11.0


title: "硬盘、RAID组与Ceph分布式存储IOPS计算公式" date: 2017-06-04 categories: - "linux-admin" tags: - "Storage" - "Performance"


防怼说明:本文用于速算,想把难以量化的环境变量以及各种组合拿来说事儿的请自行Google,或者问厂商和IDC要报告去。

机械硬盘

1
2
3
7200硬盘IOPS = 1000/(3 + 1000*(7200/60)/2) = 140
10k硬盘IOPS = 1000/(3 + 60000/10000/2) = 167
15k硬盘IOPS = 1000/(3 + 60000/15000/2) = 200

其中3为寻道延迟,7200/10k/15k为转速(rpm),1000*(7200/60)/2为旋转延迟(旋转延迟一般用转一圈所需时间的1/2表示),结果为理论峰值,实际还会有系统延迟导致测得IOPS一般低于此值。

RAID组 由于RAID组需要校验以提供恢复功能,所以会存在一定写惩罚,这个系数如下: RAID0: 1 RAID1: 2 RAID5: 4 RAID6: 6 RAID1-0: 2

所以RAID组IOPS = 硬盘写IOPS硬盘数量写操作百分比/写惩罚系数 + 硬盘读IOPS硬盘数量读操作百分比。

以4块IOPS为180的SAS硬盘组RAID 6然后百分百随机写操作为例:

IOPS = 180*4/6 = 120

Ceph的IOPS经验公式 由于Ceph存储结构不同于物理硬件,所以影响其IOPS的因素主要有网络、副本数量、日志、OSD(硬盘)数量、OSD服务器数量、OSD IOPS等,这里给出一个来自Mirantis的经验公式:

IOPS = 硬盘IOPS * 硬盘数量 * 0.88 / 副本数量, 其中0.88为4-8k随机读操作占比(88%)。

关于Ceph的IOPS计算仅供参考,计算结果可能会跟物理环境实测有较大偏差。

ZStack笔记

ZStack与Neutron集成的探索(2017-07)

这篇文章较之前的ZStack+Neutron更为简单,由于ZStack的vxlan实现没有使用ovs,所以。。我不管了,直接ovs吧。另外,你如果使用了vyos,我没研究,可以等到下一期处理。

以下方法仅仅从实现角度出发,理应适用于其他平台,如果是正经的集成,请自己编写模块。

环境:单台主机有两个网卡,相同网段(纯粹方便使用而搞,不要学习),ZStack已经安装,其中eno16780032为管理网络,eno33561344为ZStack二层网络接口,三层网络novlan。

集成OVS/ODL

  1. 于计算节点中安装openvswitch。

wget https://repos.fedorapeople.org/repos/openstack/openstack-ocata/rdo-release-ocata-3.noarch.rpm rpm -i rdo-release-ocata-3.noarch.rpm yum --enablerepo=* install -y openvswitch

yum --enablerepo=* install -y openvswitch-ovn*

systemctl enable openvswitch systemctl start openvswitch

  1. 接下来我给你解释一下,要怎么做了。 首先,由于ZStack的flat网络使用了network namespace,通过一对pair将其与linuxbridge相连,ns内的叫inner0,外部的叫outer0;其中ns中会有dnsmasq启动的dhcp服务,我们将ns看作一个带dhcp的功能交换机好了,仅仅提供dhcp能力。

然后,我们要创建一个ovs,为了将虚拟机的网口vnic1.0能够通过ovs进行控制,同时与dhcp交换机接通,我们需要一根线将ovs与linuxbridge接起来,如此一来,看下图(幸苦画的ASCII图没了!)。

创建ovs

ovs-vsctl add-br ovs-br0 ip link set dev ovs-br0 up

创建接口对

ip link add name veth0 type veth peer name veth0p

开始扎物理网线

brctl delif br_eno16780032 eno16780032 ovs-vsctl add-port ovs-br0 br_eno16780032

扎接口对

brctl addif br_eno16780032 veth0 ovs-vsctl add-port ovs-br0 veth0p ip link set dev veth0 up ip link set dev veth0p up

最后由于我们的虚拟机接口vnic1.0每次都会创建到linuxbridge上,所以我们要把它拔下来插ovs上从而可以进行流表控制(可以保存为脚本)。

brctl delif br_eno16780032 vnic1.0 ovs-vsctl add-port ovs-br0 vnic1.0

Q: 为啥要把物理网口eno33561344放到ovs里? A: 为了保持纯粹 :)

Q: 为啥不把outer0直接放到ovs里? A: ZStack逻辑每次创建虚拟机都会试图把outer0加到linuxbridge里,如果已经加到其他网桥虚拟机创建会失败。

最后,把物理机的OVS实例交给ODL处理吧,不画图了。

ovs-vsctl set-manager tcp:opendaylight_ip:6640

也可以单独设置网桥的控制器,如果不想全被控制的话

ovs-vsctl set-controller ovs-br0 tcp:controller_ip:6633

安装ODL的插件

cd ODL_DIR ./bin/bash ./bin/client

安装netvirt与dlux界面,安装netvirt与yang

opendaylight-user@root> feature:install odl-netvirt-openstack odl-dlux-all odl-dlux-yangman odl-mdsal-apidocs odl-netvirt-ui

物理机关机了或者新建主机了咋办? 自己写网络配置文件、手撸脚本,方便的话可以进ZStack公司报名学习。

集成DPDK

为什么要做这件事儿呢?因为Intel说将DPDK与OVS结合会极大提升传输效率,https://download.01.org/packet-processing/ONPS2.1/Intel_ONP_Release_2.1_Performance_Test_Report_Rev1.0.pdf

OK,那就开始换模块插网线吧,如果对DPDK不熟悉的同学可以去http://dpdk.org扫一眼tutorial。

首先修改grub文件,在kernel启动参数中加入如下内容,尺寸自己酌情添加。

iommu=pt intel_iommu=on hugepages=16 hugepagesz=2M hugepages=2048 iommu=pt intel_iommu=on isolcpus=0-3

将上述内容加入到/etc/default/grub的CMDLINE后,执行“grub2-mkconfig > /boot/grub2/grub.cfg”并重启。

然后启用CentOS的Extra源并安装DPDK,这步操作较DPDK刚出来的时候已经良心很多了。。

yum install dpdk dpdk-tools driverctl

将网卡与vfio_pci绑定,没错,Intel的万兆卡。

modprobe vfio_pci

driverctl -v list-devices|grep Ether 0000:02:00.0 XXX driverctl set-override 0000:02:00.0 vfio-pci

在OVS中配置使用dpdk,这里我们创建另外一个OVS桥。

ovs-vsctl add-br ovs-br1

ovs-vsctl --no-wait set Open_vSwitch . other_config:dpdk-init=true

ovs-vsctl --no-wait set Open_vSwitch . other_config:dpdk-socket-mem="1024,0"

ovs-vsctl --no-wait set Open_vSwitch . other_config:dpdk-lcore-mask=0xf

ovs-vsctl set Open_vSwitch . other_config:pmd-cpu-mask=0xf

systemctl restart openvswitch

ovs-vsctl list Open_vSwitch [dpdk, dpdkr, dpdkvhostuser, dpdkvhostuserclient, geneve, gre, internal, ipsec_gre, lisp, patch, stt, system, tap, vxlan]

然后,创建ovs-br1并塞俩vhost接口。

ovs-vsctl add-br ovs-br1 -- set bridge ovs-br1 datapath_type=netdev ovs-vsctl add-port ovs-br1 vhost-user1 -- set Interface vhost-user1 type=dpdkvhostuser ovs-vsctl add-port ovs-br1 vhost-user2 -- set Interface vhost-user2 type=dpdkvhostuser

到这里,工作基本完成,然后修改ZStack计算节点的虚拟机定义,目的是添加以下参数。

-chardev socket,id=char1,path=/run/openvswitch/vhost-user1 \ -netdev type=vhost-user,id=mynet1,chardev=char1,vhostforce \ -device virtio-net-pci,mac=00:00:00:00:00:01,netdev=mynet1 \ -object memory-backend-file,id=mem,size=1G,mem-path=/dev/hugepages,share=on -numa node,memdev=mem -mem-prealloc

怎么加呢?先virsh shutdown 1,然后virsh edit 1,并找到合适的地方加如下内容(开启平台设置中的NUMA选项)。

...

...

最后virsh start 1。

然后同样方法启动第2台虚拟机,在虚拟机里尝试 iperf,对比一下数据,整体来说都会获得些许提升以榨干网卡能力。

注意:以上内容仅仅是为了好玩,不要轻易在自己的ZStack生产环境中测试!

参考: https://software.intel.com/en-us/articles/set-up-open-vswitch-with-dpdk-on-ubuntu-server https://www.ovirt.org/blog/2017/09/ovs-dpdk/ https://libvirt.org/formatdomain.html


title: "ZStack Glusterfs 超融合方案" date: 2017-07-14 categories: - "cloud-infra" - "draft"


ZStack 2.1版本中已经支持了NFS作为MNHA节点的存储,那么我们可以按照之前glusterfs组件oVirt超融合的方式直接使用,过程如下。

实验环境 服务器3台,双千兆网口,均已安装ZStack专家模式操作系统。

部署三节点无条带双副本分布式glusterfs存储 节点安装ZStack计算节点后,分别在三台上使用如下命令安装glusterfs。

部署ZStack HA管理节点 将glusterfs的路径分别挂载至/zstack/glusterfs/mnha/,但要注意NFS/glusterfs的IP,因为glusterfs到服务端的连接不同于

title: "ZStack OpenStack API wrapper" date: 2017-09-14 categories: - "cloud-infra"


This is a flag.

title: "在ZStack中集成OpenStack Neutron组件" date: 2017-06-26 categories: - "cloud-infra" - "draft" tags: - "Cloud Computing" - "TBD"


以笔者目前对ZStack源码的掌握,并不能较为产品化地集成Neutron,所以只能用点稍微hack的技巧将其用起来。

实验材料:ZStack单机版,OpenStack Neutron with Dashboard and OVS bridge

实验目的:通过修改ZStack实例的开机xml(或者新建主机时修改网络为openvswitch bridge),调用Neutron API,并将实例网络桥接至OVS网桥。

实验步骤:

  1. 搭建ZStack,略。

  2. 搭建OpenStack Neutron实例,参考脚本https://...

  3. 编写hook脚本

  4. 开机测试

  5. 通过OpenStack Dashboard查看

实验思考:

这就是KVM平台的好处,互操作性杠杠的。另外,Neutron可作为VM Appliance单独提供,加上Cloud-Init就更好了。

实验过程:

1. 集成oVirt与Neutron

2. 集成ZStack与Neutron

3. Neutron与其产品的集成

参考链接:

http://www.ovirt.org/develop/release-management/features/cloud/neutronvirtualappliance/

TBD

在LinuxBridge/OVS中使用VxLAN组网以及创建VTEP

这是一篇入门文章,帮助初学者理清VxLAN的基本原理与使用,ovs只是工具,新版本内核也可使用ip命令直接创建。

本篇内容分为两篇,第一篇是使用简单VxLAN通道网络,第二篇会接入OVS模拟的VTEP设备。

一、使用VxLAN通道

原理是在网络命名空间上(仅测试环境),创建对端接口(peer/patch,虚拟化环境中即是虚拟机veth设备接口与OVS tun接口),以通过VxLAN通道与彼此通信。

host1拥有物理接口eth0(192.168.0.101),host2拥有物理接口eth0(192.168.0.102),两者在同一局域网中。

实验拓扑如下图。

在host1上创建veth与对端接口,对端接口会与ovs网桥相连,其中veth1代表虚拟机接口(地址为10.0.0.1),veth1p代表与ovs网桥相连的接口。

添加网络命名空间

ip netns add ns-host1

添加对端接口

ip link add name veth1 type veth peer name veth1p

将虚拟机接口放入命名空间

ip link set dev veth1 netns ns-host1

设置虚拟机接口IP

ip netns exec ns-host1 ifconfig veth1 10.0.0.1/24 up

添加ovs网桥

ovs-vsctl add-br ovs-vxlan

将虚拟机的对端接口放入命名空间

ovs-vsctl add-port ovs-vxlan veth1p

激活接口

ip link set ovs-vxlan up ip link set veth1p up

同样在host2上创建。

ip netns add ns-host2 ip link add name veth1 type veth peer name veth1p ip link set dev veth1 netns ns-host2 ip netns exec ns-host2 ifconfig veth1 10.0.0.2/24 up

ovs-vsctl add-br ovs-vxlan ovs-vsctl add-port ovs-vxlan veth1p ip link set ovs-vxlan up ip link set veth1p up

然后,分别在host1与host2上创建VxLAN通道。

host1,将VxLAN的对端指向host2的eth0,VNI(VXLAN Network Identifier)为123。

ovs-vsctl add-port ovs-vxlan vxlan0 -- set interface vxlan0 type=vxlan options:remote_ip=192.168.0.102 options:key=123

host2,将VxLAN的对端指向host2的eth0。

ovs-vsctl add-port ovs-vxlan vxlan0 -- set interface vxlan0 type=vxlan options:remote_ip=192.168.0.101 options:key=123

这样即可完成最简单的OVS VxLAN实验准备,在host2上的虚拟机尝试ping host1上的虚拟机。

ip netns exec ns-host2 ping 10.0.0.1 PING 10.0.0.1 (10.0.0.1) 56(84) bytes of data. 64 bytes from 10.0.0.1: icmp_seq=1 ttl=64 time=1.74 ms 64 bytes from 10.0.0.1: icmp_seq=2 ttl=64 time=0.734 ms 64 bytes from 10.0.0.1: icmp_seq=3 ttl=64 time=0.669 ms

这里可以将主机上的物理接口,比如eth1加入到ovs-vxlan中,从而使得与其相连的主机或者网络设备能够接入此VxLAN网络; 当添加第三台主机时,使用gre网络需要在每个gre0中设置remote_ip以两两相连,可以是星形或者环形(打开ovs生成树协议,ovs-vsctl set bridge ovs-gre stp_enable=true),而VxLAN网络

二、使用VxLAN通道连接虚拟机与物理机

三、接入OVS VTEP设备

参考: brctl与bridge命令对比 在oVirt中使用ovs gre网络 搭建基于Open vSwitch的VxLAN隧道实验 Connecting VMs Using Tunnels (Userspace)

虚拟化平台镜像去冗测试(opendedup)

OpenDedup,是一款开源去重文件系统,https://github.com/opendedup/sdfs,可以分布式,支持NFS、iSCSI等,感觉非常厉害,作者是Veritas的银堡(Sam Silverberg)。

Note

RedHat 7就开始带了VDO,但是还没测过。

可以去官网下载镜像,或者是笔者认为更加实用的NAS系统。

简单测试

目的是减少更多本地环境占用,使用opendedup测试。

  1. 首先测试我新闻服务器上的数据,以索引文件为主,经常变动,有大有小。

  2. 然后选择一款kvm软件平台。

安装:

 1
 2
 3
 4
 5
 6
 7
 8
 9
10
wget http://www.opendedup.org/downloads/sdfs-latest.deb
sudo dpkg -i sdfs-latest.deb

sudo su
echo "* hardnofile 65535" >> /etc/security/limits.conf
echo "* soft nofile 65535" >> /etc/security/limits.conf
exit
sudo mkfs.sdfs --volume-name=pool0 --volume-capacity=256GB
sudo mkdir /media/pool0 
sudo mount.sdfs pool0 /media/pool0/

数据拷贝进去后,原9.3GB索引数据降为8.5GB,效果不如想象中好。

可能原因:

sdfs提供了丰富的命令行选项,我没有使用,使用后可能会达到预期,比如更小的block。

"VMWare vCenter Converter SDK"

看到有公司专门做P2V、V2V,看了一下他们做了一些管理与适应各平台的边边角角工作,其技术原理是使用iotap或者VMWare Hypervisor层的 VAIO(感谢黄老师指导),从而达成CDP效果。

但这种技术的现在的缺点有两点:

  1. 没法支持任何的并行IO类应用,比如GPFS,Oracle RAC等;

  2. 本质上没法做consistent group。

更多具体内容可以查看Falcon与Commvault的相关专利,但这篇文章中2V的话还可以玩玩,那么我们试一下Converter SDK吧,也可直接下载Converter

下载最新的VMware vCenter Converter Standalone SDK 6.1

OpenStack、OpenDayLight、硬件SDN交换机集成

本文将讲述如何在OpenStack中使用SDN交换机,同时将OpenDayLight作为控制器,测试网络类型为vxlan。

本文适用目标为OpenStack Neutron组件,但理论上说包括任何可使用Neutron组件服务的云管理平台,比如oVirt。

在搭建Neutron时,笔者使用了现成的OpenStack单节点平台(可以参考https://github.com/lofyer/openstack-pxe-deployment,为防止出现3.1节末的错误,请使用Newton之前版本,我手贱部署了最新的),但为了减少搭建部署的麻烦,我会在后期尝试直接使用Neutron VM Appliance,方便集成(暂不确定是否影响性能)。

update 2017-05-27: 当前版本zstack的云路由功能vyos所实现的nfv软路由,笔者会考虑将Neutron移植到ZStack中,如此以来SDN即可将注意力主要放在Neutron。

update 2017-06-01: 加入盛科交换机,4.10内核的vtep可直接内核实现,参考Linux doc

update 2017-06-07: OpenStack版本从Ocata切换为Newton,实验3.3重新做了。

update 2017-06-12: 使用 Neutron appliance,并添加hooks,构建ZStack SDN解决方案,来源可自行搜索oVirt的相关资料

1. 环境准备

Pica8 P-5101 48+4*8 10Gb SDN交换机2台(吵地脑袋疼),OpenStack Ocata,OpenDayLight Lastest,管理机器。

mininet虚拟机地址:192.168.0.68

操作机地址:192.168.0.55

2. 架构方案与mininet环境模拟实验

拓扑使用miniedit制作,同时首选项中打开“Start CLI”,操作机“ssh -Y mininet@MININET_IP”后,运行“sudo ~/mininet/examples/mininet.py”以开启。

2.1. 基础模拟实验——交换机互联

文字描述可参考http://blog.scottlowe.org/2012/11/27/connecting-ovs-bridges-with-patch-ports/以及其中链接。

miniedit拓扑:

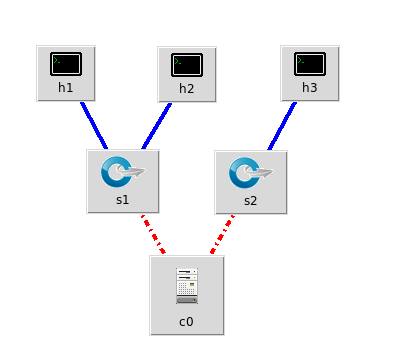
目的:连接两个交换机,使得h1与h3互通。

方法:将两个交换机上的一个端口组组成patch。

ovs-vsctl -- add-port s1 patch1 -- set interface patch1 type=patch options:peer=patch2 -- add-port s2 patch2 -- set interface patch2 type=patch options:peer=patch1

结果:

root@mininet-vm:/home/mininet# ovs-vsctl show 918037ec-b307-45d7-a75a-f1ac4337d135 Bridge "s1" Controller "tcp:127.0.0.1:6633" is_connected: true fail_mode: secure Port "s1" Interface "s1" type: internal Port "s1-eth2" Interface "s1-eth2" Port "s1-eth1" Interface "s1-eth1" Port "patch1" Interface "patch1" type: patch options: {peer="patch2"} Bridge "s2" Controller "tcp:127.0.0.1:6633" is_connected: true fail_mode: secure Port "s2-eth1" Interface "s2-eth1" Port "s2" Interface "s2" type: internal Port "patch2" Interface "patch2" type: patch options: {peer="patch1"} ovs_version: "2.0.2"

2.2. 进阶实验——流表

miniedit拓扑:同上。

目的:阻断h1与h2、h2与h3,使得h1与h3互通。

方法:下发如下流表。

阻断h2与h1/h3的协议封包: ovs-ofctl add-flow s1 in_port=2,arp,ip,nw_dst=10.0.0.1,actions=drop ovs-ofctl add-flow s1 in_port=2,arp,ip,nw_dst=10.0.0.3,actions=drop

结果

mininet> h1 ping h2 -c 2 PING 10.0.0.2 (10.0.0.2) 56(84) bytes of data. ^C --- 10.0.0.2 ping statistics --- 2 packets transmitted, 0 received, 100% packet loss, time 1006ms

mininet> h2 ping h1 -c 2 PING 10.0.0.1 (10.0.0.1) 56(84) bytes of data. ^C --- 10.0.0.1 ping statistics --- 2 packets transmitted, 0 received, 100% packet loss, time 1000ms

mininet> h3 ping h2 -c 2 PING 10.0.0.2 (10.0.0.2) 56(84) bytes of data. ^C --- 10.0.0.2 ping statistics --- 2 packets transmitted, 0 received, 100% packet loss, time 999ms

mininet> h2 ping h3 -c 2 PING 10.0.0.3 (10.0.0.3) 56(84) bytes of data. ^C --- 10.0.0.3 ping statistics --- 2 packets transmitted, 0 received, 100% packet loss, time 1006ms

mininet> h1 ping h3 -c 2 PING 10.0.0.3 (10.0.0.3) 56(84) bytes of data. 64 bytes from 10.0.0.3: icmp_seq=1 ttl=64 time=2.37 ms 64 bytes from 10.0.0.3: icmp_seq=2 ttl=64 time=0.561 ms

--- 10.0.0.3 ping statistics --- 2 packets transmitted, 2 received, 0% packet loss, time 1001ms rtt min/avg/max/mdev = 0.561/1.466/2.372/0.906 ms mininet> h3 ping h1 -c 2 PING 10.0.0.1 (10.0.0.1) 56(84) bytes of data. 64 bytes from 10.0.0.1: icmp_seq=1 ttl=64 time=2.49 ms 64 bytes from 10.0.0.1: icmp_seq=2 ttl=64 time=0.548 ms

--- 10.0.0.1 ping statistics --- 2 packets transmitted, 2 received, 0% packet loss, time 1001ms rtt min/avg/max/mdev = 0.548/1.521/2.494/0.973 ms mininet>

root@mininet-vm:~# ovs-ofctl dump-flows s1 NXST_FLOW reply (xid=0x4): cookie=0x0, duration=485.308s, table=0, n_packets=0, n_bytes=0, idle_age=485, ip,in_port=2,nw_dst=10.0.0.1 actions=drop cookie=0x0, duration=483.569s, table=0, n_packets=3, n_bytes=294, idle_age=183, ip,in_port=2,nw_dst=10.0.0.3 actions=drop cookie=0x0, duration=1715.894s, table=0, n_packets=93, n_bytes=3906, idle_age=202, arp,in_port=1,arp_tpa=10.0.0.2 actions=drop cookie=0x0, duration=715.43s, table=0, n_packets=4, n_bytes=392, idle_age=400, ip,in_port=1,nw_dst=10.0.0.2 actions=drop

3. 综合实验环境配置

首先来看一下实验拓扑:

图。。。。。。

SDN交换机 管理地址:192.168.0.250/24,

OpenStack Controller/Neutron IP: 192.168.0.80

OpenDayLight IP: 192.168.0.90 Web: http://192.168.0.90:8181/index.html

3.1. 设置OpenDayLight

在主机192.168.0.90上下载启动Boron版本OpenDayLight(其他版本未测试),然后解压运行(需要Java环境):

unzip distribution-karaf-0.5.3-Boron-SR3.zip cd distribution-karaf-0.5.3-Boron-SR3

启动ODL服务

./bin/start

本地安装并启动OpenvSwitch以作测试

yum localinstall -y https://repos.fedorapeople.org/repos/openstack/openstack-ocata/rdo-release-ocata-3.noarch.rpm systemctl enable openvswitch systemctl start openvswitch ovs-vsctl set-manager tcp:192.168.0.90:6640

进入客户端

./bin/client

安装netvirt与dlux界面,其中yangman为包管理器UI

opendaylight-user@root> feature:install odl-netvirt-openstack odl-dlux-all odl-dlux-yangman odl-mdsal-apidocs odl-netvirt-ui

然后访问http://192.168.0.90:8181/index.html,用户密码为admin/admin,可以看到我们刚刚添加的本地OVS。

3.3. OpenStack与OpenDayLight集成

首先要清除原有的实例和neutron网络。

实例

openstack server list +--------------------------------------+-----------+---------+------------+-------------+------------------------------------------------------+ | ID | Name | Status | Task State | Power State | Networks | +--------------------------------------+-----------+---------+------------+-------------+------------------------------------------------------+ | d45b1646-b559-4d6d-963c-af3da205aa36 | instance3 | SHUTOFF | - | Shutdown | flat-ens39=192.168.0.108; sharednet1=192.168.118.203 | +--------------------------------------+-----------+---------+------------+-------------+------------------------------------------------------+

openstack server delete instance3

网络

openstack subnet list +--------------------------------------+-------------+--------------------------------------+------------------+ | ID | Name | Network | Subnet | +--------------------------------------+-------------+--------------------------------------+------------------+ | b0acb3ad-22d4-491c-94e7-488aca906398 | flat-subnet | b8f95552-9a45-49ae-b080-2e0041d4b2a0 | 192.168.0.0/24 | | c066992d-294d-4cd6-a3fb-0386619922c7 | subnet1 | 5ac25e6f-bf49-4217-abbc-11bf171c0a3e | 192.168.118.0/24 | +--------------------------------------+-------------+--------------------------------------+------------------+

openstack router list +------------------------------+-------------------+--------+-------+-------------+-------+------------------------------+ | ID | Name | Status | State | Distributed | HA | Project | +------------------------------+-------------------+--------+-------+-------------+-------+------------------------------+ | 78507b26-38f0-4b4a- | router-flat-ens39 | ACTIVE | UP | False | False | de2aea51161642759a687b5768b2 | | a3c6-13d15c4f9665 | | | | | | 3b7e | +------------------------------+-------------------+--------+-------+-------------+-------+------------------------------+ ........

删除所有port、router、subnet后,再用如下命令检查一遍,应该为空

openstack port list

接下来,我们将控制节点(neutron管理节点)与计算节点的OVS交于ODL管理。 首先停止相应服务。

计算节点,如果与控制节点相同则优先运行此部分内容

systemctl stop neutron-openvswitch-agent systemctl disable neutron-openvswitch-agent systemctl stop neutron-l3-agent systemctl disable neutron-l3-agent

Neutron控制节点

systemctl stop neutron-server systemctl stop neutron-l3-agent

然后清空OVS数据库。

systemctl stop openvswitch rm -rf /var/log/openvswitch/* rm -rf /etc/openvswitch/conf.db systemctl start openvswitch

清空后可看到如下

ovs-vsctl show bdf45776-c7c2-4df4-9911-007e89b67bbe ovs_version: "2.6.1"

将其交予ODL管理。

ovs-vsctl set-manager tcp:192.168.0.90:6640

然后在控制节点与计算节点设置用来vxlan通信的本地端,这里只有一个节点192.168.0.80。

ovs-vsctl set Open_vSwitch . other_config:local_ip=192.168.0.80

设置好以后可以在节点上看到ODL自动创建了一个连接到ODL控制器的br-int。

ovs-vsctl show bdf45776-c7c2-4df4-9911-007e89b67bbe Manager "tcp:192.168.0.90:6640" is_connected: true Bridge br-int Controller "tcp:192.168.0.90:6653" is_connected: true fail_mode: secure Port br-int Interface br-int type: internal ovs_version: "2.6.1"

ovs-vsctl get Open_vSwitch . other_config

此时reloadODL界面,可以看到多了个OVS。

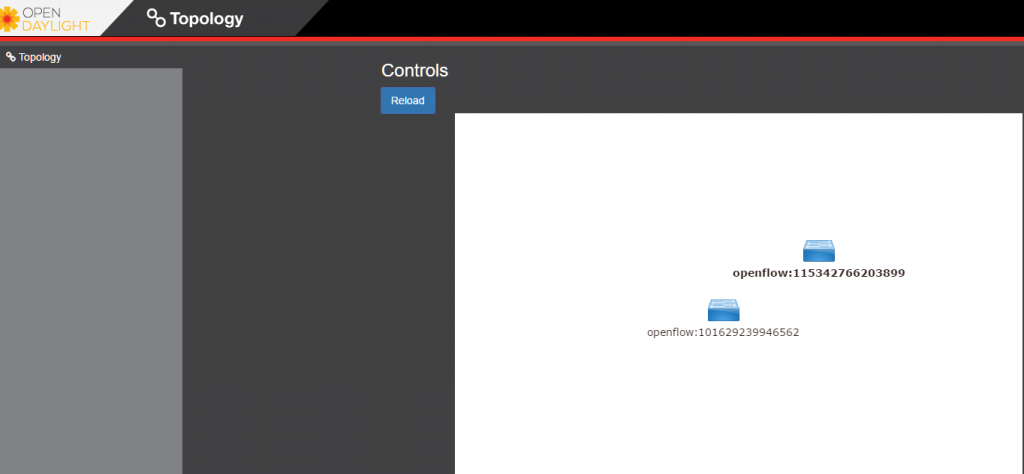
接下来让neutron使用ODL,我们首先需要在neutron控制节点上安装一个对应包。

对于将ODL放置于OS控制节点的同学可以参考如下内容以修改swift端口:

First, ensure that port 8080 (which will be used by OpenDaylight to listen for REST calls) is available. By default, swift-proxy-service listens on the same port, and you may need to move it (to another port or another host), or disable that service. It can be moved to a different port (e.g. 8081) by editing /etc/swift/proxy-server.conf and /etc/cinder/cinder.conf, modifying iptables appropriately, and restarting swift-proxy-service. Alternatively, OpenDaylight can be configured to listen on a different port, by modifying the jetty.port property value in etc/jetty.conf.

yum install -y python-networking-odl

修改/etc/neutron/plugins/ml2/ml2_conf.ini并添加内容。

crudini --set /etc/neutron/plugins/ml2/ml2_conf.ini ml2 mechanism_drivers opendaylight crudini --set /etc/neutron/plugins/ml2/ml2_conf.ini ml2 tenant_network_types vxlan

ml2_conf_odl.ini中的设置无效且报错,可能是我姿势不对,原因是我忘了修改neutron-server的启动命令。

cat <> /etc/neutron/plugins/ml2/ml2_conf.ini [ml2_odl] url = http://192.168.0.90:8080/controller/nb/v2/neutron password = admin username = admin EOF

然后修改服务后端为ODL。

crudini --set /etc/neutron/neutron.conf DEFAULT service_plugins odl-router crudini --set /etc/neutron/dhcp_agent.ini DEFAULT force_metadata True crudini --set /etc/neutron/dhcp_agent.ini ovs ovsdb_interface vsctl

重置neutron数据库并重启服务。

mysql -e "DROP DATABASE IF EXISTS neutron_ml2;" -uroot -p mysql -e "CREATE DATABASE neutron_ml2 CHARACTER SET utf8;" -uroot -p neutron-db-manage --config-file /etc/neutron/neutron.conf --config-file /etc/neutron/plugins/ml2/ml2_conf.ini upgrade head systemctl start neutron-server

验证是否成功。

curl -u admin:admin http://192.168.0.90:8080/controller/nb/v2/neutron/networks { "networks" : [ ] }

最后在openstack中创建网络与实例。

neutron router-create router1 neutron net-create private neutron subnet-create private --name=private_subnet 10.10.5.0/24 neutron router-interface-add router1 private_subnet nova boot --flavor --image --nic net-id= test1 nova boot --flavor --image --nic net-id= test2

添加浮动IP。

ovs-vsctl set Open_vSwitch . other_config:provider_mappings=physnet1:eth1 neutron net-create public-net -- --router:external --is-default --provider:network_type=flat --provider:physical_network=physnet1 neutron subnet-create --allocation-pool start=10.10.10.2,end=10.10.10.254 --gateway 10.10.10.1 --name public-subnet public-net 10.10.0.0/16 -- --enable_dhcp=False neutron router-gateway-set router1 public-net

neutron floatingip-create public-net nova floating-ip-associate test1

在OpenStack O版中创建网络时ODL与OS分别出现如下错误。

ODL: 2017-06-03 11:27:10,768 | ERROR | pool-46-thread-1 | QosInterfaceStateChangeListener | 350 - org.opendaylight.netvirt.neutronvpn-impl - 0.3.3.Boron-SR3 | Qos:Exception caught in Interface Operational State Up event java.lang.IllegalArgumentException: Supplied value "tapd5e5b153-39" does not match required pattern "^[0-9a-fA-F]{8}-[0-9a-fA-F]{4}-[0-9a-fA-F]{4}-[0-9a-fA-F]{4}-[0-9a-fA-F]{12}\(" at com.google.common.base.Preconditions.checkArgument(Preconditions.java:145)[65:com.google.guava:18.0.0] at org.opendaylight.yang.gen.v1.urn.ietf.params.xml.ns.yang.ietf.yang.types.rev130715.Uuid.<init>(Uuid.java:55)[80:org.opendaylight.mdsal.model.ietf-yang-types-20130715:2013.7.15.9_3-Boron-SR3] at org.opendaylight.netvirt.neutronvpn.QosInterfaceStateChangeListener.add(QosInterfaceStateChangeListener.java:61)[350:org.opendaylight.netvirt.neutronvpn-impl:0.3.3.Boron-SR3] at org.opendaylight.netvirt.neutronvpn.QosInterfaceStateChangeListener.add(QosInterfaceStateChangeListener.java:27)[350:org.opendaylight.netvirt.neutronvpn-impl:0.3.3.Boron-SR3] at org.opendaylight.genius.datastoreutils.AsyncDataTreeChangeListenerBase\)DataTreeChangeHandler.run(AsyncDataTreeChangeListenerBase.java:136)[310:org.opendaylight.genius.mdsalutil-api:0.1.3.Boron-SR3] at java.util.concurrent.ThreadPoolExecutor.runWorker(ThreadPoolExecutor.java:1142)[:1.8.0_131] at java.util.concurrent.ThreadPoolExecutor$Worker.run(ThreadPoolExecutor.java:617)[:1.8.0_131] at java.lang.Thread.run(Thread.java:748)[:1.8.0_131]

OS: ERROR neutron.plugins.ml2.managers [req-8174eb6e-6a01-428e-9c3d-d9f115dfa36b - - - - -] Failed to bind port d5e5b153-390a-4129-babd-7work': None, 'id': u'f01e69c5-096e-4d01-a239-5dbe37005e9b', 'network_type': u'vxlan'}]

原因可能是版本传参变了,ODL没及时更新,但我不会Java,会也不想去改ODL,所以我推荐读者用个老版本的Neutron,比如M版、N版啥的。

3.4. OVS创建vtep

IP: 192.168.0.101

3.5. OpenStack与SDN交换机集成

在ODL结束以后,我们再来试一下OpenStack与SDN交换机的集成,与上一节相互独立,即一个全新的OpenStack Newton环境。

由于商业法务问题,我不会将Pica8的OpenStack插件源码全部放出来,另外放出来意义也不大,现有SDN交换机的同学可以直接向厂商索要。

/usr/lib/python2.7/site-packages/neutron/plugins/ml2/drivers/

Pica8交换机工作在OVS模式下,需要将neutron server与OVS Manager相连(管理网口),或许有其他方法。

首先将插件文件拷贝至/usr/lib/python2.7/site-packages/neutron/plugins/ml2/drivers/,目录结构如下。

/usr/lib/python2.7/site-packages/neutron/plugins/ml2/drivers/pica8/ ├── config.pyc ├── db.pyc ├── exceptions.pyc ├── init.pyc ├── mechanism_pica8.pyc ├── ml2_conf_pica8.ini ├── rpc.pyc └── vtep.ovsschema

修改/usr/lib/python2.7/site-packages/neutron-9.3.1-py2.7.egg-info/entry_points.txt添加neutron驱动。

... [neutron.ml2.mechanism_drivers] ... pica8 = neutron.plugins.ml2.drivers.pica8.mechanism_pica8:Pica8Driver ...

创建/etc/neutron/plugins/ml2/ml2_conf_pica8.ini,并添加如下内容。

[ml2_pica8]

(ListOpt) List of other VTEPs' IP address, either a software vtep or

other vendor's hardware vtep.

Example: vtep_list=10.0.0.100,10.0.0.101,10.0.0.102

vtep_list=192.168.0.101

(IntOpt) Sync interval in seconds between Neutron plugin and PicaOS.

This field defines how often the synchronization is performed.

This is an optional field. If not set, a value of 180 seconds

is assumed.

sync_interval = 60

Example: sync_interval = 60

openstack_version = newton

Example: openstack_version = kilo

PicOS Switch configurations.

Each switch to be managed by Openstack Neutron must be configured here.

Format:

[ml2_mech_pica_switch:192.168.0.250] =:,,... =: # =:project_name,,vni, # ...

ovsdb_port=

Example:

[ml2_mech_pica_switch:192.168.0.250]

te-1/1/1=physnet1:dev-1,dev-2,dev-3

te-1/1/2=physnet2:dev-4

te-1/1/3=physnet1:project_name,admin,vni,3535

ovsdb_port=6640

source_ip=192.168.0.80

修改/usr/lib/systemd/system/neutron-server.service文件,在${DAEMON_ARGS}字段添加pica8的引导配置,需要停止neutron-server服务并systemctl daemon-reload。

--config-file=/etc/neutron/plugins/ml2/ml2_conf_pica8.ini

修改/etc/neutron/plugins/ml2/ml2_conf.ini,如下。

type_drivers = vlan,vxlan project_network_types = vxlan mechanism_drivers = pica8,openvswitch

Make sure the is consistent in the following configuration

bridge_mappings=:br-ex network_vlan_ranges = :1:4094

安装python-ovs库。

yum install -y python-pip pip install ovs

运行如下命令创建pica8插件数据库动作。

neutron-db-manage --config-file /etc/neutron/neutron.conf --config-file /etc/neutron/plugins/ml2/ml2_conf.ini revision -m "add pica8 mechanism driver" --expand

在生成的/usr/lib/python2.7/site-packages/neutron/db/migration/alembic_migrations/versions/newton/expand/94ca4fc9191b_add_pica8_mechanism_driver.py文件中添加如下内容。

def upgrade(): op.create_table( 'pica8_interfaces_v2', sa.Column('id', sa.String(length=36), nullable=False, primary_key=True), sa.Column('switch', sa.String(length=36), nullable=False), sa.Column('interface', sa.String(10), nullable=False) ) op.create_table( 'pica8_vlan_allocations_v2', sa.Column('id', sa.String(length=36), nullable=False, primary_key=True), sa.Column('project_id', sa.String(length=255), nullable=False), sa.Column('network_id', sa.String(length=36), nullable=False), sa.Column('segmentation_id', sa.Integer, nullable=False), sa.Column('vlan_id', sa.Integer, nullable=False), sa.Column('vm_reference', sa.Integer, nullable=False, default=0), sa.Column('interface_id', sa.String(length=36), nullable=True), sa.ForeignKeyConstraint(['interface_id'], ['pica8_interfaces_v2.id'], ondelete='CASCADE') ) def downgrade(): op.drop_table('pica8_interfaces') op.drop_table('pica8_vlan_allocations_v2')

执行如下命令升级数据库(如果失败请将最后参数替换为head)。

neutron-db-manage --config-file /etc/neutron/neutron.conf --config-file /etc/neutron/plugins/ml2/ml2_conf.ini upgrade 94ca4fc9191b

重启服务。

systemctl restart openstack-nova-api systemctl restart neutron-server

物理主机接入配置。

Edit the file /etc/neutron/plugins/ml2/ml2_conf_pica8.ini to contain the following content: =:project_name,,vni, is the interface of Pica8 switch connected to the physical host < project_name > is the name of the project owning the physical host is the vxlan id of the project network the physical host connects to

miniedit使用 Pica8手册 ODL手册 OpenDaylight with Openstack Guide OpenStack with NetVirt Installing OpenStack and OpenDaylight using DevStack https://wiki.opendaylight.org//blog/images/5/59/CloudIntegrationwithOpenStackOVSDBNetVirt.pdf

再一个近期

最近把亚马逊购物车的几本书入了,目的是能够彻底掌握或者精通ABM建模中常用/不常用的模型。

把DataNote写完吧,今年。

另外我刚从亚马逊购入的书为:

Think Complexity: Complexity Science and Computational Modeling

Agent-Based and Individual-Based Modeling: A Practical Introduction

Agent-based Models of the Economy: From Theories to Applications

Agent-Based Modelling in Economics

An Introduction to Agent-Based Modeling: Modeling Natural, Social, and Engineered Complex Systems with NetLogo (MIT Press)

Thinking in Systems: A Primer