这是一篇表达
距离上一次写已经很久了,而且似乎有个趋势就是对生活越熟悉就越麻木,也同样伴随体重的增加。
写了一句话,我已经忘了落笔时的念想。
要偶尔转移压力,但不是通过思考,方法或许成熟,但是经不得劳累。
要放弃linode的集群了,因为vultr ipv6内部通信更便宜。
距离上一次写已经很久了,而且似乎有个趋势就是对生活越熟悉就越麻木,也同样伴随体重的增加。
写了一句话,我已经忘了落笔时的念想。
要偶尔转移压力,但不是通过思考,方法或许成熟,但是经不得劳累。
要放弃linode的集群了,因为vultr ipv6内部通信更便宜。
Wikipedia is good. https://en.wikipedia.org/wiki/Supercomputer
Storage Network Server Cooler
Infrastructure deployment Parallel Filesystem Workload Management Development
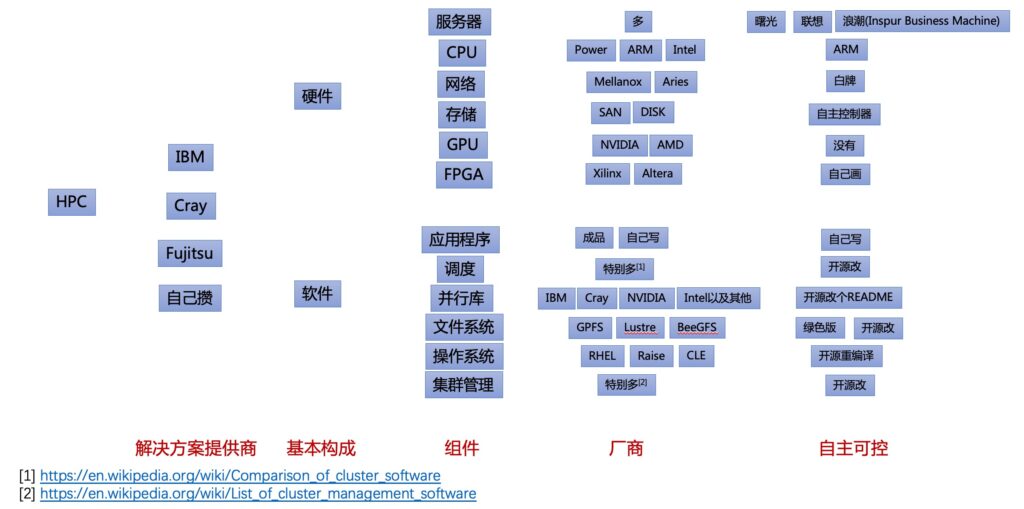
Finally, we've got a PPT.
但是这个PPT很长,我只能截一些出来。


HPC的生意目前来看还是集成,部分组件可以标准化,但是克雷、富士通、IBM、NVIDIA都有自己的盘子,库也都是为自家架构优化,这些都没有问题,理解。
想搞高性能向HPC技术方向学习,也没有问题,但是搞完过后想复制,那就铺人天了。一堆定制设备、一堆专有技术栈,加上已知最好的设备和软件都是国外垄断,生意做着做着就自己就成集成商了。集成商没啥不好,毕竟150W刀一个P的算力,这生意走量。国产化版本堆算力早些年成本差不多两倍,但现在差距在逐步缩小。
HPC的生意不好做,进不去圈子,但是汤可以喝,而且大厂们也想喝这个汤,不信你看GPFS都卖给了谁。后来做的纯软裸金属算是产品入局了,但是再往上走适配一个已经很很很完整的生态,想想都觉得累。
title: "构建基于ARM的超算集群" date: 2019-08-26 categories: - "cloud-infra" - "devices" - "hpc"
Nowadays ARM-based servers are being applied to many scenarios, so we are going to port some workload to the minimal ARM SoC with NVIDIA GPU to evaluate the feasibility of production usage.
Hardware: Legacy ARM SoC boards, e.g. Raspberry Pi, Beagle Board, NVIDIA Jetson(GPU) and standard ARM-based servers.
MPI: OpenMPICH and MPICH2.
Share Storage: ARM-based Glusterfs with pNFS.
Application: ANY
Ref:
Since the MicroBlaze provides the lockstep feature, so finally we can make a POC.
[1] Triple Modular Redundancy: https://www.xilinx.com/support/documentation/ip_documentation/tmr/v1_0/pg268-tmr.pdf
[2] Fault Tolerance Technique for Dynamically Reconfigurable Processor: https://pdfs.semanticscholar.org/2e98/b34ee8736eba7747b223c333de5739a6e601.pdf
[3] Xilinx Reduces Risk and Increases Efficiency for IEC61508 and ISO26262 Certified Safety Applications: https://www.xilinx.com/support/documentation/white_papers/wp461-functional-safety.pdf
[4] Spartan-6 FPGA Dual-Lockstep MicroBlaze Processor with Isolation Design Flow: https://www.xilinx.com/support/documentation/application_notes/xapp584-dual-lockstep-microblaze-IDF.pdf
[5] MicroBlaze Processor Reference Guide: https://www.xilinx.com/support/documentation/sw_manuals/xilinx2019_2/ug984-vivado-microblaze-ref.pdf
Before stepping into the virtio acceleration, we will build and run a Linux(PetaLinux) in FPGA.
Despite the poor performance of simulation in X86, it's very convenient to create POC.
We choose MPSoC zcu106(PS) to test ARM, Zynq zc702(PS) to test ARM and Kintex UltraScale kcu705(PL) to test MicroBlaze softcore.
OS: Ubuntu 16.04 Desktop
Vivado: 2019.1
Xilinx SDK: 2019.1
PetalLinux SDK: PetaLinux 2019.1
BSP: Evaluation Board BSP or generated from Vivado/Xilinx SDK
QEMU is in the PetaLinux SDK directory, it's not necessary to rebuild if you do not wanna modify anything.
git clone git://github.com/Xilinx/qemu.git cd qemu apt install libglib2.0-dev libgcrypt20-dev zlib1g-dev autoconf automake libtool bison flex libpixman-1-dev git submodule update --init dtc ./configure --target-list="aarch64-softmmu,microblazeel-softmmu" --enable-fdt --disable-kvm --disable-xen make -j4
petalinux-create -t project -n zcu106_arm_a53 --template zynqMP -s ../bsp/xilinx-zcu106-v2019.1-final.bsp petalinux-config # Decide what to build
After the project created, pre-built images is in directory pre-built. You can test it via petalinux-boot
petalinux-boot --qemu --prebuilt 3 # Start ZCU106 virtual machine with prebuilt kernel
To accelerate the sstate mirror check process, you need download the sstate cache in Ref [5].
If you are using petalinux as root, you need modify sanity.conf like this:
cat /opt/petalinux/v2019.1/components/yocto/source/aarch64/layers/core/meta/conf/sanity.conf
1 2 3 4 5 6 7 8 9 10 11 12 13 14 15 | |
petalinux-boot --qemu --prebuilt 3
/root/Desktop/qemu_zynq_devices/qemu/aarch64-softmmu/qemu-system-aarch64 \ -M arm-generic-fdt-7series -machine linux=on -smp 2 -m 1G \ -serial /dev/null -serial mon:stdio -display none \ -kernel /blog/images/linux/uImage -dtb /blog/images/linux/system.dtb
Now we'll add sdcard and try to boot Ubuntu Core OS.
qemu-img create qemu_sd.img 2G -M arm-generic-fdt-7series -machine linux=on -smp 2 -m 1G \ -serial /dev/null -serial mon:stdio -display none \ -kernel /blog/images/linux/uImage -dtb /blog/images/linux/system.dtb
Ref:
[1] Build QEMU: https://xilinx-wiki.atlassian.net/wiki/spaces/A/pages/18842060/QEMU
[2] Zynq UltraScale+ QEMU: https://xilinx-wiki.atlassian.net/wiki/spaces/A/pages/18841606/QEMU+-+Zynq+UltraScalePlus
[3] CoSim: https://xilinx-wiki.atlassian.net/wiki/spaces/A/pages/18842109/QEMU+SystemC+and+TLM+CoSimulation
[4] Xilinx Evaluation Board BSP files and Yocto local mirror: https://www.xilinx.com/support/download/index.html/content/xilinx/en/downloadNav/embedded-design-tools.html
https://github.com/Xilinx/PYNQ-Networking