Get the latest packages. up to 2014-02-10
You can use freepbx on http://localhost .
title: "use MAXS to control your device via ejabberd(plus ssh, jingle voice talk as a bonus)" date: 2014-02-26 categories: - "cloud-infra"
Let's see what we have got here: A xmpp server based on ejabberd on my host: lofyer.org. Windows client: Jitsi(Recommended), Pidgin. (Optional)A Android client: Xabber. MAXS on my Nexus 5 Android phone.
Change hosts and admin section to your FQDN. Here's a example:
{hosts, ["lofyer.org"]}. {acl, admin, {user, "mypassword", "lofyer.org"}}.
Then you should restart ejabberd, and maybe a reboot is essential.
You need JingleNodes module on your server.
Add following content to your ejabberd.cfg in the modules section.
{mod_jinglenodes, [ {host, "jinglenodes.@HOST@"}, {public_ip, "192.168.1.148"}, {purge_period, 5000}, {relay_timeout, 60000} ]},
Add to ejabberd.cfg, 'modules' section the basic configuration:
{modules, [ ... {mod_register_web, []}, ... ]}.
In the 'listen' section enable the web page:
{listen, [ ... {5281, ejabberd_http, [ tls, {certfile, "/etc/ejabberd/ejabberd.pem"}, {request_handlers, [ {["register"], mod_register_web} ]} ]}, ... ]}.
openssl req -new -x509 -newkey rsa:1024 -days 3650 -keyout privkey.pem -out server.pem openssl rsa -in privkey.pem -out privkey.pem cat privkey.pem >> server.pem rm privkey.pem
The port numbers you should open are: 5281(http://localhost:5281/register/) 5280(http://localhost:5280/admin) and 5222(for c2s).
Register users:
title: "foreman/puppet/cfengine/bcfg2/chef howto" date: 2014-02-21 categories: - "linux-admin"
title: "Gitlab quick deploy" date: 2014-06-08 categories: - "linux-admin"
Well, Gitweb + ssh://git@host is out of date. Even we use it for almost 2 years.
We are migrating our repositories to Gitlab which we benefit from its "issue" a lot.
Please follow this scripts I wrote.
title: "Grafana+InfluxDB+Collectd/Telegraf on RPi2" date: 2017-03-06 categories: - "linux-admin"
Grafana will provide a visual view for the sites, InfluxDB is the data box, and collectd/telegraf is the agent on the server. Here we go.
Install Grafana:
root@raspberrypi:~# rpm -i grafana.deb root@raspberrypi:~# service grafana-server start
Install InfluxDB: Download from https://portal.influxdata.com/downloads
root@raspberrypi:~# tar xf influxdb-1.2.0_linux_armhf.tar.gz root@raspberrypi:~# cp -a influxdb-1.2.0-1/* /
vim /etc/influxdb/influxdb.ini:
[admin] enabled=true
[http] enabled=true
[collectd] enabled=true bind-address=":25826" database="collectd"
Then run "influxdb &" and check it out in http://localhost:8083, add db named "collectd".
Install Collectd:
root@raspberrypi:~# apt-get install collectd
In /etc/collectd/collectd.conf, find :
Then restart collectd service.
title: "Hercules with Jason UI, emulator of IBM mainframe" date: 2017-04-26 categories: - "linux-admin"
Hercules is an open source software implementation of the mainframe System/370 and ESA/390 architectures, in addition to the new 64-bit z/Architecture. Hercules runs under Linux, Windows (98, NT, 2000, and XP), Solaris, FreeBSD, and Mac OS X (10.3 and later).
Online web interface.(deprecated)
Jason 1.00 is an integrated graphical frontend to the Hercules S/370, ESA/390 and z/Architecture Emulator. What, you haven't heard of Hercules before? It's a masterpiece that emulates IBM mainframes, from old good IBM System/360 and up to the modern z Series... No, it has nothing to do with IBM compatible... No, it can't emulate Xbox 360... Oh, you are asking what a mainframe is? Then probably you don't need Jason.
Download Hercules with Jason.
title: "Heartbeat and drbd test high availability" date: 2014-01-16 categories: - "linux-admin"
Hosts: 192.168.1.101 ha1.lofyer.org, 2 hard drive disks, two ethernet ports 192.168.1.103 ha2.lofyer.org, almost same as ha1
Server host, this is the IP of heartbeat service: 192.168.1.100
The repos you need in centos
[epel] name=Extra Packages for Enterprise Linux 6 - $basearch
mirrorlist=https://mirrors.fedoraproject.org/metalink?repo=epel-6&arch=$basearch failovermethod=priority enabled=1 gpgcheck=0 gpgkey=file:///etc/pki/rpm-gpg/RPM-GPG-KEY-EPEL-6
[elrepo] name=ELRepo.org Community Enterprise Linux Repository - el6 baseurl=http://elrepo.org/linux/elrepo/el6/$basearch/ mirrorlist=http://elrepo.org/mirrors-elrepo.el6 enabled=1 gpgcheck=0 gpgkey=file:///etc/pki/rpm-gpg/RPM-GPG-KEY-elrepo.org protect=0
Add following content to file: /etc/hosts
192.168.1.101 ha1.lofyer.org 192.168.1.103 ha2.lofyer.org
Disable selinux and iptables
Prepare the disk partion
n p 1
w EOF
Configuration for mysql # mkdir db # sed -i 's/datadir=\/var\/lib\/mysql/datadir=\/db/' /etc/my.cnf Configuration for drbd file: /etc/drbd.conf
global { minor-count 64; usage-count yes; } common { syncer { rate 1000M; } } resource ha { protocol C; handlers { pri-on-incon-degr "/usr/lib/drbd/notify-pri-on-incon-degr.sh; /usr/lib/drbd/notify-emergency-reboot.sh; echo b > /proc/sysrq-trigger ; reboot -f"; pri-lost-after-sb "/usr/lib/drbd/notify-pri-lost-after-sb.sh; /usr/lib/drbd/notify-emergency-reboot.sh; echo b > /proc/sysrq-trigger ; reboot -f"; local-io-error "/usr/lib/drbd/notify-local-io-error.sh; /usr/lib/drbd/notify-emergency-shutdown.sh; echo o > /proc/sysrq-trigger ; halt -f"; fence-peer /usr/lib/heartbeat/drbd-peer-outdater -t 5; pri-lost "/usr/lib/drbd/notify-pri-lost.sh; /usr/lib/drbd/notify-emergency-reboot.sh; echo b > /proc/sysrq-trigger ; reboot -f"; split-brain "/usr/lib/drbd/notify-split-brain.sh root"; out-of-sync "/usr/lib/drbd/notify-out-of-sync.sh root"; } startup { wfc-timeout 60; degr-wfc-timeout 120; outdated-wfc-timeout 2; } disk { on-io-error detach; fencing resource-only; } syncer { rate 1000M; } on ha1.lofyer.org { device /dev/drbd0; disk /dev/sdb1; address 192.168.1.101:7788; meta-disk internal; } on ha2.lofyer.org { device /dev/drbd0; disk /dev/sdb1; address 192.168.1.103:7788; meta-disk internal; } }
Chmod for drbd
# chgrp haclient /sbin/drbdsetup # chmod o-x /sbin/drbdsetup # chmod u+s /sbin/drbdsetup # chgrp haclient /sbin/drbdmeta # chmod o-x /sbin/drbdmeta # chmod u+s /sbin/drbdmeta
Resource for drbd
# modprobe drbd # dd if=/dev/zero of=/dev/hdb1 bs=1M count=100 # drbdadm create-md ha # service drbd start # chkconfig drbd on
Watch drbd status
You can see that both hosts are Secondary/Secondary.
Make ha1 Primary
# drbdadm -- --overwrite-data-of-peer primary ha # service drbd status
Then you should see Primary and wait for both hosts are UpToDate. Initialization for Mysql Make a
Now you should see what you have got in /db, then umount /db, stop mysql-server and make ha1 Secondary.
cluster authkey
auth 1 1 sha1 71461fc5e160d7846c2f4b524f952128
YOU SHOULD MODIFY THE IP IN THE FILE. file: /etc/ha.d/ha.cf
debugfile /var/log/ha-debug logfile /var/log/ha-log logfacility local0 autojoin none ucast eth0 192.168.1.101 ucast eth1 192.168.1.102 ping 192.168.1.100 respawn hacluster /usr/lib64/heartbeat/ipfail respawn hacluster /usr/lib64/heartbeat/dopd apiauth dopd gid=haclient uid=hacluster udpport 694 warntime 5 deadtime 15 initdead 60 keepalive 2 node ha1.lofyer.org node ha2.lofyer.org auto_failback off
The service will be serve on IP 192.168.1.100. file: /etc/ha.d/haresources
mysql.lofyer.org 192.168.1.100 drbddisk::ha Filesystem::/dev/drbd0::/db::ext4 mysql
If you just wanna a virtual ip, use this
hosta.vf.com IPaddr::192.168.0.100/24/eth0:0
Add mysql entry to heartbeat file: /etc/ha.d/resource.d/mysql
. /etc/ha.d/shellfuncs case "\(1" in start) res=\`/etc/init.d/mysqld start\` ret=\)? ha_log $res exit \(ret ;; stop) res=\`/etc/init.d/mysqld stop\` ret=\)? ha_log $res exit $ret ;; status) if [[ `ps -ef | grep '[m]ysqld'` > 1 ]]; then echo "running" else echo "stopped" fi ;; *) echo "Usage: mysqld {start|stop|status}" exit 1 ;; esac exit 0
Add excute permission to it.
Add heartbeat service to system
You may need modify order of drbd and heartbeat service. In /etc/init.d/, the number 85 and 15 represent the order number which the script is to be run at start up time and shutdown time. # chkconfig: - 85 15
title: "ltsp相关" date: 2013-03-15 categories: - "linux-admin"
参考: https://help.ubuntu.com/community/UbuntuLTSP
安装: apt-get install ltsp-server-standalone
启动要素: nbd-server dhcpd tftp-hpa openssh-server
绑定客户端地址: [dhcpd.conf] host client201 { hardware ethernet 08:00:27:89:70:01; fixed-address 192.168.0.201; } 另外一种是在启动pxe配置文件中指定 http://wiki.phys.ethz.ch/readme/setting_up_an_ltsp_server_for_diskless_clients
session & windows [/usr/share/xsession/*] Exec=/root/.xsession
[/root/.xsession] #!/bin/bash gnome-session & firefox logout
获取session list [/usr/share/ldm/ldminfod] [/etc/X11/xinit/Xsession] [/etc/X11/Xsession] **failsafe [/etc/X11/xdm/Xsession] [/usr/lib/X11/xdm/Xsession] *[/usr/share/xsession]
**default session exported by Xsession.d echo $DEFAULTS_PATH /usr/share/gconf/
修改default session [/var/lib/tftp.../lts.conf] LDM_SESSION="gnome-session &;firefox;logout"
FatClient [/var/lib/tftp.../lts.conf] [default] LDM_DIRECTX=true
[00:A1:08:EB:43:27] LTSP_FATCLIENT=false
AutoLogin [/var/lib/tftp.../lts.conf] [Default] LDM_AUTOLOGIN = True
[192.168.1.101] LDM_USERNAME = user1 LDM_PASSWORD = password1
[192.168.1.102] LDM_USERNAME = user2 LDM_PASSWORD = password2
title: "IPA服务器搭建" date: 2012-11-27 categories: - "linux-admin"
IPASERVER+DNS(DDWRT)+IPACLIENT
SERVER: ipa-server-install时这里可以不要内部dns 注意host以及domain要在dns里有记录 添加用户 ipa user-add 设置密码 ipa passwd demo DNS: 下面是ddwrt的dnsmasq配置 domain=ovirt.engine local=/ovirt.engine/ expand-hosts address=/ovirtmgmt.ovirt.engine/192.168.1.106 ptr-record=106.1.168.192.in-addr.arpa,"ovirtmgmt.ovirt.engine" address=/ipa.ovirt.engine/192.168.1.108 ptr-record=108.1.168.192.in-addr.arpa,"ipa.ovirt.engine" srv-host=_kerberos-master._tcp,ipa.ovirt.engine,88,0,100 srv-host=_kerberos-master._udp,ipa.ovirt.engine,88,0,100 srv-host=_kerberos._tcp,ipa.ovirt.engine,88,0,100 srv-host=_kerberos._udp,ipa.ovirt.engine,88,0,100 srv-host=_kpasswd._tcp,ipa.ovirt.engine,464,0,100 srv-host=_kpasswd._udp,ipa.ovirt.engine,464,0,100 srv-host=_ldap._tcp,ipa.ovirt.engine,389,0,100 
IPACLIENT: install时注意域名及主机名正确
OVIRT: 初次使用要在SERVER运行 kinit admin
title: "Intergrate owncloud with AD(LDAP)" date: 2014-04-24 categories: - "linux-admin"
Windows 2008R2 server with AD role built. User group: owncloudgrp User in owncloudgrp: aaa, beta Users must have logon name, first name, last name set.
Server:
User Filter:
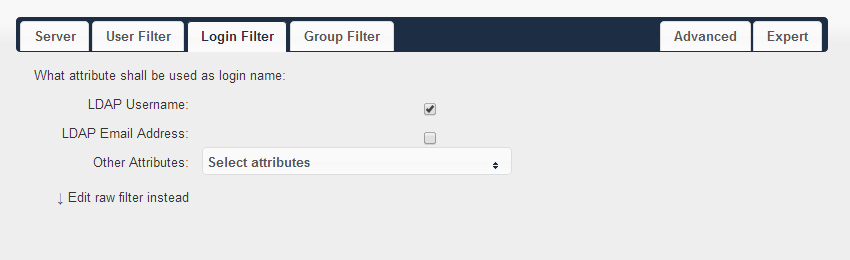
Login Filter:
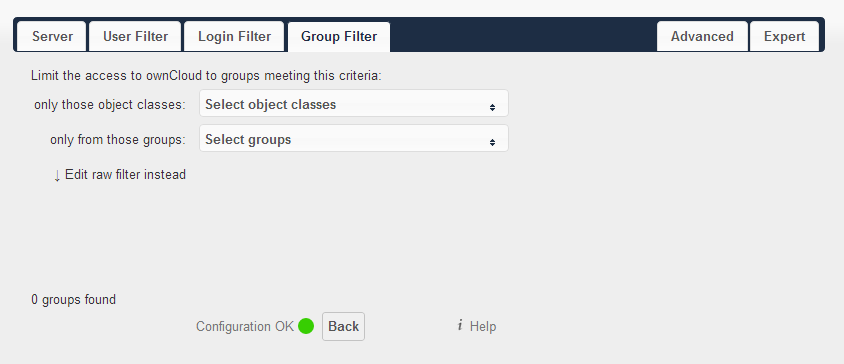
Group Filter: Every time you change these two sections, wait for a few seconds until more than zero users discovered.
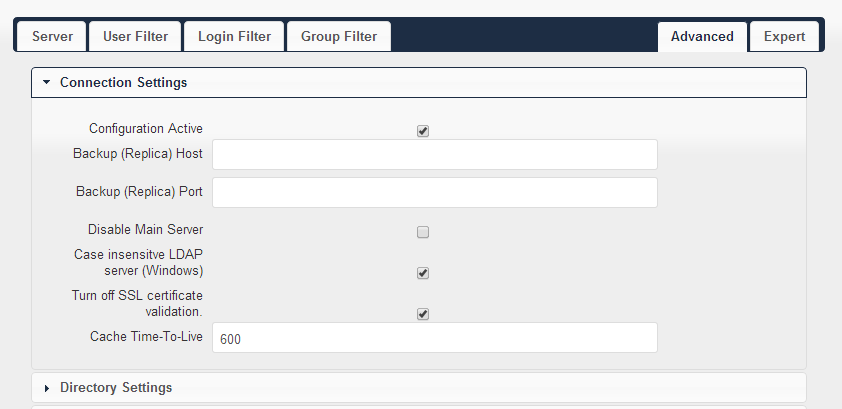
Advanced - Connection Settings:
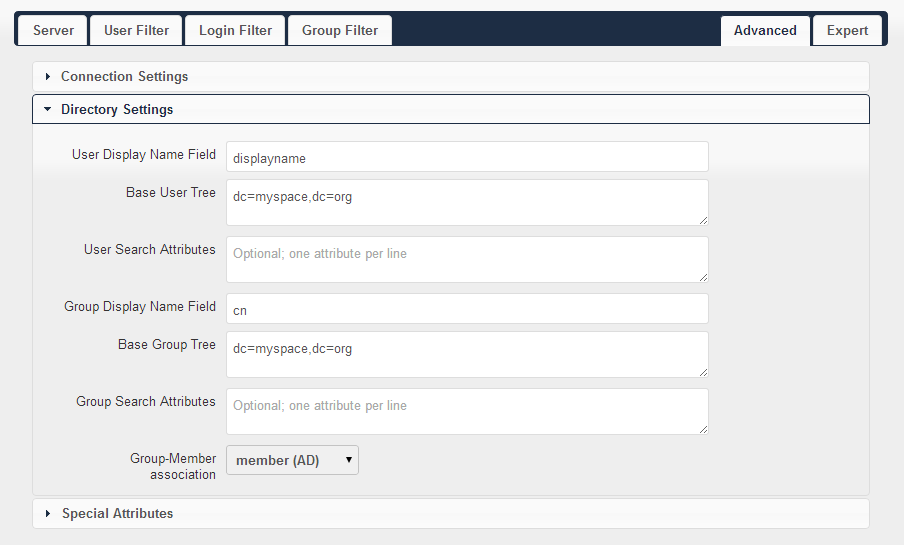
Advanced - Directory Settings:
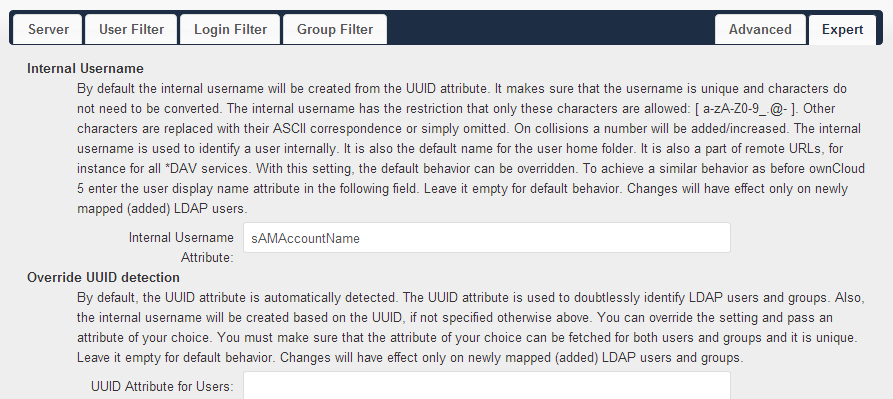
Expert: Add internal username: sAMAccountName
title: "use Foreman/Nagios/Icinga to make life easy..." date: 2013-09-24 categories: - "linux-admin"
add use flag "apache2" to /etc/portage/make.conf
ScriptAlias /nagios/cgi-bin "/usr/lib64/nagios/cgi-bin"
| Options ExecCGI
AllowOverride None
Order allow,deny
Allow from all
|
| AuthName "Nagios Access"
AuthType Basic
AuthUserFile /etc/nagios/auth.users
Require valid-user
|
Alias /nagios "/usr/share/nagios/htdocs"
| Options None
AllowOverride None
Order allow,deny
Allow from all
|
| AuthName "Nagios Access"
AuthType Basic
AuthUserFile /etc/nagios/auth.users
Require nagiosadmin
|
/etc/conf.d/apache
APACHE2_OPTS="... -D NAGIOS -D PHP5"
Add user nagios to apache group
Start service
title: "OAuth2 Guide" date: 2017-07-28 categories: - "linux-admin" - "draft"
这是一篇OAuth2的入门短文,这就开始。
整体可以参考Hydra OAuth2的搭建过程,非常详细,过程就不讲了,直接看图更直观。

title: "OpenLDAP step by step how-to" date: 2014-04-14 categories: - "linux-admin"
I need an authentication system with compatibility and many extended features(like bio-device). So, I've got AD, IPA and OpenLDAP to choose from. AD comes from MS and it is too "heavy" for the not-very-large system. IPA and OpenLDAP are almost same, but I prefer latter, since it's compatible with oVirt(This why I choose CentOS rather than debian).
A basic LDAP without any security or additional features.
Add SASL to our LDAP.
To add Windows PC to our domain.
This is what we want finally. ============================================================
I've got 2 ways to setup an openldap server: 389-ds script and manually configure.
Here's the original article.
Before setup, this configuration should be modified. Add following:
192.168.1.80 ldap.lofyer.org
Add following:
net.ipv4.tcp_keepalive_time = 30 net.ipv4.ip_local_port_range = 1024 65000 fs.file-max = 64000
Add following:
* soft nofile 8192 * hard nofile 8192
Add following:
session required /lib/security/pam_limits.so
Then reboot the machine to make above configurations work.
Then you'll see some questions like this(sorry for the high-lighting...):
============================================================================== This program will set up the 389 Directory and Administration Servers.
It is recommended that you have "root" privilege to set up the software. Tips for using this program: - Press "Enter" to choose the default and go to the next screen - Type "Control-B" then "Enter" to go back to the previous screen - Type "Control-C" to cancel the setup program
Would you like to continue with set up? [yes]: ## Press Enter ##
============================================================================== Your system has been scanned for potential problems, missing patches, etc. The following output is a report of the items found that need to be addressed before running this software in a production environment.
389 Directory Server system tuning analysis version 23-FEBRUARY-2012.
NOTICE : System is i686-unknown-linux2.6.32-431.el6.i686 (1 processor).
WARNING: 622MB of physical memory is available on the system. 1024MB is recommended for best performance on large production system.
WARNING : The warning messages above should be reviewed before proceeding.
Would you like to continue? [no]: yes ## Type Yes and Press Enter ##
============================================================================== Choose a setup type: 1. Express Allows you to quickly set up the servers using the most common options and pre-defined defaults. Useful for quick evaluation of the products. 2. Typical Allows you to specify common defaults and options. 3. Custom Allows you to specify more advanced options. This is recommended for experienced server administrators only. To accept the default shown in brackets, press the Enter key.
Choose a setup type [2]: ## Press Enter ##
============================================================================== Enter the fully qualified domain name of the computer on which you're setting up server software. Using the form . Example: eros.example.com.
To accept the default shown in brackets, press the Enter key.
Warning: This step may take a few minutes if your DNS servers can not be reached or if DNS is not configured correctly. If you would rather not wait, hit Ctrl-C and run this program again with the following command line option to specify the hostname:
| General.FullMachineName=your.hostname.domain.name
|
Computer name [ldap.lofyer.org]: ## Press Enter ##
============================================================================== he servers must run as a specific user in a specific group. It is strongly recommended that this user should have no privileges on the computer (i.e. a non-root user). The setup procedure will give this user/group some permissions in specific paths/files to perform server-specific operations.
If you have not yet created a user and group for the servers, create this user and group using your native operating system utilities.
System User [nobody]: ldapadmin ## Enter LDAP user name created above # System Group [nobody]: ldapadmin
============================================================================== Server information is stored in the configuration directory server. This information is used by the console and administration server to configure and manage your servers. If you have already set up a configuration directory server, you should register any servers you set up or create with the configuration server. To do so, the following information about the configuration server is required: the fully qualified host name of the form .(e.g. hostname.example.com), the port number (default 389), the suffix, the DN and password of a user having permission to write the configuration information, usually the configuration directory administrator, and if you are using security (TLS/SSL). If you are using TLS/SSL, specify the TLS/SSL (LDAPS) port number (default 636) instead of the regular LDAP port number, and provide the CA certificate (in PEM/ASCII format).
If you do not yet have a configuration directory server, enter 'No' to be prompted to set up one. Do you want to register this software with an existing configuration directory server? [no]: ## Press Enter ##
============================================================================== Please enter the administrator ID for the configuration directory server. This is the ID typically used to log in to the console. You will also be prompted for the password. Configuration directory server administrator ID [admin]: ## Press Enter ## Password: ## create password ## Password (confirm): ## re-type password ##
============================================================================== The information stored in the configuration directory server can be separated into different Administration Domains. If you are managing multiple software releases at the same time, or managing information about multiple domains, you may use the Administration Domain to keep them separate.
If you are not using administrative domains, press Enter to select the default. Otherwise, enter some descriptive, unique name for the administration domain, such as the name of the organization responsible for managing the domain.
Administration Domain [lofyer.org]: ## Press Enter ##
============================================================================== The standard directory server network port number is 389. However, if you are not logged as the superuser, or port 389 is in use, the default value will be a random unused port number greater than 1024. If you want to use port 389, make sure that you are logged in as the superuser, that port 389 is not in use. Directory server network port [389]: ## Press Enter ##
============================================================================== Each instance of a directory server requires a unique identifier. This identifier is used to name the various instance specific files and directories in the file system, as well as for other uses as a server instance identifier.
Directory server identifier [server]: ## Press Enter ##
============================================================================== The suffix is the root of your directory tree. The suffix must be a valid DN. It is recommended that you use the dc=domaincomponent suffix convention. For example, if your domain is example.com, you should use dc=example,dc=com for your suffix. Setup will create this initial suffix for you, but you may have more than one suffix. Use the directory server utilities to create additional suffixes.
Suffix [dc=lofyer, dc=org]: ## Press Enter ##
=============================================================================
Certain directory server operations require an administrative user. This user is referred to as the Directory Manager and typically has a bind Distinguished Name (DN) of cn=Directory Manager. You will also be prompted for the password for this user. The password must be at least 8 characters long, and contain no spaces. Press Control-B or type the word "back", then Enter to back up and start over. Directory Manager DN [cn=Directory Manager]: ## Press Enter ## Password: ## Enter the password ## Password (confirm):
============================================================================== The Administration Server is separate from any of your web or application servers since it listens to a different port and access to it is restricted.
Pick a port number between 1024 and 65535 to run your Administration Server on. You should NOT use a port number which you plan to run a web or application server on, rather, select a number which you will remember and which will not be used for anything else. Administration port [9830]: ## Press Enter ##
============================================================================== The interactive phase is complete. The script will now set up your servers. Enter No or go Back if you want to change something.
Are you ready to set up your servers? [yes]: ## Press Enter ## Creating directory server . . . Your new DS instance 'server' was successfully created. Creating the configuration directory server . . . Beginning Admin Server creation . . . Creating Admin Server files and directories . . . Updating adm.conf . . . Updating admpw . . . Registering admin server with the configuration directory server . . . Updating adm.conf with information from configuration directory server . . . Updating the configuration for the httpd engine . . . Starting admin server . . . output: Starting dirsrv-admin: output: [ OK ] The admin server was successfully started. Admin server was successfully created, configured, and started. Exiting . . . Log file is '/tmp/setupo1AlDy.log'
Then make these two services start on startup.
With 389-ds scripts, you could use 389-console, please refer to the link above.
Here's the original article.
/etc/openldap/slapd.d/cn\=config.ldif Delete olcAllows: bind_v2 if you want only v3. Modify olcIdleTimeout from 0 to 30 if you want close the idle connection for more than 30 seconds.
Before next step, run this command to generate a SHA encrypted password.
New password: Re-enter new password: {SSHA}aW7TYJ3faz13RKsnr3uiCsbgi55RKhW9
Then copy the output to your clipboard.
/etc/openldap/slapd.d/cn\=config/olcDatabase\=\{2\}bdb.ldif Modify olcSuffix, RootDN, olcRootPW to this:
... olcSuffix: dc=lofyer, dc=org olcRootPW: {SSHA}aW7TYJ3faz13RKsnr3uiCsbgi55RKhW9 RootDN: cn=admin, dc=lofyer, dc=org ...
dn: dc=lofyer,dc=org objectclass: dcObject objectclass: organization o: Lofyer Org dc: lofyer
dn: ou=People,dc=lofyer,dc=org objectClass: organizationalUnit objectClass: top ou: People
dn: ou=Groups,dc=lofyer,dc=org objectClass: organizationalUnit objectClass: top
ou: Groups dn: cn=admin,dc=lofyer,dc=org objectclass: organizationalRole cn: admin
Import the ldif:
Add following content to user.ldif
dn: uid=demo,ou=People,dc=lofyer,dc=org objectclass: top objectclass: person objectclass: inetOrgPerson objectclass: organizationalPerson uid: demo cn: demo sn: demo givenName: demo
Provide a password:
New password: Re-enter new password: Enter LDAP Password:
Add: dn: cn=myteam,ou=Groups,dc=lofyer,dc=org changetype: modify add: member member: uid=user1,ou=People,dc=lofyer,dc=org
Delete:
dn: cn=myteam,ou=Groups,dc=lofyer,dc=org changetype: modify delete: member member: uid=user1,ou=People,dc=lofyer,dc=org
Here's the original article.
Follow this script.
cd /etc/openldap/certs rm -rf *
echo "mypassword" > /etc/openldap/certs/password export PATH=/usr/bin/:$PATH echo falkdjfdajkasdndwndoqndwapqmhfaksj >> noise.txt
certutil -N -d . -f /etc/openldap/certs/password certutil -G -d . -z noise.txt -f /etc/openldap/certs/password
certutil -S -n "CA certificate" -s "cn=CACert" -x -t "CT,," -m 1000 -v 120 -d . -z /etc/openldap/certs/noise.txt -f /etc/openldap/certs/password
certutil -S -n "OpenLDAP Server" -s "cn=ldap.lofyer.org" -c "CA certificate" -t "u,u,u" -m 1001 -v 120 -d . -z /etc/openldap/certs/noise.txt -f /etc/openldap/certs/password
pk12util -d . -o cacert.p12 -n "CA certificate"
pk12util -d . -o servercert.p12 -n "OpenLDAP Server"
certutil -L -d . -n "CA certificate" -a > /etc/openldap/certs/cacert.pem
chmod 644 *
sed -i 's/SLAPD_LDAPS=no/SLAPD_LDAPS=yes/g' /etc/sysconfig/ldap
I think you should notice that the private key password is "mypassword". Then you will get three files: cacert.p12, cacert.pem, servercert.p12. And, that's all.
OKay, we'll add SASL to our ldap connections.
title: "owncloud webdav intergration" date: 2013-01-03 categories: - "linux-admin"
安装好owncloud后,可以使用webdav协议进行远程挂载,比如
mount -t davfs {http://localhost/remote.php/webdav,http://localhost/files/webdav.php} /mnt
2003上需启动webclient服务 而在2008上, webclient被集成到desktop experience组件中, 从service manager->feature中添加desktop experience,并且修改注册表HKEY_LOCAL_MACHINE->SYSTEM->CurrentControlSet->Services->WebClient->Parameters->BasicAuthLevel 的值为 2,重启服务 此时可映射网络驱动器,钩选“connect using different credentials”,输入其用户名密码即可 或者命令行
NET USE * http://localhost/remote.php/webdav 123456 /user:admin
title: "Using X server in Windows Linux Subsystem" date: 2016-10-09 categories: - "linux-admin"
1. Turn on "Developer Mode" in Control panel. 

2. Run "bash" 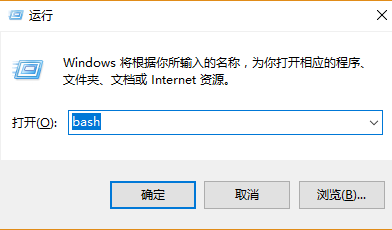
3. Install Xming(Xserver for Windows) Download
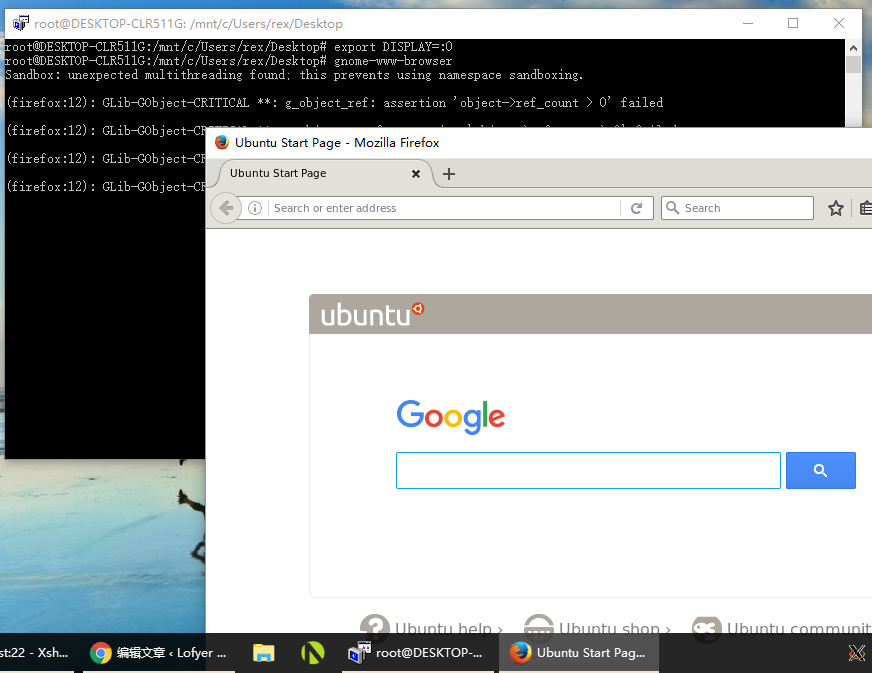
4. Launch your app
5. You can create a link on your desktop like this 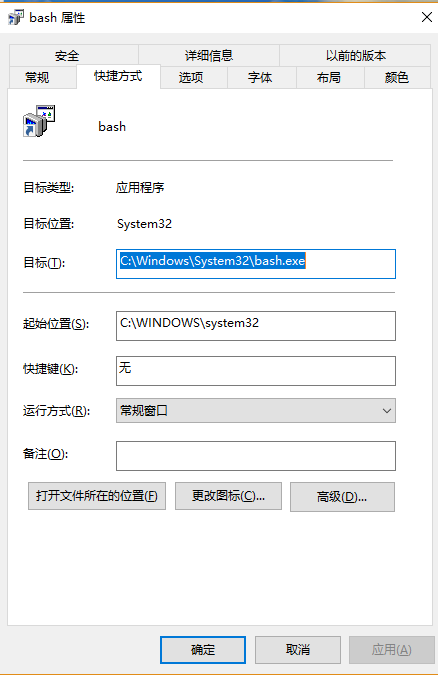
and ~/.bashrc
alias home='cd /mnt/c/Users/rex/Desktop' home export DISPLAY=:0
Tips:
title: "Configure corosync and pacemaker" date: 2015-02-28 categories: - "linux-admin"
Env: node1 eth0 192.168.0.201 node2 eth0 192.168.0.202
Add following content to /etc/yum.repos.d/ha.repo, since you will need crmsh later:
[haclustering] name=HA Clustering baseurl=http://download.opensuse.org/repositories/network:/ha-clustering:/Stable/CentOS_CentOS-6/ enabled=1 gpgcheck=0
Install packages:
Using configuration files below if you need broadcast:
service { # Load the Pacemaker Cluster Resource Manager ver: 0 name: pacemaker use_mgmtd: no use_logd: no }
totem { version: 2 secauth: off interface { member { memberaddr: 192.168.0.201 } member { memberaddr: 192.168.0.202 } ringnumber: 0 bindnetaddr: 192.168.0.0 mcastport: 5405 ttl: 1 } transport: udpu }
logging { fileline: off to_logfile: yes to_syslog: yes logfile: /var/log/cluster/corosync.log debug: off timestamp: on logger_subsys { subsys: AMF debug: off } }
Here's a sample using multicast:
service { # Load the Pacemaker Cluster Resource Manager ver: 0 name: pacemaker use_mgmtd: no use_logd: no }
totem { version: 2
 1
 2
 3
 4
 5
 6
 7
 8
 9
10
11
12
13
14
15
16
17 | # secauth: Enable mutual node authentication. If you choose to
# enable this ("on"), then do remember to create a shared
# secret with "corosync-keygen".
secauth: off
threads: 0
# interface: define at least one interface to communicate
# over. If you define more than one interface stanza, you must
# also set rrp\_mode.
interface {
ringnumber: 0
bindnetaddr: 192.168.1.0
mcastaddr: 239.255.1.1
mcastport: 5405
ttl: 1
}
|
}
logging { fileline: off to_stderr: no to_logfile: yes logfile: /var/log/cluster/corosync.log to_syslog: yes debug: off timestamp: on logger_subsys { subsys: AMF debug: off } }
Note that if the ver in the service section of pacemaker is 0, pacemaker will be loaded automatically, or else you will start the pacemaker service manually.
Copy this configuration file to the other host and start the service:
On 192.168.0.201:
On 192.168.0.202:
Add virtual IP to your cluster:
crm(live)configure# primitive vip1 ocf IPaddr2 params ip=192.168.0.209 cidr_netmask=24 op monitor interval=10s crm(live)configure# property stonith-enabled=false # To prevent split-brain crm(live)configure# property no-quorum-policy=stop # To prevent split-brain crm(live)configure# commit
Test:
crm(live)configure# migrate vip1 crm(live)configure# unmigrate vip1
title: "Deploy Skype for Business Server 2015" date: 2015-08-12 categories: - "cloud-infra"
ad(ad.virtfan.com): Windows Server 2012 R2 lync(lync.virtfan.com): Windows Server 2012 R2 Following instruction is for LAN.
Ref: https://technet.microsoft.com/en-us/library/dn933900.aspx Install lync 2013 server in win2008r2
1. After a fresh installation of Windows Server 2012 R2, we will update it to latest. 2. We need create an AD DS with AD CS in ad.virtfan.com. So that we can retrieve CA to complete our deployment. 3. Then we start setting up Skype Server in lync.virtfan.com(in domain virtfan.com). 4. Set up DNS, add more users, use lync to communicate.
Following steps are in ad.virtfan.com. 1. Assign a static IP. Change computer name to ad.  2. Add Active Directory Domain Service and DNS Roles. Create a new forest(virtfan.com) with level Windows 2008 R2.
  3. Add Active Directory Certificate Service Role with all the six features checked.
  4. (Optional)Run gpmc.msc, right click on the Default Domain Policy to edit. Change Password Complexity to False. Run gpupdate /force to update the group policy.
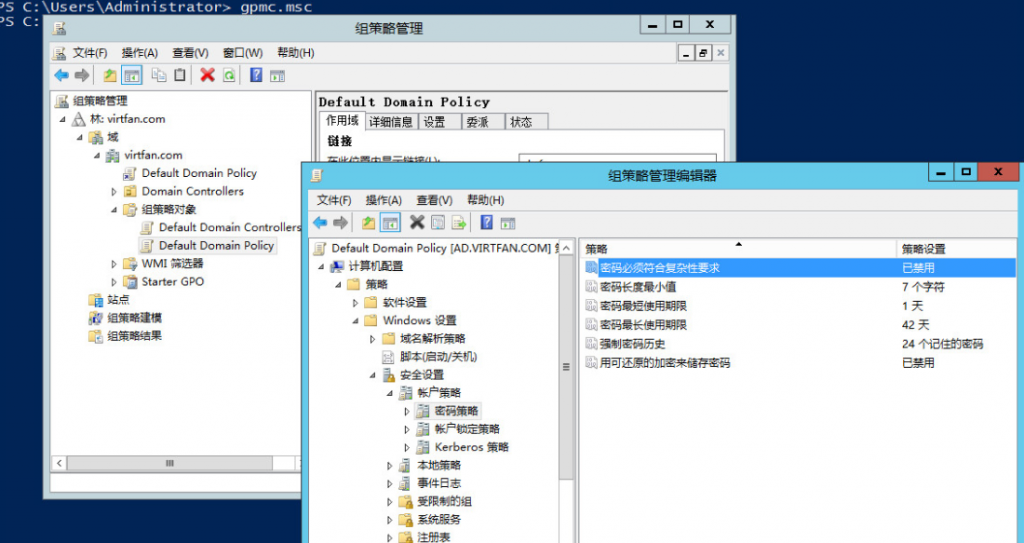
Following steps are in lync.virtfan.com. Make sure you have got more than 32GB space in C:. 1. Assign a static IP, change name to lync and join domain virtfan.com. Add following features: .Net Framework 3.5, .Net Framework 4.5 -> WCF Services -> HTTP Activation, Media Foundation, Remote Server Administration Tools -> Role Administration Tools -> AD DS and AD LDS Tools -> Windows Identity Foundation 3.5 2. Add IIS Role with following features: 静态内容、默认文档、HTTP 错误、ASP.NET、.NET 扩展性、Internet 服务器 API (ISAPI)扩展、ISAPI 筛选器、HTTP 日志记录、日志记录工具、跟踪、客户端证书映射身份验证、Windows 身份验证、请求筛选、静态内容压缩、动态内容压缩、IIS 管理控制台、IIS 管理脚本和工具 3. Logon as VIRTFAN\Administrator and add feature .Net3.5. 4. Install KB2982006. 5. Mount Skype Business 2015 ISO and run Setup to install.
Following steps are in lync.virtfan.com and logon as VIRTFAN\Administrator and add feature .Net3.5. 1. Create a directory in C:\share, make it sharable and writable. 2. Run Skype for Business Server 部署向导(Deploy Wizard) from Start menu.  3. Then we will are going to follow the steps in Prepare Active Directory.
  4. Click Prepare the first Standard Edition Server. It will create database. 5. Install management utilities. 6. Run Skype for Business Server topology generator from Start menu to generate a topology.
  7. Create a new topology like this:


 Click Finish and right click on the Skype for Business Server to edit property. Fill in the admin url like: https://admin.virtfan.com Select a fronted server as central server.
  8. Publish topology. 9. Click Install or update Skype for Business Server System. And follow its guide.
  10. When you are in Step.3(Assign Certificate). Click Request to request certificate from ad.virtfan.com.
 11. Run start-cspool from cmd to start the server. Warning is OK, error is not OK. 12. Define your DNS and port-forwarding(443) so that we can use Skype from WAN.
https://meet.virtfan.com -> lync.virtfan.com's IP https://lync.virtfan.com -> lync.virtfan.com's IP https://dialin.virtfan.com -> lync.virtfan.com's IP https://admin.virtfan.com -> lync.virtfan.com's IP (optional)https://ad.virtfan.com -> ad.virtfan.com's IP
13. Add domain users and assign users via https://admin.virtfan.com. 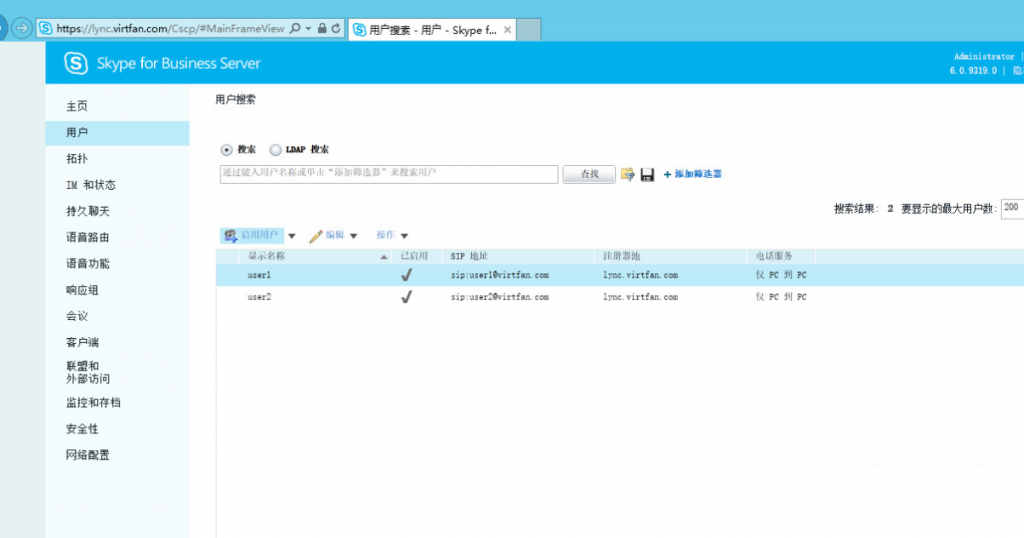
1. Install Lync/Skype within Microsoft Office 2013 or Office365. 2. Download and install CA from https://ad.virtfan.com/certsrv/ or you can put it somewhere else. 3. Configure your client like this:  4. Click Logon.
Here you go!
If you are using servers behind a firewall or a router, you should add something like this. 1. On your DNS provider, set these 6 A records lync/admin/dialin/meet/lyncdiscover/lyncdiscoverinternal.virtfan.com to your WAN IP. 2. Port forward from 443,5601 to lync server LAN IP. (Alternative)2. If you are using Apache virtualhost, you'll need export certificate and its private key of lync.virtfan.com to the Apache server with jailbreak and configure all 6 domain names like this:
... ServerName skype.virtfan.com SSLEngine on SSLProxyEngine on SSLCertificateFile /etc/httpd/conf.d/lync-ca/lync.virtfan.com.cer SSLCertificateKeyFile /etc/httpd/conf.d/lync-ca/lync.virtfan.com.key ProxyRequests Off ProxyPass / https://skype.virtfan.com/ ProxyPassReverse / https://skype.virtfan.com/ ...
ServerName lyncdiscover.virtfan.com ProxyRequests Off ProxyPass / http://lyncdiscover.virtfan.com/ ProxyPassReverse / http://lyncdiscover.virtfan.com/
ServerName lyncdiscoverinternal.virtfan.com ProxyRequests Off ProxyPass / http://lyncdiscoverinternal.virtfan.com/ ProxyPassReverse / http://lyncdiscoverinternal.virtfan.com/
... 192.168.122.222 admin.virtfan.com 192.168.122.222 lync.virtfan.com 192.168.122.222 dialin.virtfan.com 192.168.122.222 skype.virtfan.com 192.168.122.222 meet.virtfan.com 192.168.122.222 lyncdiscover.virtfan.com 192.168.122.222 lyncdiscoverinternal.virtfan.com ...
And configure iptables:
3. DO NOT ADD "Internal Server" in your lync client, "External Server" will be enough.