跳转至

首页

黄酒篇

偶见楼下一黄酒店铺,坛中酒对于我这个北方人来说有些罕见,于是便提了三斤加饭回家,两天后觉得不错,便出此念想:尝遍门店甘酿。

5c61e74b8e5ca4a8

2015.3.10 绍兴咸亨雕王 加热后甜味浮出,入口颇顺,酒意略潜。 IMG_20150310_192723

2015.3.10 绍兴花雕王 为入口已有红枣泥香,酒意浅,连续品尝后有一丝苦涩。 IMG_20150310_194616

2015.3.10 绍兴八年加饭 酒意刚好,也有红枣泥香。 IMG_20150310_212108

2015.3.12 绍兴太雕 加热后酒意略浓,听老板说近年太雕不如花雕王卖的好,人总是会变的。 image

2015.3.16 黑枣女儿红 枣香不如花雕浓郁,酒意略浓。 IMG_20150316_181259

2015.3.16 桂花酒 未加热前,满满桂花香,加热后,伴着酒醇飘出,另外,从颜色看,这才叫黄酒啊。 IMG_20150314_162735

2015.3.17 古越龙山 名字好听,入口易,酒意浅。 IMG_20150319_184354

2015.3.17 状元红 与花雕王差不多,但是枣香更浓。 IMG_20150321_094236

2015.3.18 竹叶青 药酒,味不如名,也有可能是这家酿造的方法问题,不好喝。 IMG_20150318_185003

惊梦

剑无主, 水无渊。 刃利湍急少有仙。 梦中再驶千帆舵, 意恍然, 莫凭栏, 骇浪惊涛最教人马乱。 划水天, 行桑耶, 尸骨已寒, 不复当年, 天授之卷也枉然。 行云中, 才看淡, 好使他山把玉残。

修一时之为, 养一方之锐, 也将败在自己戾气, 不如下一盘棋, 方罢好好玩得这一遭。

2015 Roadmap

1. 从Coursera拓展一些知识面

In CS: Coding the Matrix: Linear Algebra Mining Massive Datasets Process Mining: Data science in Action Network Analysis in Systems Biology Text Mining and Analytics Text Retrieval and Search Engines Machine Learning Machine Learning Techniques Machine Learning Foundations Social Network Analysis Artificial Intelligence Planning Computational Inversting Web Intelligence and Big Data

In Electronics: Control of Mobile Robots

In Business: Introduction to Finance

2. Books:

鉴于某些国外友人对InTheCloud也有些需求,抽时间把全篇完成并写个英文版。

3. 融合

21. Hadoop/Storm 介绍

终于到这一章了。 期望这一章的读者不要盲目跟风,找到适合自己的便好。

14. oVirt使用进阶

ovirt-shell

使用ovirt-shell在一定程度上适合于某些场景。

ovirt-shell -I -u admin@internal -l https://server_ip/api

============================================================================ >>> connected to oVirt manager 3.4.0.0 <<< ============================================================================

++++++++++++++++++++++++++++++++++++++++++++++++++++++++++++++++++++++++++++

1
                         Welcome to oVirt shell

++++++++++++++++++++++++++++++++++++++++++++++++++++++++++++++++++++++++++++

[oVirt shell (connected)]#

主机hooks

参考vdsm-hooks

集群策略

参考这个PDF

libguestfs扩容

LVM扩容 普通扩容

UI plugin

ShellInABox

平台插件

Foreman OpenStack Network OpenStack Image

手动创建导出域

构造目录,形如:

tree exports

. ├── 37e0e64b-5445-4bc3-8675-ceff4637e8e3/ │   ├── dom_md/ │   │   ├── ids │   │   ├── inbox │   │   ├── leases │   │   ├── metadata │   │   └── outbox │   ├── /blog/images/ │   └── master/ │   ├── tasks/ │   └── vms/ └── __DIRECT_IO_TEST__

创建_leases_文件:

echo 2d2d2d2d2d2d465245452d2d2d2d2d2d3030303030303030303030303030

303000000000000000000000000000000000000000000000000000000000 000000000000000000000000000000000000000000000000000000000000 000000000000000000000000000000000000000000000000000000000000 000000000000000000000000000000000000000000000000000000000000 000000000000000000000000000000000000000000000000000000000000 000000000000000000000000000000000000000000000000000000000000 000000000000000000000000000000000000000000000000000000000000 000000000000000000000000000000000000000000000000000000000000 000000000000000000000000000000000000000000000000000000000000 000000000000000000000000000000000000000000000000000000000000 000000000000000000000000000000000000000000000000000000000000 000000000000000000000000000000000000000000000000000000000000 000000000000000000000000000000000000000000000000000000000000 000000000000000000000000000000000000000000000000000000000000 000000000000000000000000000000000000000000000000000000000000 000000000000000000000000000000000000000000000000000000000000 0000 | xxd -r -p > leases

添加如下内容至_metadata_文件:

CLASS=Backup DESCRIPTION=Export IOOPTIMEOUTSEC=10 LEASERETRIES=3 LEASETIMESEC=60 LOCKPOLICY= LOCKRENEWALINTERVALSEC=5 MASTER_VERSION=0 POOL_UUID= REMOTE_PATH=192.168.1.108:/home/nfs_exports ROLE=Regular SDUUID=37e0e64b-5445-4bc3-8675-ceff4637e8e3 TYPE=NFS VERSION=0

_SHA_CKSUM=5737f1270bf93fdd660fea819655b01a34c315b9

使用如下脚本(参考源码中packaging/setup/plugins/ovirt-engine-setup/config/iso_domain.py)计算SHA校验值,并将其填入_metadata_中的_SHA_CKSUM段:

!/usr/bin/python

import hashlib from optparse import OptionParser

if __name__ == "__main__": parser = OptionParser() (options, args) = parser.parse_args() if len(args) != 1: parser.error("Missing metadata file") f = open(args[0], "r") mds = {} for line in f: line = line.strip() if not line or line.startswith('#'): continue try: key,value = line.split('=', 1) if key == '_SHA_CKSUM': continue mds[key] = value except Exception, e: continue f.close() #print mds csum = hashlib.sha1() keys = mds.keys() keys.sort() for key in keys: value = mds[key] line = "%s=%s" % (key, value) csum.update(line) print(csum.hexdigest())

更改权限:

chown -R vdsm.kvm exports

然后可以作为空导出域进行导入。

13. 完善平台

我想,你看到这的话应该已经有了一个数据中心、几个宿主机,也可能有一个虚拟机(engine),还差一个存储虚拟机镜像的地方就可以具有基本功能的oVirt平台了。

Ok, here we go.

添加节点(宿主机)

对于第11节的普通oVirt、第12节的ha平台,你可能需要添加更多节点以支持更好的SLA(service level agreement)。 添加节点目前有三种方式,一种是通过oVirt的节点ISO直接安装再加入,另一种是直接将现有CentOS或者Fedora转化为节点,另外还可以指定使用外部节点(Foreman),在此我们使用第二种方法。

add_node_1

添加存储域

存储域有3种,Data(数据域)、ISO(ISO域)、Export(导出域)。 其中,数据域是为必需,在创建任何虚拟机之前需要有一个可用的数据域用于存储虚拟磁盘以及快照文件;ISO域中可以存放ISO和VFD格式的系统镜像或者驱动文件;导出域用于导出或导入OVF格式的虚机。 而根据数据域的存储类型,我们有5种(NFS、POSIX兼容、Glusterfs、iSCSI、光纤)可选,在此,建议(为什么?)选择glusterfs导出的NFS。

此图可以换掉 add_storage_1

注意:确保存储域权限为36:36,也即vdsm.kvm。

11. 搭建oVirt虚拟化平台

对于初次使用oVirt的用户,建议使用此种搭建方式,太折腾的话就吓走好多目标读者了

使用之前的四台机器,分别为gs1.lofyer.org,gs2.lofyer.org,gs3.lofyer.org和gs4.lofyer.org,其中,将gs1作为管理机安装ovirt-engine,其余三台作为节点(node),存储使用已经创建好的glusterfs。

准备

存储可以使用之前的glusterfs,方式为NFS_V3,注意将brick的权限设置为vdsm.kvm或者36:36。

gluster volume create gluster-vol1 replica 2 gs1.example.com:/gluster_brick0 gs2.example.com:/gluster_brick0 gs3.example.com:/gluster_brick0 gs4.example.com:/gluster_brick0 gs1.example.com:/gluster_brick1 gs2.example.com:/gluster_brick1 gs3.example.com:/gluster_brick1 gs4.example.com:/gluster_brick1 force

gluster-ovirt

由于engine以及node的网络服务依赖于network而非NetworkManager,我们需要启用前者禁用后者,在每一台服务器上都进行如下类似配置修改网络。

NAME=eth0 DEVICE=eth0 ONBOOT=yes BOOTPROTO=static

注意修改此处的IP

IPADDR=192.168.10.101 NETMASK=255.255.255.0 GATEWAY=192.168.10.1 DNS1=192.168.10.1

chkconfig NetworkManager off

chkconfig network on

service NetworkManager stop; service network restart

添加repo

yum localinstall http://resources.ovirt.org/releases/ovirt-release.noarch.rpm

yum install ovirt-hosted-engine-setup

或者手动添加:

[ovirt-stable] name=Latest oVirt Releases baseurl=http://ovirt.org/releases/stable/rpm/EL/$releasever/ enabled=1 skip_if_unavailable=1 gpgcheck=0

[ovirt-3.4-stable] name=Latest oVirt 3.4.z Releases baseurl=http://ovirt.org/releases/3.4/rpm/EL/$releasever/ enabled=1 skip_if_unavailable=1 gpgcheck=0

[epel] name=Extra Packages for Enterprise Linux 6 - $basearch

baseurl=http://download.fedoraproject.org/pub/epel/6/$basearch

mirrorlist=https://mirrors.fedoraproject.org/metalink?repo=epel-6&arch=$basearch failovermethod=priority enabled=1 includepkgs=epel-release,python-uinput,puppet,python-lockfile,python-cpopen,python-ordereddict,python-pthreading,python-inotify,python-argparse,novnc,python-ply,python-kitchen,python-daemon,python-websockify,livecd-tools,spice-html5,mom gpgcheck=0

[ovirt-glusterfs-epel] name=GlusterFS is a clustered file-system capable of scaling to several petabytes. baseurl=http://download.gluster.org/pub/gluster/glusterfs/LATEST/EPEL.repo/epel-\(releasever/\)basearch/ enabled=1 skip_if_unavailable=1 gpgcheck=0

[ovirt-glusterfs-noarch-epel] name=GlusterFS is a clustered file-system capable of scaling to several petabytes. baseurl=http://download.gluster.org/pub/gluster/glusterfs/LATEST/EPEL.repo/epel-$releasever/noarch enabled=1 skip_if_unavailable=1 gpgcheck=0

安装管理节点。

在gs1上运行如下命令。

yum install ovirt-engine

engine-setup --offline

[ INFO ] Stage: Initializing [ INFO ] Stage: Environment setup Configuration files: ['/etc/ovirt-engine-setup.conf.d/10-packaging.conf'] Log file: /var/log/ovirt-engine/setup/ovirt-engine-setup-20140508054649.log Version: otopi-1.2.0 (otopi-1.2.0-1.el6) [ INFO ] Stage: Environment packages setup [ INFO ] Stage: Programs detection [ INFO ] Stage: Environment setup [ INFO ] Stage: Environment customization

 1
 2
 3
 4
 5
 6
 7
 8
 9
10
11
12
13
14
      --== PRODUCT OPTIONS ==--


      --== PACKAGES ==--


      --== NETWORK CONFIGURATION ==--

      Host fully qualified DNS name of this server \[gs1.lofyer.org\]: 
      Setup can automatically configure the firewall on this system.
      Note: automatic configuration of the firewall may overwrite current settings.
      Do you want Setup to configure the firewall? (Yes, No) \[Yes\]: 
      The following firewall managers were detected on this system: iptables
      Firewall manager to configure (iptables): iptables

[ INFO ] iptables will be configured as firewall manager.

 1
 2
 3
 4
 5
 6
 7
 8
 9
10
11
12
13
14
15
16
17
18
19
20
21
22
23
24
25
26
27
28
29
30
31
32
33
      --== DATABASE CONFIGURATION ==--

      Where is the Engine database located? (Local, Remote) \[Local\]: 
      Setup can configure the local postgresql server automatically for the engine to run. This may conflict with existing applications.
      Would you like Setup to automatically configure postgresql and create Engine database, or prefer to perform that manually? (Automatic, Manual) \[Automatic\]:

      --== OVIRT ENGINE CONFIGURATION ==--

      Application mode (Both, Virt, Gluster) \[Both\]: 
      Default storage type: (NFS, FC, ISCSI, POSIXFS) \[NFS\]: 
      Engine admin password: 
      Confirm engine admin password:

      --== PKI CONFIGURATION ==--

      Organization name for certificate \[lofyer.org\]:

      --== APACHE CONFIGURATION ==--

      Setup can configure apache to use SSL using a certificate issued from the internal CA.
      Do you wish Setup to configure that, or prefer to perform that manually? (Automatic, Manual) \[Automatic\]: 
      Setup can configure the default page of the web server to present the application home page. This may conflict with existing applications.
      Do you wish to set the application as the default page of the web server? (Yes, No) \[Yes\]:

      --== SYSTEM CONFIGURATION ==--

      Configure WebSocket Proxy on this machine? (Yes, No) \[Yes\]: 
      Configure an NFS share on this server to be used as an ISO Domain? (Yes, No) \[Yes\]: no

      --== MISC CONFIGURATION ==--


      --== END OF CONFIGURATION ==--

[ INFO ] Stage: Setup validation

 1
 2
 3
 4
 5
 6
 7
 8
 9
10
11
12
13
14
15
16
17
18
19
20
      --== CONFIGURATION PREVIEW ==--

      Engine database name                    : engine
      Engine database secured connection      : False
      Engine database host                    : localhost
      Engine database user name               : engine
      Engine database host name validation    : False
      Engine database port                    : 5432
      PKI organization                        : lofyer.org
      Application mode                        : both
      Firewall manager                        : iptables
      Update Firewall                         : True
      Configure WebSocket Proxy               : True
      Host FQDN                               : gs1.lofyer.org
      Datacenter storage type                 : nfs
      Configure local Engine database         : True
      Set application as default page         : True
      Configure Apache SSL                    : True

      Please confirm installation settings (OK, Cancel) \[OK\]: ok

[ INFO ] Stage: Transaction setup [ INFO ] Stopping engine service [ INFO ] Stopping websocket-proxy service [ INFO ] Stage: Misc configuration [ INFO ] Stage: Package installation [ INFO ] Stage: Misc configuration [ INFO ] Initializing PostgreSQL [ INFO ] Creating PostgreSQL 'engine' database [ INFO ] Configuring PostgreSQL [ INFO ] Creating Engine database schema [ INFO ] Creating CA [ INFO ] Configuring WebSocket Proxy [ INFO ] Generating post install configuration file '/etc/ovirt-engine-setup.conf.d/20-setup-ovirt-post.conf' [ INFO ] Stage: Transaction commit [ INFO ] Stage: Closing up

 1
 2
 3
 4
 5
 6
 7
 8
 9
10
      --== SUMMARY ==--

      SSH fingerprint: 1B:FD:08:A2:FD:83:20:8A:65:F5:0D:F6:CB:BF:46:C7
      Internal CA 28:7E:D6:6B:F7:F2:6C:B5:60:27:44:C3:7F:3C:22:63:E5:68:DD:F4
      Web access is enabled at:
          http://gs1.lofyer.org:80/ovirt-engine
          https://gs1.lofyer.org:443/ovirt-engine
      Please use the user "admin" and password specified in order to login into oVirt Engine

      --== END OF SUMMARY ==--

[ INFO ] Starting engine service [ INFO ] Restarting httpd [ INFO ] Generating answer file '/var/lib/ovirt-engine/setup/answers/20140508054842-setup.conf' [ INFO ] Stage: Clean up Log file is located at /var/log/ovirt-engine/setup/ovirt-engine-setup-20140508054649.log [ INFO ] Stage: Pre-termination [ INFO ] Stage: Termination [ INFO ] Execution of setup completed successfully

至此,管理节点安装结束。

接下来,加入节点以及存储域,请参考第13节。

12. 搭建高可用oVirt(hosted engine)

笔者写此文时oVirt已经更新到3.4。

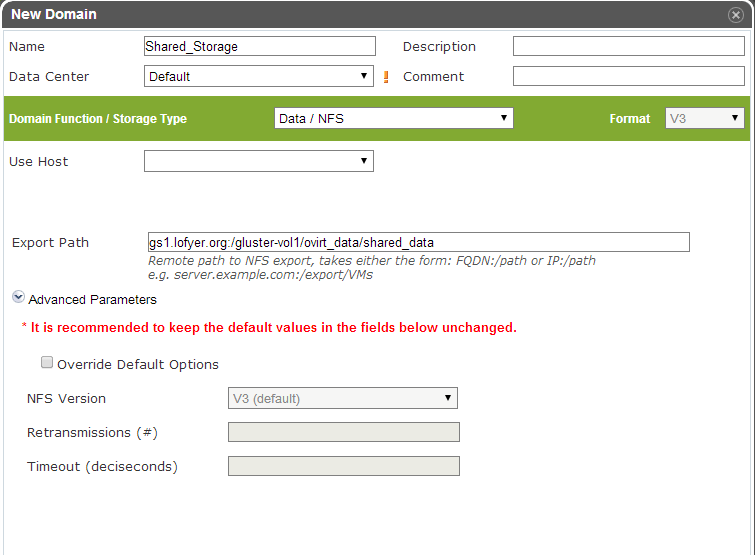
在此,我们会用到之前创建的distributed-replicate存储,这样可用保证系统服务的高度可用性有所提高。

有以下几点需要注意:

1. 宿主机的CPU架构需要为Westmere(Westmere E56xx/L56xx/X56xx)、Nehalem(Intel Core i7 9xx)、Penryn(Intel Core 2 Duo P9xxx)或者Conroe(Intel Celeron_4x0)中的之一,否则集群类型会与宿主机类型不兼容导致数据中心启动失败。

CPU Family table 参阅 Intel Architecture and Processor Identification With CPUID Model and Family Numbers

2. 建议参考第11节提前安装含有oVirt管理的虚拟机,硬盘格式为RAW,从而在安装管理机时作为OVF导入或者覆盖虚拟磁盘,减少失败风险时间。

准备

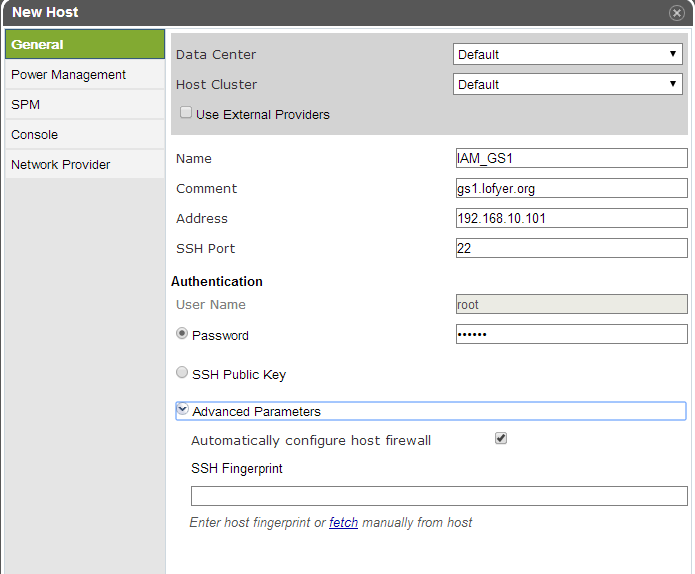
每台机器上都要添加作为虚拟机运行的engine的FQDN,此处为ha.lofyer.org。

echo -e '192.168.10.100\tha.lofyer.org' >> /etc/hosts

存储可以使用之前的glusterfs,方式为NFS_V3,注意将brick的权限设置为vdsm.kvm或者36:36。

gluster volume create gluster-vol1 replica 2 gs1.example.com:/gluster_brick0 gs2.example.com:/gluster_brick0 gs3.example.com:/gluster_brick0 gs4.example.com:/gluster_brick0 gs1.example.com:/gluster_brick1 gs2.example.com:/gluster_brick1 gs3.example.com:/gluster_brick1 gs4.example.com:/gluster_brick1 force

gluster-ovirt

由于engine以及node的网络服务依赖于network而非NetworkManager,我们需要启用前者禁用后者,在每一台服务器上都进行如下类似配置修改网络。

NAME=eth0 DEVICE=eth0 ONBOOT=yes BOOTPROTO=static

注意修改此处的IP

IPADDR=192.168.10.101 NETMASK=255.255.255.0 GATEWAY=192.168.10.1 DNS1=192.168.10.1

chkconfig NetworkManager off

chkconfig network on

service NetworkManager stop; service network restart

添加repo

yum localinstall http://resources.ovirt.org/releases/ovirt-release.noarch.rpm

yum install ovirt-hosted-engine-setup

或者手动添加:

[ovirt-stable] name=Latest oVirt Releases baseurl=http://ovirt.org/releases/stable/rpm/EL/$releasever/ enabled=1 skip_if_unavailable=1 gpgcheck=0

[ovirt-3.4-stable] name=Latest oVirt 3.4.z Releases baseurl=http://ovirt.org/releases/3.4/rpm/EL/$releasever/ enabled=1 skip_if_unavailable=1 gpgcheck=0

[epel] name=Extra Packages for Enterprise Linux 6 - $basearch

baseurl=http://download.fedoraproject.org/pub/epel/6/$basearch

mirrorlist=https://mirrors.fedoraproject.org/metalink?repo=epel-6&arch=$basearch failovermethod=priority enabled=1 includepkgs=epel-release,python-uinput,puppet,python-lockfile,python-cpopen,python-ordereddict,python-pthreading,python-inotify,python-argparse,novnc,python-ply,python-kitchen,python-daemon,python-websockify,livecd-tools,spice-html5,mom gpgcheck=0

[ovirt-glusterfs-epel] name=GlusterFS is a clustered file-system capable of scaling to several petabytes. baseurl=http://download.gluster.org/pub/gluster/glusterfs/LATEST/EPEL.repo/epel-\(releasever/\)basearch/ enabled=1 skip_if_unavailable=1 gpgcheck=0

[ovirt-glusterfs-noarch-epel] name=GlusterFS is a clustered file-system capable of scaling to several petabytes. baseurl=http://download.gluster.org/pub/gluster/glusterfs/LATEST/EPEL.repo/epel-$releasever/noarch enabled=1 skip_if_unavailable=1 gpgcheck=0

安装hosted-engine

yum install ovirt-hosted-engine-setup

回答一些列问题,如下所示:

hosted-engine --deploy

[ INFO ] Stage: Initializing Continuing will configure this host for serving as hypervisor and create a VM where you have to install oVirt Engine afterwards. Are you sure you want to continue? (Yes, No)[Yes]: yes [ INFO ] Generating a temporary VNC password. [ INFO ] Stage: Environment setup Configuration files: [] Log file: /var/log/ovirt-hosted-engine-setup/ovirt-hosted-engine-setup-20140508182241.log Version: otopi-1.2.0 (otopi-1.2.0-1.el6) [ INFO ] Hardware supports virtualization [ INFO ] Bridge ovirtmgmt already created [ INFO ] Stage: Environment packages setup [ INFO ] Stage: Programs detection [ INFO ] Stage: Environment setup [ INFO ] Stage: Environment customization

1
2
3
4
      --== STORAGE CONFIGURATION ==--

      During customization use CTRL-D to abort.
      Please specify the storage you would like to use (nfs3, nfs4)\[nfs3\]:

此处的存储域只存储hosted-engine的相关文件,不作为主数据域

1
      Please specify the full shared storage connection path to use (example: host:/path): 192.168.10.101:/gluster-vol1/ovirt\_data/hosted\_engine

[ INFO ] Installing on first host Please provide storage domain name. [hosted_storage]: Local storage datacenter name is an internal name and currently will not be shown in engine's admin UI.Please enter local datacenter name [hosted_datacenter]:

1
2
3
4
5
6
7
8
9
      --== SYSTEM CONFIGURATION ==--


      --== NETWORK CONFIGURATION ==--

      iptables was detected on your computer, do you wish setup to configure it? (Yes, No)\[Yes\]: no
      Please indicate a pingable gateway IP address \[192.168.10.1\]:

      --== VM CONFIGURATION ==--

虚拟engine的安装方式

 1
 2
 3
 4
 5
 6
 7
 8
 9
10
11
12
13
14
15
16
17
18
19
20
21
      Please specify the device to boot the VM from (cdrom, disk, pxe) \[cdrom\]: 
      The following CPU types are supported by this host:
         - model\_Conroe: Intel Conroe Family
      Please specify the CPU type to be used by the VM \[model\_Conroe\]: 
      Please specify path to installation media you would like to use \[None\]: /tmp/centos.iso
      Please specify the number of virtual CPUs for the VM \[Defaults to minimum requirement: 2\]: 
      Please specify the disk size of the VM in GB \[Defaults to minimum requirement: 25\]: 
      You may specify a MAC address for the VM or accept a randomly generated default \[00:16:3e:59:9b:e2\]: 
      Please specify the memory size of the VM in MB \[Defaults to minimum requirement: 4096\]: 4096
      Please specify the console type you would like to use to connect to the VM (vnc, spice) \[vnc\]:

      --== HOSTED ENGINE CONFIGURATION ==--

      Enter the name which will be used to identify this host inside the Administrator Portal \[hosted\_engine\_1\]: 
      Enter 'admin@internal' user password that will be used for accessing the Administrator Portal: 
      Confirm 'admin@internal' user password: 
      Please provide the FQDN for the engine you would like to use.
      This needs to match the FQDN that you will use for the engine installation within the VM.
      Note: This will be the FQDN of the VM you are now going to create,
      it should not point to the base host or to any other existing machine.
      Engine FQDN: ha.lofyer.org

[WARNING] Failed to resolve ha.lofyer.org using DNS, it can be resolved only locally Please provide the name of the SMTP server through which we will send notifications [localhost]: Please provide the TCP port number of the SMTP server [25]: Please provide the email address from which notifications will be sent [root@localhost]: Please provide a comma-separated list of email addresses which will get notifications [root@localhost]: [ INFO ] Stage: Setup validation

 1
 2
 3
 4
 5
 6
 7
 8
 9
10
11
12
13
14
15
16
17
18
19
      --== CONFIGURATION PREVIEW ==--

      Engine FQDN                        : ha.lofyer.org
      Bridge name                        : ovirtmgmt
      SSH daemon port                    : 22
      Gateway address                    : 192.168.10.1
      Host name for web application      : hosted\_engine\_1
      Host ID                            : 1
      Image size GB                      : 25
      Storage connection                 : 192.168.10.101:/gluster-vol1/ovirt\_data/hosted\_data/
      Console type                       : vnc
      Memory size MB                     : 4096
      MAC address                        : 00:16:3e:59:9b:e2
      Boot type                          : cdrom
      Number of CPUs                     : 2
      ISO image (for cdrom boot)         : /tmp/centos.iso
      CPU Type                           : model\_Conroe

      Please confirm installation settings (Yes, No)\[No\]: yes

[ INFO ] Generating answer file '/etc/ovirt-hosted-engine/answers.conf' [ INFO ] Stage: Transaction setup [ INFO ] Stage: Misc configuration [ INFO ] Stage: Package installation [ INFO ] Stage: Misc configuration [ INFO ] Configuring libvirt [ INFO ] Configuring VDSM [ INFO ] Starting vdsmd [ INFO ] Waiting for VDSM hardware info [ INFO ] Waiting for VDSM hardware info [ INFO ] Waiting for VDSM hardware info [ INFO ] Waiting for VDSM hardware info [ INFO ] Creating Storage Domain [ INFO ] Creating Storage Pool [ INFO ] Connecting Storage Pool [ INFO ] Verifying sanlock lockspace initialization [ INFO ] Initializing sanlock lockspace [ INFO ] Initializing sanlock metadata [ INFO ] Creating VM Image [ INFO ] Disconnecting Storage Pool [ INFO ] Start monitoring domain [ INFO ] Configuring VM [ INFO ] Updating hosted-engine configuration [ INFO ] Stage: Transaction commit [ INFO ] Stage: Closing up The following network ports should be opened: tcp:5900 tcp:5901 udp:5900 udp:5901 An example of the required configuration for iptables can be found at: /etc/ovirt-hosted-engine/iptables.example In order to configure firewalld, copy the files from /etc/ovirt-hosted-engine/firewalld to /etc/firewalld/services and execute the following commands: firewall-cmd -service hosted-console [ INFO ] Creating VM You can now connect to the VM with the following command: /usr/bin/remote-viewer vnc://localhost:5900 Use temporary password "2067OGHU" to connect to vnc console. Please note that in order to use remote-viewer you need to be able to run graphical applications. This means that if you are using ssh you have to supply the -Y flag (enables trusted X11 forwarding). Otherwise you can run the command from a terminal in your preferred desktop environment. If you cannot run graphical applications you can connect to the graphic console from another host or connect to the console using the following command: virsh -c qemu+tls://192.168.1.150/system console HostedEngine If you need to reboot the VM you will need to start it manually using the command: hosted-engine --vm-start You can then set a temporary password using the command: hosted-engine --add-console-password The VM has been started. Install the OS and shut down or reboot it. To continue please make a selection:

1
2
3
      (1) Continue setup - VM installation is complete
      (2) Reboot the VM and restart installation
      (3) Abort setup

需要在另外一个有图形能力的terminal中运行"remote-viewer vnc://192.168.10.101:5900"连接虚拟机并关闭(密码在第123行),如有需要可运行"hosted-engine --add-console-password"更换控制台密码。如果之前选择cdrom进行安装的话,此处可以在gs1上用已经安装好engine的虚拟磁盘进行覆盖,类似"mount -t nfs 192.168.10.101:192.168.10.101:/gluster-vol1/ovirt_data/hosted_data/ /mnt; engine.raw /mnt/ovirt_data/hosted_data/.../vm_UUID"

1
2
      (1, 2, 3)\[1\]: 1
      Waiting for VM to shut down...

[ INFO ] Creating VM You can now connect to the VM with the following command: /usr/bin/remote-viewer vnc://localhost:5900 Use temporary password "2067OGHU" to connect to vnc console. Please note that in order to use remote-viewer you need to be able to run graphical applications. This means that if you are using ssh you have to supply the -Y flag (enables trusted X11 forwarding). Otherwise you can run the command from a terminal in your preferred desktop environment. If you cannot run graphical applications you can connect to the graphic console from another host or connect to the console using the following command: virsh -c qemu+tls://192.168.1.150/system console HostedEngine If you need to reboot the VM you will need to start it manually using the command: hosted-engine --vm-start You can then set a temporary password using the command: hosted-engine --add-console-password Please install and setup the engine in the VM. You may also be interested in installing ovirt-guest-agent-common package in the VM. To continue make a selection from the options below: (1) Continue setup - engine installation is complete (2) Power off and restart the VM (3) Abort setup

此处参考第一次操作,连接虚拟机控制台后进行"engine-setup --offline"以安装engine

1
      (1, 2, 3)\[1\]: 1

[ INFO ] Engine replied: DB Up!Welcome to Health Status! [ INFO ] Waiting for the host to become operational in the engine. This may take several minutes... [ INFO ] Still waiting for VDSM host to become operational... [ INFO ] The VDSM Host is now operational Please shutdown the VM allowing the system to launch it as a monitored service.

到此,需要连接虚拟机控制台关闭虚拟机

1
      The system will wait until the VM is down.

[ INFO ] Enabling and starting HA services Hosted Engine successfully set up [ INFO ] Stage: Clean up [ INFO ] Stage: Pre-termination [ INFO ] Stage: Termination

此时,运行"hosted-engine --vm-start"启动engine。

10. oVirt简介

Welcome to the core!

云计算目前主流实现有SaaS(Software-as-a-service)、PaaS(Platform-as-a-service)和IaaS(Infrastructure-as-a-service)。IaaS和PaaS都算作基础件,SaaS可以与基础件自由组合或者单独使用。

虚拟化技术已经很受重视而且被推到了一个浪尖。如今诸多开源虚拟化平台,比如XenServer、CloudStack、OpenStack、Eucalyptus、oVirt、OpenVZ等,我们都看花了眼,些许慌乱不知哪个适合自己了。

各平台实现方式:全虚拟化,半虚拟化,TBD

我在写这篇文档的时候,只对oVirt略知一二,其他平台(XenServer、OpenStack)稍懂皮毛,再剩下的我就没怎么用过了。那么,只挑最熟悉的来讲吧。

IaaS云计算平台,综合来说具有以下特性:

虚拟化

虚拟化作为云计算平台的核心,是资源利用的主要形式之一。网络、存储、CPU乃至GPU等主要通过虚拟主机进行实体化。

分布式

分布式可利用共享的存储,通过网络将资源进行整合,是实现资源化的必备条件。

高可用

对于规模庞大的云平台,提供管理节点、重要服务的高度可用性是十分必要的。笔者在写这篇文章时,oVirt 3.4已经可以做到管理节点的高度可用。

兼容性

云计算平台众多,各家有各家的特点,同一数据中心部署不同的平台的可能性极大,因此,主要服务(比如虚拟网络、存储、虚机等)要有一定兼容性,比如oVirt可以利用OpenStack的Nouveau提供的虚拟网络、Foreman可以方便地在oVirt上部署新机器等。

另外,也有DeltaCloud、libvirt等API,用户可以利用它们自由地实现自己的云综合管理工具。

资源池化

网络、存储、CPU或者GPU可以综合或者单独划分资源池,通过配额进行分配,从而保证其合理利用。

安全性

现代企业对于安全性的要求已经十分苛刻,除去传统数据加密、访问控制,甚至对于社会工程也要有一定防护能力;用户数据具有对非企业管理员具有防护性能,即使将虚拟机磁盘文件拷贝出来也不能直接获取其内容。

需求导向性

在计算水平上,优质资源最先提供给重要服务;服务水平上,平台具有可定制能力。

oVirt物理层视图

管理独占一台物理机

Normal

高可用管理机

HA

内容预览

第11(6-2)搭建管理引擎; 第12(6-3)搭建高可用管理引擎; 第13(6-4)加入节点,构建一个完整的云平台; 第14(6-5)应用进阶;