跳转至

首页

-1. 为什么我的序号那么奇葩

好的,本文作为未来几十或者上百篇系列文章的第一篇,就不负众望地来个开场白吧:

序号为0的那篇注定作为系列文章(姑且称之为“书”吧)的序言了,但是又不好意思当-0,就-1吧,跟大家随便聊聊。

从07年那会儿,甚至更早,拥有千万用户(包括盗版受害者在内)的行业先锋VMware,又有Google数据中心以及Amazon各种在线服务,这些实打实的东西遵循计算能力的摩尔定律,再顺应日益增长的商业需求,就有了“云”和“大数据”这两个让许多企业再次躁动的概念。

稍微有些行业经验(至少以为是或者看来是)的人觉得这俩只是个噱头;搞大型机的说,嗯,这个,呵呵;搞IDC的觉得一台机器现在当二十台甚至更多卖,不错;搞互联网服务的就有些挠头,咦,这啥?噢,就那玩意儿啊,干嘛起这名?

不管大家都怎么看吧,先引用一句关于“大数据”的经典:

“Big Data is like teenage sex: everyone talks about it, nobody really knows how to do it, everyone thinks everyone else is doing it, so everyone claims they are doing it.”

有时,你我或许都会有迷惘,我这么做(说),对么?

那就这样吧,但行好事,莫问前程

顺便提一下,本“书”对读者的要求是:1.没阅读障碍;2.能提出尽量没有偏见的问题。

Deploy Asterisk on CentOS

Get the latest packages. up to 2014-02-10

rpm -Uvh http://packages.asterisk.org/centos/6/current/x86_64/RPMS/asterisknow-version-3.0.1-2_centos6.noarch.rpm

yum install asterisk asterisk-configs --enablerepo=asterisk-12

yum install dahdi-linux dahdi-tools libpri

chkconfig dahdi on

chkconfig asterisk on

service dahdi start

service asterisk start

You can use freepbx on http://localhost .

yum install freepbx


title: "use MAXS to control your device via ejabberd(plus ssh, jingle voice talk as a bonus)" date: 2014-02-26 categories: - "cloud-infra"


Let's see what we have got here: A xmpp server based on ejabberd on my host: lofyer.org. Windows client: Jitsi(Recommended), Pidgin. (Optional)A Android client: Xabber. MAXS on my Nexus 5 Android phone.

1. Prepare the server(Debian 7)

apt-get install ejabberd

cd /etc/ejabberd/; wget http://people.collabora.com/~robot101/olpc-ejabberd/ejabberd.cfg

Change hosts and admin section to your FQDN. Here's a example:

{hosts, ["lofyer.org"]}. {acl, admin, {user, "mypassword", "lofyer.org"}}.

Then you should restart ejabberd, and maybe a reboot is essential.

/etc/init.d/ejabberd restart

Enable Jingle(voice and video)

You need JingleNodes module on your server.

apt-get install erlang-tools

git clone git://git.process-one.net/exmpp/mainline.git exmpp

cd exmpp; ./configure; make; make install

svn checkout http://jinglenodes.googlecode.com/svn/ jinglenodes

cd jinglenodes; ./configure --prefix=/usr/; make; make install

Add following content to your ejabberd.cfg in the modules section.

{mod_jinglenodes, [ {host, "jinglenodes.@HOST@"}, {public_ip, "192.168.1.148"}, {purge_period, 5000}, {relay_timeout, 60000} ]},

Enable web register(optional)

Add to ejabberd.cfg, 'modules' section the basic configuration:

{modules, [ ... {mod_register_web, []}, ... ]}.

In the 'listen' section enable the web page:

{listen, [ ... {5281, ejabberd_http, [ tls, {certfile, "/etc/ejabberd/ejabberd.pem"}, {request_handlers, [ {["register"], mod_register_web} ]} ]}, ... ]}.

Use your own certificate

openssl req -new -x509 -newkey rsa:1024 -days 3650 -keyout privkey.pem -out server.pem openssl rsa -in privkey.pem -out privkey.pem cat privkey.pem >> server.pem rm privkey.pem

The port numbers you should open are: 5281(http://localhost:5281/register/) 5280(http://localhost:5280/admin) and 5222(for c2s).

Register users:

ejabberdctl register admin lofyer.org mypassword

ejabberdctl register myphone lofyer.org mypassword

ejabberdctl register mypc lofyer.org mypassword

2. Pidgin and MAXS test

Pidgin: [email protected] MAXS: [email protected] By the way, guarantee that there is only one running jabber client on your phone during this period. Pidgin Add a friend pidgin Shell test shell SMS test SMS-SEND And a msg to my GF. sms-receive

title: "foreman/puppet/cfengine/bcfg2/chef howto" date: 2014-02-21 categories: - "linux-admin"


Which one is the best automatic management tool TBD

title: "Gitlab quick deploy" date: 2014-06-08 categories: - "linux-admin"


Well, Gitweb + ssh://git@host is out of date. Even we use it for almost 2 years.

We are migrating our repositories to Gitlab which we benefit from its "issue" a lot.

Please follow this scripts I wrote.

https://raw.githubusercontent.com/lofyer/onekey-deploy/master/gitlab/install.sh

title: "Grafana+InfluxDB+Collectd/Telegraf on RPi2" date: 2017-03-06 categories: - "linux-admin"


Grafana will provide a visual view for the sites, InfluxDB is the data box, and collectd/telegraf is the agent on the server. Here we go.

Install Grafana:

Download deb from https://github.com/fg2it/grafana-on-raspberry

root@raspberrypi:~# rpm -i grafana.deb root@raspberrypi:~# service grafana-server start

Install InfluxDB: Download from https://portal.influxdata.com/downloads

root@raspberrypi:~# tar xf influxdb-1.2.0_linux_armhf.tar.gz root@raspberrypi:~# cp -a influxdb-1.2.0-1/* /

vim /etc/influxdb/influxdb.ini:

[admin] enabled=true

[http] enabled=true

[collectd] enabled=true bind-address=":25826" database="collectd"

Then run "influxdb &" and check it out in http://localhost:8083, add db named "collectd".

Install Collectd:

root@raspberrypi:~# apt-get install collectd

In /etc/collectd/collectd.conf, find :

Then restart collectd service.

Now you can visit http://localhost:3000 to add InfluxDB source and add panel.

title: "Hercules with Jason UI, emulator of IBM mainframe" date: 2017-04-26 categories: - "linux-admin"


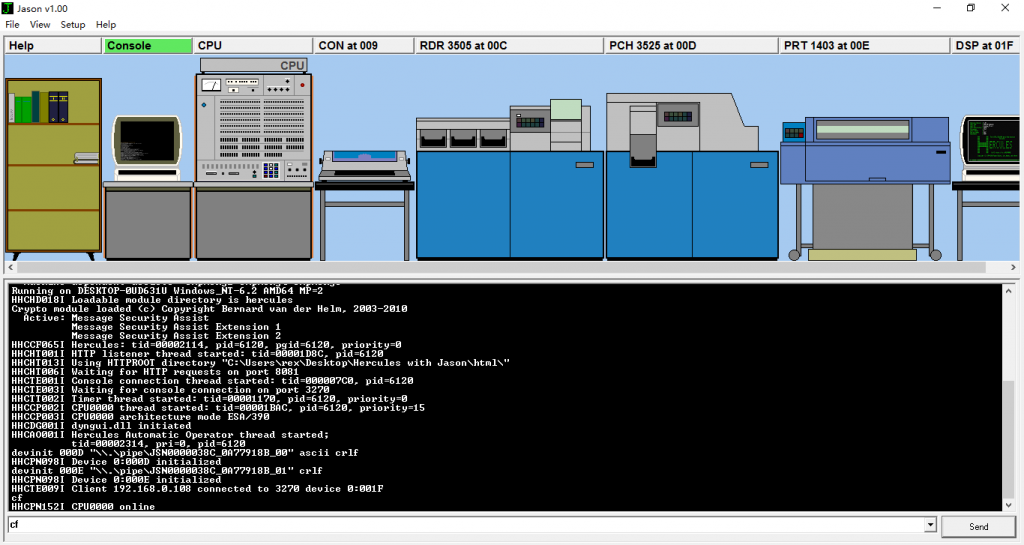
Hercules is an open source software implementation of the mainframe System/370 and ESA/390 architectures, in addition to the new 64-bit z/Architecture. Hercules runs under Linux, Windows (98, NT, 2000, and XP), Solaris, FreeBSD, and Mac OS X (10.3 and later).

Online web interface.(deprecated)

Jason 1.00 is an integrated graphical frontend to the Hercules S/370, ESA/390 and z/Architecture Emulator. What, you haven't heard of Hercules before? It's a masterpiece that emulates IBM mainframes, from old good IBM System/360 and up to the modern z Series... No, it has nothing to do with IBM compatible... No, it can't emulate Xbox 360... Oh, you are asking what a mainframe is? Then probably you don't need Jason.

Download Hercules with Jason.
title: "Heartbeat and drbd test high availability" date: 2014-01-16 categories: - "linux-admin"


Hosts: 192.168.1.101 ha1.lofyer.org, 2 hard drive disks, two ethernet ports 192.168.1.103 ha2.lofyer.org, almost same as ha1

Server host, this is the IP of heartbeat service: 192.168.1.100

Install

The repos you need in centos

[epel] name=Extra Packages for Enterprise Linux 6 - $basearch

baseurl=http://download.fedoraproject.org/pub/epel/6/$basearch

mirrorlist=https://mirrors.fedoraproject.org/metalink?repo=epel-6&arch=$basearch failovermethod=priority enabled=1 gpgcheck=0 gpgkey=file:///etc/pki/rpm-gpg/RPM-GPG-KEY-EPEL-6

[elrepo] name=ELRepo.org Community Enterprise Linux Repository - el6 baseurl=http://elrepo.org/linux/elrepo/el6/$basearch/ mirrorlist=http://elrepo.org/mirrors-elrepo.el6 enabled=1 gpgcheck=0 gpgkey=file:///etc/pki/rpm-gpg/RPM-GPG-KEY-elrepo.org protect=0

yum install drbd84 kmod-drbd84 heartbeat mysql-server

Setup

1. Drbd configuration both hosts

Add following content to file: /etc/hosts

192.168.1.101 ha1.lofyer.org 192.168.1.103 ha2.lofyer.org

Disable selinux and iptables

sed -i 's/enforcing/permissive/' /etc/selinux/config

setenforce 0

chkconfig iptables off

service iptables stop

Prepare the disk partion

fdisk /dev/sdb << EOF

n p 1

w EOF

Configuration for mysql # mkdir db # sed -i 's/datadir=\/var\/lib\/mysql/datadir=\/db/' /etc/my.cnf Configuration for drbd file: /etc/drbd.conf

global { minor-count 64; usage-count yes; } common { syncer { rate 1000M; } } resource ha { protocol C; handlers { pri-on-incon-degr "/usr/lib/drbd/notify-pri-on-incon-degr.sh; /usr/lib/drbd/notify-emergency-reboot.sh; echo b > /proc/sysrq-trigger ; reboot -f"; pri-lost-after-sb "/usr/lib/drbd/notify-pri-lost-after-sb.sh; /usr/lib/drbd/notify-emergency-reboot.sh; echo b > /proc/sysrq-trigger ; reboot -f"; local-io-error "/usr/lib/drbd/notify-local-io-error.sh; /usr/lib/drbd/notify-emergency-shutdown.sh; echo o > /proc/sysrq-trigger ; halt -f"; fence-peer /usr/lib/heartbeat/drbd-peer-outdater -t 5; pri-lost "/usr/lib/drbd/notify-pri-lost.sh; /usr/lib/drbd/notify-emergency-reboot.sh; echo b > /proc/sysrq-trigger ; reboot -f"; split-brain "/usr/lib/drbd/notify-split-brain.sh root"; out-of-sync "/usr/lib/drbd/notify-out-of-sync.sh root"; } startup { wfc-timeout 60; degr-wfc-timeout 120; outdated-wfc-timeout 2; } disk { on-io-error detach; fencing resource-only; } syncer { rate 1000M; } on ha1.lofyer.org { device /dev/drbd0; disk /dev/sdb1; address 192.168.1.101:7788; meta-disk internal; } on ha2.lofyer.org { device /dev/drbd0; disk /dev/sdb1; address 192.168.1.103:7788; meta-disk internal; } }

Chmod for drbd

# chgrp haclient /sbin/drbdsetup # chmod o-x /sbin/drbdsetup # chmod u+s /sbin/drbdsetup # chgrp haclient /sbin/drbdmeta # chmod o-x /sbin/drbdmeta # chmod u+s /sbin/drbdmeta

Resource for drbd

# modprobe drbd # dd if=/dev/zero of=/dev/hdb1 bs=1M count=100 # drbdadm create-md ha # service drbd start # chkconfig drbd on

Watch drbd status

watch -n 1 service drbd status

You can see that both hosts are Secondary/Secondary.

2. Drbd configuration on one of hosts, like ha1

Make ha1 Primary

# drbdadm -- --overwrite-data-of-peer primary ha # service drbd status

Then you should see Primary and wait for both hosts are UpToDate. Initialization for Mysql Make a

mkfs.ext4 /dev/drbd0

mount /dev/drbd0 /db

service mysqld start

Now you should see what you have got in /db, then umount /db, stop mysql-server and make ha1 Secondary.

service mysqld stop

umount /dev/drbd0

drbdadm secondary ha

3. Heartbeat configuration on both hosts

cluster authkey

(echo -ne "auth 1\n1 sha1 "; dd if=/dev/urandom bs=512 count=1 | openssl md5) > /etc/ha.d/authkeys

cat /etc/ha.d/authkeys

auth 1 1 sha1 71461fc5e160d7846c2f4b524f952128

chmod 600 /etc/ha.d/authkeys

scp /etc/ha.d/authkeys node2:/etc/ha.d/

YOU SHOULD MODIFY THE IP IN THE FILE. file: /etc/ha.d/ha.cf

debugfile /var/log/ha-debug logfile /var/log/ha-log logfacility local0 autojoin none ucast eth0 192.168.1.101 ucast eth1 192.168.1.102 ping 192.168.1.100 respawn hacluster /usr/lib64/heartbeat/ipfail respawn hacluster /usr/lib64/heartbeat/dopd apiauth dopd gid=haclient uid=hacluster udpport 694 warntime 5 deadtime 15 initdead 60 keepalive 2 node ha1.lofyer.org node ha2.lofyer.org auto_failback off

The service will be serve on IP 192.168.1.100. file: /etc/ha.d/haresources

mysql.lofyer.org 192.168.1.100 drbddisk::ha Filesystem::/dev/drbd0::/db::ext4 mysql

If you just wanna a virtual ip, use this

hosta.vf.com IPaddr::192.168.0.100/24/eth0:0

Add mysql entry to heartbeat file: /etc/ha.d/resource.d/mysql

!/bin/bash

. /etc/ha.d/shellfuncs case "\(1" in start) res=\`/etc/init.d/mysqld start\` ret=\)? ha_log $res exit \(ret ;; stop) res=\`/etc/init.d/mysqld stop\` ret=\)? ha_log $res exit $ret ;; status) if [[ `ps -ef | grep '[m]ysqld'` > 1 ]]; then echo "running" else echo "stopped" fi ;; *) echo "Usage: mysqld {start|stop|status}" exit 1 ;; esac exit 0

Add excute permission to it.

chmod 755 /etc/ha.d/resource.d/mysql

Add heartbeat service to system

chkconfig --add heartbeat

chkconfig heartbeat on

service heartbeat start

You may need modify order of drbd and heartbeat service. In /etc/init.d/, the number 85 and 15 represent the order number which the script is to be run at start up time and shutdown time. # chkconfig: - 85 15

Test HA


title: "ltsp相关" date: 2013-03-15 categories: - "linux-admin"


参考: https://help.ubuntu.com/community/UbuntuLTSP

安装: apt-get install ltsp-server-standalone

启动要素: nbd-server dhcpd tftp-hpa openssh-server

绑定客户端地址: [dhcpd.conf] host client201 { hardware ethernet 08:00:27:89:70:01; fixed-address 192.168.0.201; } 另外一种是在启动pxe配置文件中指定 http://wiki.phys.ethz.ch/readme/setting_up_an_ltsp_server_for_diskless_clients

session & windows [/usr/share/xsession/*] Exec=/root/.xsession

[/root/.xsession] #!/bin/bash gnome-session & firefox logout

获取session list [/usr/share/ldm/ldminfod] [/etc/X11/xinit/Xsession] [/etc/X11/Xsession] **failsafe [/etc/X11/xdm/Xsession] [/usr/lib/X11/xdm/Xsession] *[/usr/share/xsession]

**default session exported by Xsession.d echo $DEFAULTS_PATH /usr/share/gconf/

修改default session [/var/lib/tftp.../lts.conf] LDM_SESSION="gnome-session &;firefox;logout"

FatClient [/var/lib/tftp.../lts.conf] [default] LDM_DIRECTX=true

[00:A1:08:EB:43:27] LTSP_FATCLIENT=false

AutoLogin [/var/lib/tftp.../lts.conf] [Default] LDM_AUTOLOGIN = True

[192.168.1.101] LDM_USERNAME = user1 LDM_PASSWORD = password1

[192.168.1.102] LDM_USERNAME = user2 LDM_PASSWORD = password2

一些参考配置 [lts.conf] # Global defaults for all clients # if you refer to the local server, just use the # "server" keyword as value # see lts_parameters.txt for valid values ################ [default] X_COLOR_DEPTH=24 LOCALDEV=True SOUND=True USE_LOCAL_SWAP=True NBD_SWAP=False SYSLOG_HOST=server #XKBLAYOUT=de SCREEN_02=shell SCREEN_03=shell SCREEN_04=shell SCREEN_05=shell SCREEN_06=shell SCREEN_07=ldm # LDM_DIRECTX=True allows greater scalability and performance # Turn this off if you want greater security instead. LDM_DIRECTX=True # LDM_SYSLOG=True writes to server's syslog LDM_SYSLOG=True

title: "IPA服务器搭建" date: 2012-11-27 categories: - "linux-admin"


IPASERVER+DNS(DDWRT)+IPACLIENT

SERVER: ipa-server-install时这里可以不要内部dns 注意host以及domain要在dns里有记录 添加用户 ipa user-add 设置密码 ipa passwd demo DNS: 下面是ddwrt的dnsmasq配置 domain=ovirt.engine local=/ovirt.engine/ expand-hosts address=/ovirtmgmt.ovirt.engine/192.168.1.106 ptr-record=106.1.168.192.in-addr.arpa,"ovirtmgmt.ovirt.engine" address=/ipa.ovirt.engine/192.168.1.108 ptr-record=108.1.168.192.in-addr.arpa,"ipa.ovirt.engine" srv-host=_kerberos-master._tcp,ipa.ovirt.engine,88,0,100 srv-host=_kerberos-master._udp,ipa.ovirt.engine,88,0,100 srv-host=_kerberos._tcp,ipa.ovirt.engine,88,0,100 srv-host=_kerberos._udp,ipa.ovirt.engine,88,0,100 srv-host=_kpasswd._tcp,ipa.ovirt.engine,464,0,100 srv-host=_kpasswd._udp,ipa.ovirt.engine,464,0,100 srv-host=_ldap._tcp,ipa.ovirt.engine,389,0,100

IPACLIENT: install时注意域名及主机名正确

OVIRT: 初次使用要在SERVER运行 kinit admin

reinstall出错时: # ipa-server-install --uninstall -U # ls -ld /var/lib/pki-ca If it exists run: # pkiremove -pki_instance_root=/var/lib -pki_instance_name=pki-ca --force # yum reinstall pki-selinux

title: "Intergrate owncloud with AD(LDAP)" date: 2014-04-24 categories: - "linux-admin"


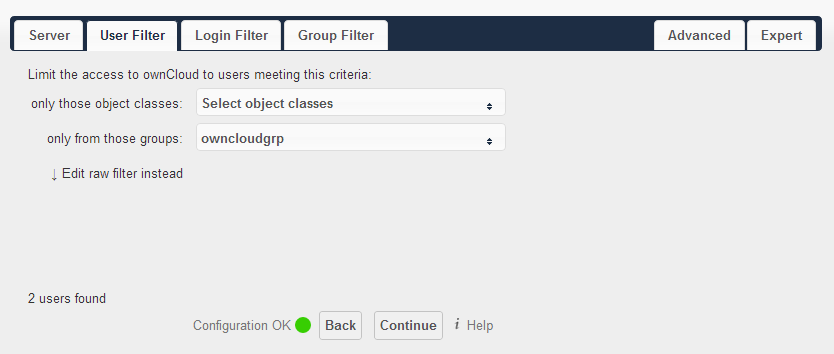
Windows 2008R2 server with AD role built. User group: owncloudgrp User in owncloudgrp: aaa, beta Users must have logon name, first name, last name set.

Configure the owncloud:

Server:

oc1

User Filter:

oc2

Login Filter:

oc3

Group Filter: Every time you change these two sections, wait for a few seconds until more than zero users discovered.
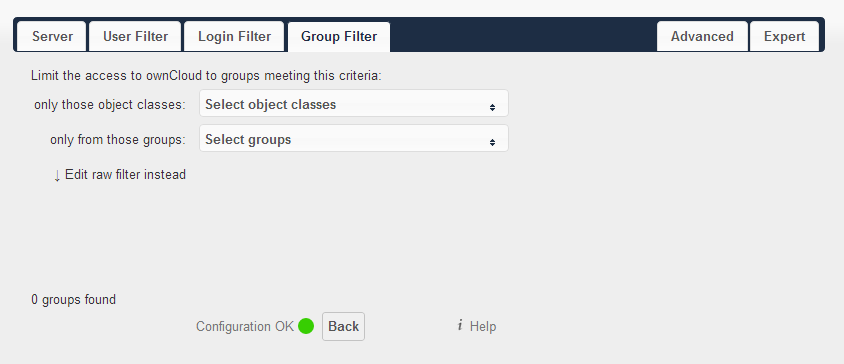
oc4

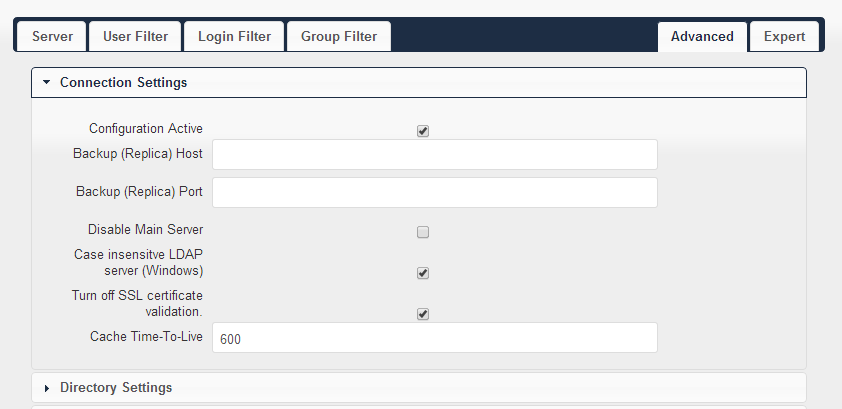
Advanced - Connection Settings:

oc5

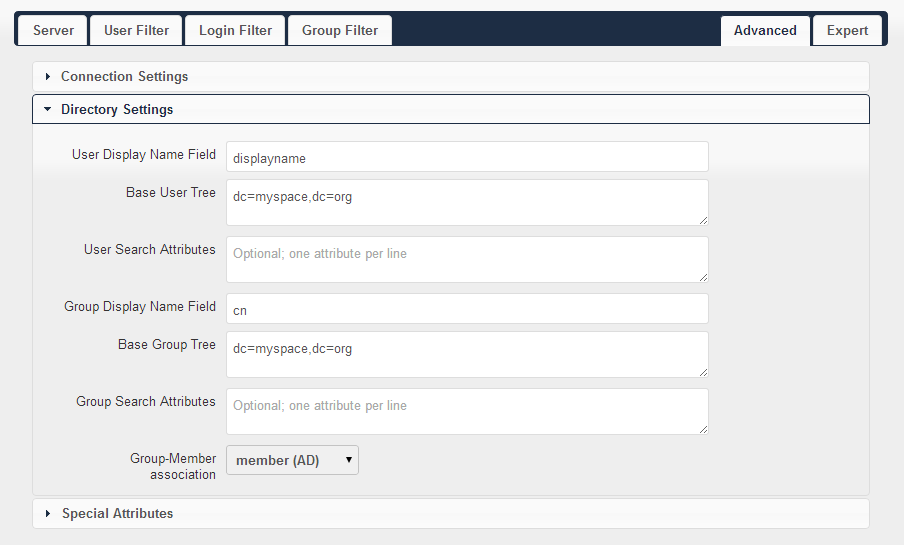
Advanced - Directory Settings:

oc6

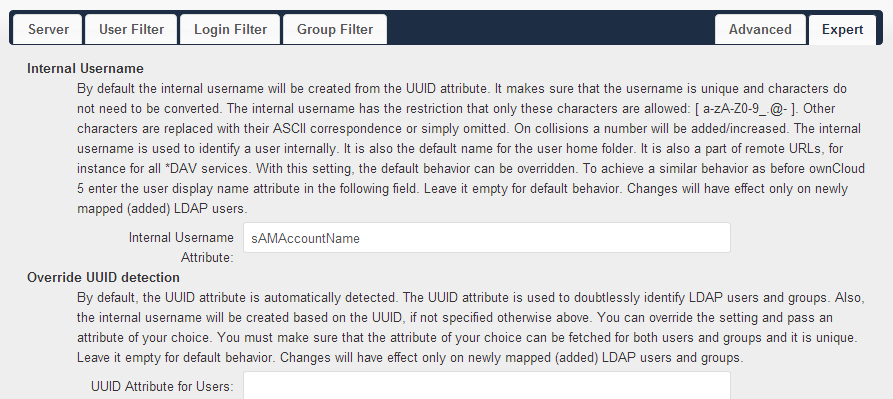
Expert: Add internal username: sAMAccountName
oc7

title: "use Foreman/Nagios/Icinga to make life easy..." date: 2013-09-24 categories: - "linux-admin"


Install nagios in Gentoo/CentOS

Gentoo

emerge nagios

Option: recompile apache for php support

add use flag "apache2" to /etc/portage/make.conf

emerge --ask --changed-use --deep @world

Copy following content to /etc/apache2/vhosts.d/

ScriptAlias /nagios/cgi-bin "/usr/lib64/nagios/cgi-bin"

SSLRequireSSL

1
2
3
4
Options ExecCGI
AllowOverride None
Order allow,deny
Allow from all

Order deny,allow

Deny from all

Allow from 127.0.0.1

1
2
3
4
AuthName "Nagios Access"
AuthType Basic
AuthUserFile /etc/nagios/auth.users
Require valid-user

Alias /nagios "/usr/share/nagios/htdocs"

SSLRequireSSL

1
2
3
4
Options None
AllowOverride None
Order allow,deny
Allow from all

Order deny,allow

Deny from all

Allow from 127.0.0.1

1
2
3
4
AuthName "Nagios Access"
AuthType Basic
AuthUserFile /etc/nagios/auth.users
Require nagiosadmin

Create password for nagiosadmin

htpasswd2 -c /etc/nagios/auth.users nagiosadmin

Add NAGIOS to apache config

/etc/conf.d/apache

APACHE2_OPTS="... -D NAGIOS -D PHP5"

Add user nagios to apache group

usermod -a -G nagios apache

Start service

rc-service nagios restart

rc-service apache2 restart

CentOS

yum install "nagios*"

htpasswd -c /etc/nagios/passwd admin

chkconfig nagios on

chkconfig httpd on

service nagios start

service httpd start

Add routers/hosts, add service, add hooks

Intergrate with oVirt

using Foreman

Install

USE

Intergrate with oVirt

TBD

title: "OAuth2 Guide" date: 2017-07-28 categories: - "linux-admin" - "draft"


这是一篇OAuth2的入门短文,这就开始。

整体可以参考Hydra OAuth2的搭建过程,非常详细,过程就不讲了,直接看图更直观。

建议过程:在host上搭建server以后,创建client、user、callback_url,还能绑定OpenID,多好。

title: "OpenLDAP step by step how-to" date: 2014-04-14 categories: - "linux-admin"


I need an authentication system with compatibility and many extended features(like bio-device). So, I've got AD, IPA and OpenLDAP to choose from. AD comes from MS and it is too "heavy" for the not-very-large system. IPA and OpenLDAP are almost same, but I prefer latter, since it's compatible with oVirt(This why I choose CentOS rather than debian).

The simplest OpenLDAP server

A basic LDAP without any security or additional features.

OpenLDAP with SASL

Add SASL to our LDAP.

OpenLDAP with SAMBA

To add Windows PC to our domain.

OpenLDAP with Kerberos

This is what we want finally. ============================================================

1. The simplest OpenLDAP server

I've got 2 ways to setup an openldap server: 389-ds script and manually configure.

1.1 Using 389-ds script

Here's the original article.

Preparation

Before setup, this configuration should be modified. Add following:

192.168.1.80 ldap.lofyer.org

Add following:

net.ipv4.tcp_keepalive_time = 30 net.ipv4.ip_local_port_range = 1024 65000 fs.file-max = 64000

Add following:

* soft nofile 8192 * hard nofile 8192

Add following:

session required /lib/security/pam_limits.so

Then reboot the machine to make above configurations work.

Setup 389-ds

useradd ldapadmin

passwd ldapadmin

yum install -y 389-ds openldap-clients

setup-ds-admin.pl

Then you'll see some questions like this(sorry for the high-lighting...):

============================================================================== This program will set up the 389 Directory and Administration Servers.

It is recommended that you have "root" privilege to set up the software. Tips for using this program: - Press "Enter" to choose the default and go to the next screen - Type "Control-B" then "Enter" to go back to the previous screen - Type "Control-C" to cancel the setup program

Would you like to continue with set up? [yes]: ## Press Enter ##

============================================================================== Your system has been scanned for potential problems, missing patches, etc. The following output is a report of the items found that need to be addressed before running this software in a production environment.

389 Directory Server system tuning analysis version 23-FEBRUARY-2012.

NOTICE : System is i686-unknown-linux2.6.32-431.el6.i686 (1 processor).

WARNING: 622MB of physical memory is available on the system. 1024MB is recommended for best performance on large production system.

WARNING : The warning messages above should be reviewed before proceeding.

Would you like to continue? [no]: yes ## Type Yes and Press Enter ##

============================================================================== Choose a setup type: 1. Express Allows you to quickly set up the servers using the most common options and pre-defined defaults. Useful for quick evaluation of the products. 2. Typical Allows you to specify common defaults and options. 3. Custom Allows you to specify more advanced options. This is recommended for experienced server administrators only. To accept the default shown in brackets, press the Enter key.

Choose a setup type [2]: ## Press Enter ##

============================================================================== Enter the fully qualified domain name of the computer on which you're setting up server software. Using the form . Example: eros.example.com.

To accept the default shown in brackets, press the Enter key.

Warning: This step may take a few minutes if your DNS servers can not be reached or if DNS is not configured correctly. If you would rather not wait, hit Ctrl-C and run this program again with the following command line option to specify the hostname:

1
General.FullMachineName=your.hostname.domain.name

Computer name [ldap.lofyer.org]: ## Press Enter ##

============================================================================== he servers must run as a specific user in a specific group. It is strongly recommended that this user should have no privileges on the computer (i.e. a non-root user). The setup procedure will give this user/group some permissions in specific paths/files to perform server-specific operations.

If you have not yet created a user and group for the servers, create this user and group using your native operating system utilities.

System User [nobody]: ldapadmin ## Enter LDAP user name created above # System Group [nobody]: ldapadmin

============================================================================== Server information is stored in the configuration directory server. This information is used by the console and administration server to configure and manage your servers. If you have already set up a configuration directory server, you should register any servers you set up or create with the configuration server. To do so, the following information about the configuration server is required: the fully qualified host name of the form .(e.g. hostname.example.com), the port number (default 389), the suffix, the DN and password of a user having permission to write the configuration information, usually the configuration directory administrator, and if you are using security (TLS/SSL). If you are using TLS/SSL, specify the TLS/SSL (LDAPS) port number (default 636) instead of the regular LDAP port number, and provide the CA certificate (in PEM/ASCII format).

If you do not yet have a configuration directory server, enter 'No' to be prompted to set up one. Do you want to register this software with an existing configuration directory server? [no]: ## Press Enter ##

============================================================================== Please enter the administrator ID for the configuration directory server. This is the ID typically used to log in to the console. You will also be prompted for the password. Configuration directory server administrator ID [admin]: ## Press Enter ## Password: ## create password ## Password (confirm): ## re-type password ##

============================================================================== The information stored in the configuration directory server can be separated into different Administration Domains. If you are managing multiple software releases at the same time, or managing information about multiple domains, you may use the Administration Domain to keep them separate.

If you are not using administrative domains, press Enter to select the default. Otherwise, enter some descriptive, unique name for the administration domain, such as the name of the organization responsible for managing the domain.

Administration Domain [lofyer.org]: ## Press Enter ##

============================================================================== The standard directory server network port number is 389. However, if you are not logged as the superuser, or port 389 is in use, the default value will be a random unused port number greater than 1024. If you want to use port 389, make sure that you are logged in as the superuser, that port 389 is not in use. Directory server network port [389]: ## Press Enter ##

============================================================================== Each instance of a directory server requires a unique identifier. This identifier is used to name the various instance specific files and directories in the file system, as well as for other uses as a server instance identifier.

Directory server identifier [server]: ## Press Enter ##

============================================================================== The suffix is the root of your directory tree. The suffix must be a valid DN. It is recommended that you use the dc=domaincomponent suffix convention. For example, if your domain is example.com, you should use dc=example,dc=com for your suffix. Setup will create this initial suffix for you, but you may have more than one suffix. Use the directory server utilities to create additional suffixes.

Suffix [dc=lofyer, dc=org]: ## Press Enter ##

=============================================================================

Certain directory server operations require an administrative user. This user is referred to as the Directory Manager and typically has a bind Distinguished Name (DN) of cn=Directory Manager. You will also be prompted for the password for this user. The password must be at least 8 characters long, and contain no spaces. Press Control-B or type the word "back", then Enter to back up and start over. Directory Manager DN [cn=Directory Manager]: ## Press Enter ## Password: ## Enter the password ## Password (confirm):

============================================================================== The Administration Server is separate from any of your web or application servers since it listens to a different port and access to it is restricted.

Pick a port number between 1024 and 65535 to run your Administration Server on. You should NOT use a port number which you plan to run a web or application server on, rather, select a number which you will remember and which will not be used for anything else. Administration port [9830]: ## Press Enter ##

============================================================================== The interactive phase is complete. The script will now set up your servers. Enter No or go Back if you want to change something.

Are you ready to set up your servers? [yes]: ## Press Enter ## Creating directory server . . . Your new DS instance 'server' was successfully created. Creating the configuration directory server . . . Beginning Admin Server creation . . . Creating Admin Server files and directories . . . Updating adm.conf . . . Updating admpw . . . Registering admin server with the configuration directory server . . . Updating adm.conf with information from configuration directory server . . . Updating the configuration for the httpd engine . . . Starting admin server . . . output: Starting dirsrv-admin: output: [ OK ] The admin server was successfully started. Admin server was successfully created, configured, and started. Exiting . . . Log file is '/tmp/setupo1AlDy.log'

Then make these two services start on startup.

chkconfig dirsrv on

chkconfig dirsrv-admin on

With 389-ds scripts, you could use 389-console, please refer to the link above.

1.2 Manually configure

Here's the original article.

Install the packages

yum install openldap{,-clients,-servers}

Change the configuration

/etc/openldap/slapd.d/cn\=config.ldif Delete olcAllows: bind_v2 if you want only v3. Modify olcIdleTimeout from 0 to 30 if you want close the idle connection for more than 30 seconds.

Before next step, run this command to generate a SHA encrypted password.

slappasswd

New password: Re-enter new password: {SSHA}aW7TYJ3faz13RKsnr3uiCsbgi55RKhW9

Then copy the output to your clipboard.

/etc/openldap/slapd.d/cn\=config/olcDatabase\=\{2\}bdb.ldif Modify olcSuffix, RootDN, olcRootPW to this:

... olcSuffix: dc=lofyer, dc=org olcRootPW: {SSHA}aW7TYJ3faz13RKsnr3uiCsbgi55RKhW9 RootDN: cn=admin, dc=lofyer, dc=org ...

Start service

service slapd start

chkconfig slpad on

Add rootdn and groups

dn: dc=lofyer,dc=org objectclass: dcObject objectclass: organization o: Lofyer Org dc: lofyer

dn: ou=People,dc=lofyer,dc=org objectClass: organizationalUnit objectClass: top ou: People

dn: ou=Groups,dc=lofyer,dc=org objectClass: organizationalUnit objectClass: top

ou: Groups dn: cn=admin,dc=lofyer,dc=org objectclass: organizationalRole cn: admin

Import the ldif:

ldapadd -x -D "cn=admin,dc=lofyer,dc=org" -W -f /etc/openldap/schema/lofyer.org.ldif

ldapsearch -x -b 'dc=lofyer,dc=org' '(objectclass=*)'

Create a user

Add following content to user.ldif

dn: uid=demo,ou=People,dc=lofyer,dc=org objectclass: top objectclass: person objectclass: inetOrgPerson objectclass: organizationalPerson uid: demo cn: demo sn: demo givenName: demo

Provide a password:

ldapadd -x -W -D "cn=admin,dc=lofyer,dc=org" -f user.ldif

New password: Re-enter new password: Enter LDAP Password:

Add or delete a member from group(myteam)

Add: dn: cn=myteam,ou=Groups,dc=lofyer,dc=org changetype: modify add: member member: uid=user1,ou=People,dc=lofyer,dc=org

ldapmodify -x -D "cn=admin,dc=lofyer,dc=org" -W -f add.ldif

Delete:

dn: cn=myteam,ou=Groups,dc=lofyer,dc=org changetype: modify delete: member member: uid=user1,ou=People,dc=lofyer,dc=org

ldapmodify -x -D "cn=admin,dc=lofyer,dc=org" -W -f delete.ldif

Use TSL

Here's the original article.

(NOT NECESSARY)Generate CA

Follow this script.

!/bin/bash

Change to the directory and clear out the old certs

cd /etc/openldap/certs rm -rf *

This echo statement is actually putting the word “password” (without the quotes) in a temporary password file to help

automate the process. This will be the password for your certificate. Change this as appropriate

echo "mypassword" > /etc/openldap/certs/password export PATH=/usr/bin/:$PATH echo falkdjfdajkasdndwndoqndwapqmhfaksj >> noise.txt

Associate the password with the certificates which will be generated in the current directory

certutil -N -d . -f /etc/openldap/certs/password certutil -G -d . -z noise.txt -f /etc/openldap/certs/password

Generate a CA certificate for the 389 server

certutil -S -n "CA certificate" -s "cn=CACert" -x -t "CT,," -m 1000 -v 120 -d . -z /etc/openldap/certs/noise.txt -f /etc/openldap/certs/password

anwsers are Y, , Y

This builds the server cert

certutil -S -n "OpenLDAP Server" -s "cn=ldap.lofyer.org" -c "CA certificate" -t "u,u,u" -m 1001 -v 120 -d . -z /etc/openldap/certs/noise.txt -f /etc/openldap/certs/password

This exports the cacert in case you need it

pk12util -d . -o cacert.p12 -n "CA certificate"

This exports the server-cert which you will need on the windows AD

pk12util -d . -o servercert.p12 -n "OpenLDAP Server"

This exports the CA cert for ldap clients

certutil -L -d . -n "CA certificate" -a > /etc/openldap/certs/cacert.pem

Make the files in here readable

chmod 644 *

Set the system to use LDAPS

sed -i 's/SLAPD_LDAPS=no/SLAPD_LDAPS=yes/g' /etc/sysconfig/ldap

Add a firewall exception in case the user has not configured their firewall properly

iptables -I INPUT -m state --state NEW -p tcp --dport 636 -j ACCEPT

/etc/init.d/iptables save

Restart slapd to make the changes take effect

/etc/init.d/slapd restart

I think you should notice that the private key password is "mypassword". Then you will get three files: cacert.p12, cacert.pem, servercert.p12. And, that's all.

2. Add SASL to OpenLDAP

OKay, we'll add SASL to our ldap connections.

Install cyrus-sasl package.

yum install cyrus-sasl-gssapi

yum install cyrus-sasl-ldap


title: "owncloud webdav intergration" date: 2013-01-03 categories: - "linux-admin"


安装好owncloud后,可以使用webdav协议进行远程挂载,比如

mount -t davfs {http://localhost/remote.php/webdav,http://localhost/files/webdav.php} /mnt

2003上需启动webclient服务 而在2008上, webclient被集成到desktop experience组件中, 从service manager->feature中添加desktop experience,并且修改注册表HKEY_LOCAL_MACHINE->SYSTEM->CurrentControlSet->Services->WebClient->Parameters->BasicAuthLevel 的值为 2,重启服务 此时可映射网络驱动器,钩选“connect using different credentials”,输入其用户名密码即可 或者命令行

NET USE * http://localhost/remote.php/webdav 123456 /user:admin

PS: 1. owncloud第三方app WebDev安装后会造成不能添加用户的麻烦 2. 修改owncloud目录权限为apache.apache或者www-data.www-data以使.htaccesss生效

title: "Using X server in Windows Linux Subsystem" date: 2016-10-09 categories: - "linux-admin"


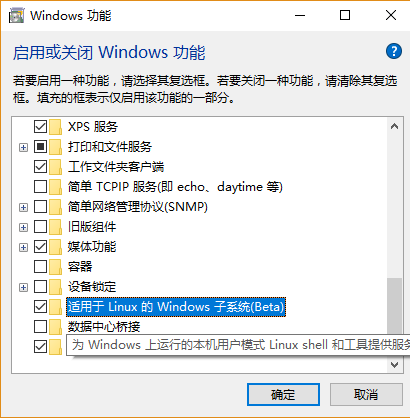
1. Turn on "Developer Mode" in Control panel. developer-mode sss

2. Run "bash" bash

3. Install Xming(Xserver for Windows) Download

4. Launch your app

export DISPLAY=:0

firefox

launch

5. You can create a link on your desktop like this aaa

and ~/.bashrc

alias home='cd /mnt/c/Users/rex/Desktop' home export DISPLAY=:0

Tips:

Use "powershell bash" instead of "bash", you can access your service in this way.

title: "Configure corosync and pacemaker" date: 2015-02-28 categories: - "linux-admin"


Env: node1 eth0 192.168.0.201 node2 eth0 192.168.0.202

1. Install essential packages

Add following content to /etc/yum.repos.d/ha.repo, since you will need crmsh later:

[haclustering] name=HA Clustering baseurl=http://download.opensuse.org/repositories/network:/ha-clustering:/Stable/CentOS_CentOS-6/ enabled=1 gpgcheck=0

Install packages:

yum install pacemaker corosync crmsh -y

2. Configure corosync

Using configuration files below if you need broadcast:

service { # Load the Pacemaker Cluster Resource Manager ver: 0 name: pacemaker use_mgmtd: no use_logd: no }

totem { version: 2 secauth: off interface { member { memberaddr: 192.168.0.201 } member { memberaddr: 192.168.0.202 } ringnumber: 0 bindnetaddr: 192.168.0.0 mcastport: 5405 ttl: 1 } transport: udpu }

logging { fileline: off to_logfile: yes to_syslog: yes logfile: /var/log/cluster/corosync.log debug: off timestamp: on logger_subsys { subsys: AMF debug: off } }

Here's a sample using multicast:

service { # Load the Pacemaker Cluster Resource Manager ver: 0 name: pacemaker use_mgmtd: no use_logd: no }

totem { version: 2

 1
 2
 3
 4
 5
 6
 7
 8
 9
10
11
12
13
14
15
16
17
    # secauth: Enable mutual node authentication. If you choose to
    # enable this ("on"), then do remember to create a shared
    # secret with "corosync-keygen".
    secauth: off

    threads: 0

    # interface: define at least one interface to communicate
    # over. If you define more than one interface stanza, you must
    # also set rrp\_mode.
    interface {
            ringnumber: 0
            bindnetaddr: 192.168.1.0
            mcastaddr: 239.255.1.1
            mcastport: 5405
            ttl: 1
    }

}

logging { fileline: off to_stderr: no to_logfile: yes logfile: /var/log/cluster/corosync.log to_syslog: yes debug: off timestamp: on logger_subsys { subsys: AMF debug: off } }

Note that if the ver in the service section of pacemaker is 0, pacemaker will be loaded automatically, or else you will start the pacemaker service manually.

Copy this configuration file to the other host and start the service:

scp /etc/corosync/corosync.conf [email protected]:/etc/corosync/corosync.conf

On 192.168.0.201:

chkconfig corosync on

service corosync start

On 192.168.0.202:

chkconfig corosync on

service corosync start

3. Configure corosync using crmsh

Add virtual IP to your cluster:

crm configure

crm(live)configure# primitive vip1 ocf💓IPaddr2 params ip=192.168.0.209 cidr_netmask=24 op monitor interval=10s crm(live)configure# property stonith-enabled=false # To prevent split-brain crm(live)configure# property no-quorum-policy=stop # To prevent split-brain crm(live)configure# commit

Test:

crm(live)configure# migrate vip1 crm(live)configure# unmigrate vip1

You will see 192.168.0.209 migrating between these two nodes.

title: "Deploy Skype for Business Server 2015" date: 2015-08-12 categories: - "cloud-infra"


Server Preparation

ad(ad.virtfan.com): Windows Server 2012 R2 lync(lync.virtfan.com): Windows Server 2012 R2 Following instruction is for LAN.

Ref: https://technet.microsoft.com/en-us/library/dn933900.aspx Install lync 2013 server in win2008r2

Procedure

1. After a fresh installation of Windows Server 2012 R2, we will update it to latest. 2. We need create an AD DS with AD CS in ad.virtfan.com. So that we can retrieve CA to complete our deployment. 3. Then we start setting up Skype Server in lync.virtfan.com(in domain virtfan.com). 4. Set up DNS, add more users, use lync to communicate.

AD Preparation

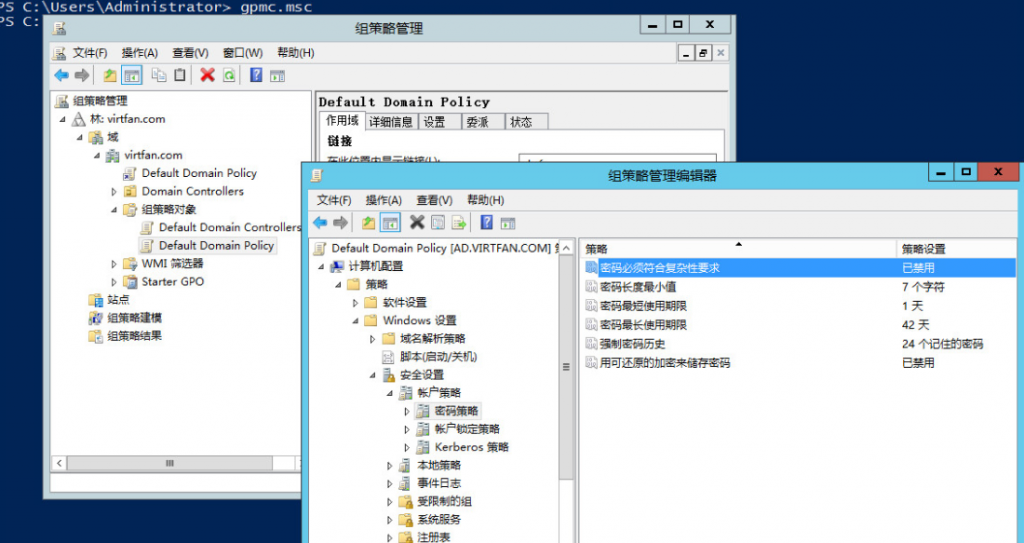
Following steps are in ad.virtfan.com. 1. Assign a static IP. Change computer name to ad. 屏幕快照 2015-08-13 上午11.42.27 2. Add Active Directory Domain Service and DNS Roles. Create a new forest(virtfan.com) with level Windows 2008 R2. 屏幕快照 2015-08-13 上午11.59.27 3. Add Active Directory Certificate Service Role with all the six features checked. 屏幕快照 2015-08-13 下午12.07.28 4. (Optional)Run gpmc.msc, right click on the Default Domain Policy to edit. Change Password Complexity to False. Run gpupdate /force to update the group policy. 屏幕快照 2015-08-13 下午12.15.33
Skype Server Preparation

Following steps are in lync.virtfan.com. Make sure you have got more than 32GB space in C:. 1. Assign a static IP, change name to lync and join domain virtfan.com. Add following features: .Net Framework 3.5, .Net Framework 4.5 -> WCF Services -> HTTP Activation, Media Foundation, Remote Server Administration Tools -> Role Administration Tools -> AD DS and AD LDS Tools -> Windows Identity Foundation 3.5 2. Add IIS Role with following features: 静态内容、默认文档、HTTP 错误、ASP.NET、.NET 扩展性、Internet 服务器 API (ISAPI)扩展、ISAPI 筛选器、HTTP 日志记录、日志记录工具、跟踪、客户端证书映射身份验证、Windows 身份验证、请求筛选、静态内容压缩、动态内容压缩、IIS 管理控制台、IIS 管理脚本和工具 3. Logon as VIRTFAN\Administrator and add feature .Net3.5. 4. Install KB2982006. 5. Mount Skype Business 2015 ISO and run Setup to install.

Setting up Skype Server

Following steps are in lync.virtfan.com and logon as VIRTFAN\Administrator and add feature .Net3.5. 1. Create a directory in C:\share, make it sharable and writable. 2. Run Skype for Business Server 部署向导(Deploy Wizard) from Start menu. 屏幕快照 2015-08-13 下午1.47.56 3. Then we will are going to follow the steps in Prepare Active Directory. 屏幕快照 2015-08-13 下午1.51.16 4. Click Prepare the first Standard Edition Server. It will create database. 5. Install management utilities. 6. Run Skype for Business Server topology generator from Start menu to generate a topology. 屏幕快照 2015-08-13 下午2.31.16 7. Create a new topology like this: 屏幕快照 2015-08-13 下午2.37.53 屏幕快照 2015-08-13 下午2.38.07 屏幕快照 2015-08-13 下午2.39.23 屏幕快照 2015-08-13 下午2.40.04 屏幕快照 2015-08-13 下午2.40.47 屏幕快照 2015-08-13 下午2.41.15 屏幕快照 2015-08-13 下午2.41.44 屏幕快照 2015-08-13 下午2.42.14 屏幕快照 2015-08-13 下午2.42.49 屏幕快照 2015-08-13 下午2.43.32 屏幕快照 2015-08-13 下午2.43.58 屏幕快照 2015-08-13 下午2.44.27 Click Finish and right click on the Skype for Business Server to edit property. Fill in the admin url like: https://admin.virtfan.com Select a fronted server as central server. 屏幕快照 2015-08-13 下午2.46.44 8. Publish topology. 9. Click Install or update Skype for Business Server System. And follow its guide. 屏幕快照 2015-08-13 下午2.52.18 10. When you are in Step.3(Assign Certificate). Click Request to request certificate from ad.virtfan.com. 屏幕快照 2015-08-13 下午2.53.49 屏幕快照 2015-08-13 下午2.54.39 屏幕快照 2015-08-13 下午2.54.39 11. Run start-cspool from cmd to start the server. Warning is OK, error is not OK. 12. Define your DNS and port-forwarding(443) so that we can use Skype from WAN.

https://meet.virtfan.com -> lync.virtfan.com's IP https://lync.virtfan.com -> lync.virtfan.com's IP https://dialin.virtfan.com -> lync.virtfan.com's IP https://admin.virtfan.com -> lync.virtfan.com's IP (optional)https://ad.virtfan.com -> ad.virtfan.com's IP

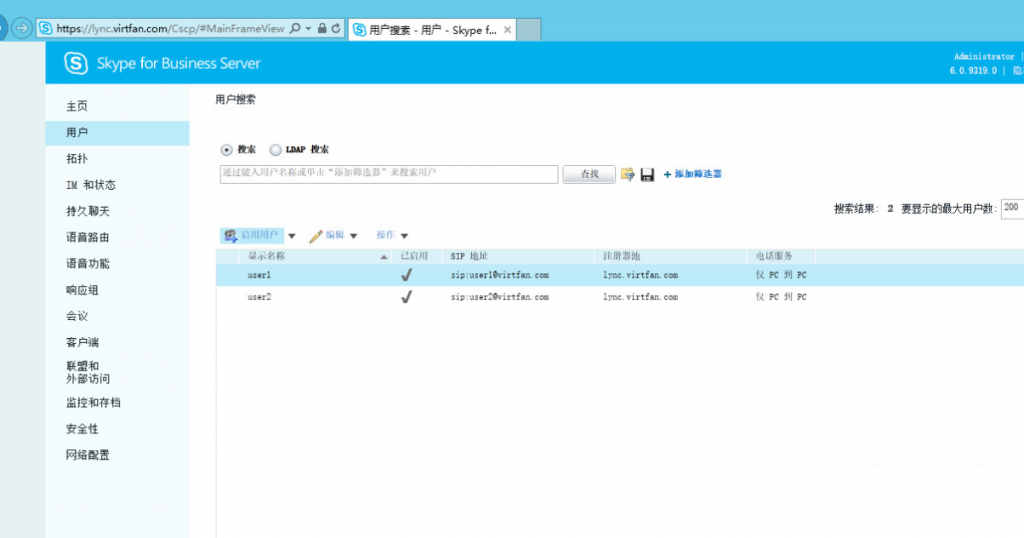
13. Add domain users and assign users via https://admin.virtfan.com. 屏幕快照 2015-08-13 下午3.10.58
Lync/Skype Client

1. Install Lync/Skype within Microsoft Office 2013 or Office365. 2. Download and install CA from https://ad.virtfan.com/certsrv/ or you can put it somewhere else. 3. Configure your client like this: lync 4. Click Logon.

Here you go!

WAN

If you are using servers behind a firewall or a router, you should add something like this. 1. On your DNS provider, set these 6 A records lync/admin/dialin/meet/lyncdiscover/lyncdiscoverinternal.virtfan.com to your WAN IP. 2. Port forward from 443,5601 to lync server LAN IP. (Alternative)2. If you are using Apache virtualhost, you'll need export certificate and its private key of lync.virtfan.com to the Apache server with jailbreak and configure all 6 domain names like this:

vi /apache/conf.d/ssl.conf

... ServerName skype.virtfan.com SSLEngine on SSLProxyEngine on SSLCertificateFile /etc/httpd/conf.d/lync-ca/lync.virtfan.com.cer SSLCertificateKeyFile /etc/httpd/conf.d/lync-ca/lync.virtfan.com.key ProxyRequests Off ProxyPass / https://skype.virtfan.com/ ProxyPassReverse / https://skype.virtfan.com/ ...

vi /etc/httpd/conf.d/vproxy.conf

ServerName lyncdiscover.virtfan.com ProxyRequests Off ProxyPass / http://lyncdiscover.virtfan.com/ ProxyPassReverse / http://lyncdiscover.virtfan.com/

ServerName lyncdiscoverinternal.virtfan.com ProxyRequests Off ProxyPass / http://lyncdiscoverinternal.virtfan.com/ ProxyPassReverse / http://lyncdiscoverinternal.virtfan.com/

vi /etc/hosts

... 192.168.122.222 admin.virtfan.com 192.168.122.222 lync.virtfan.com 192.168.122.222 dialin.virtfan.com 192.168.122.222 skype.virtfan.com 192.168.122.222 meet.virtfan.com 192.168.122.222 lyncdiscover.virtfan.com 192.168.122.222 lyncdiscoverinternal.virtfan.com ...

And configure iptables:

iptables -t nat -A PREROUTING -p tcp --dport 5061 -j DNAT --to-destination 192.168.122.222:5061

3. DO NOT ADD "Internal Server" in your lync client, "External Server" will be enough.

2013-2014

今年已经24岁了,从一个普通人生的轨迹来看,这些年应该还能接受。 2013年,成长了些,在这要感谢敖总辛苦栽培。 关于互联网行业,应该是爆发的节奏的才对,要厚积。 关于科技行业,小米这类公司看的很准,下手也是外科手术式的准。 KP我觉得还是随身带着吧,手机少看些,因为形势至少还在意料内,每天耽误时间从中间甄别出可用信息的机会成本至少就目前来说有些高,不如直接获取知识来的实在。

那么就2014,就列出来一些清单吧。 1. 在新年期间把MyIDC建设以及对应手册完成。 2. 掌握CLisp的常用特性。 3. 学习一些WPF编程。 4. 掌握法语基本语法,基本句式。 5. 入门无线电,考取A类执照。 6. 保持每天的锻炼。 7. 以上计划随工作重点可能有变。

QEMU相关

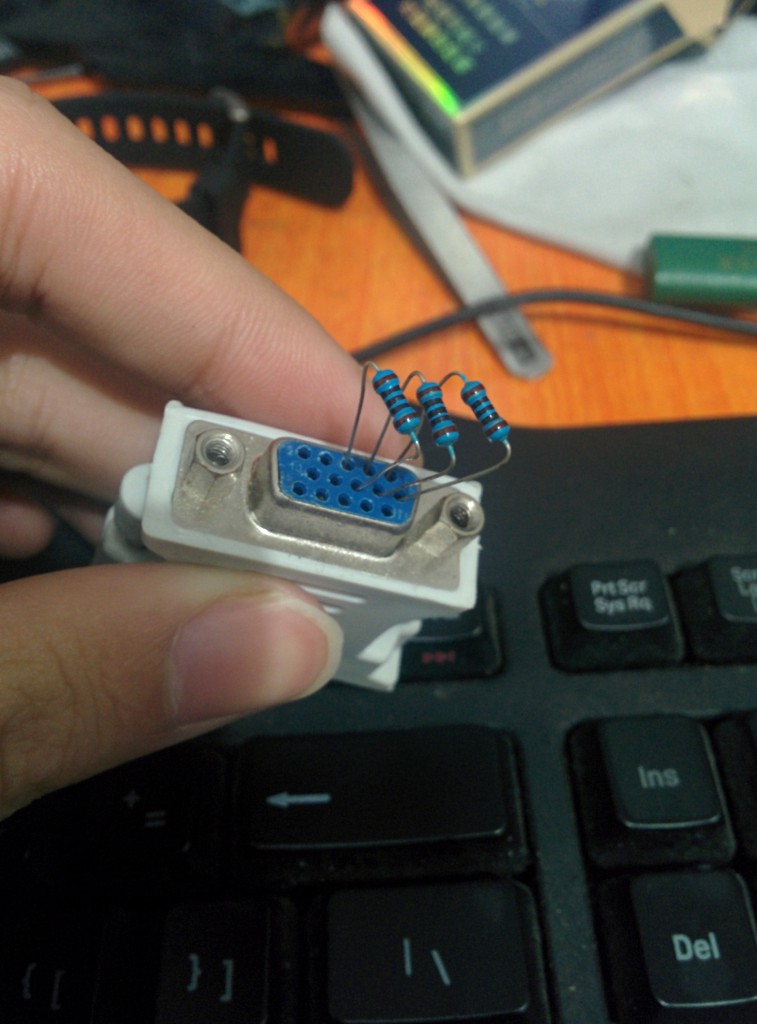
创建一个“虚拟”显示适配器,适用于那些“你知道你想干什么并且在干什么”的人。 原文参考 http://www.geeks3d.com/20091230/vga-hack-how-to-make-a-vga-dummy-plug/ http://blog.zorinaq.com/?e=11

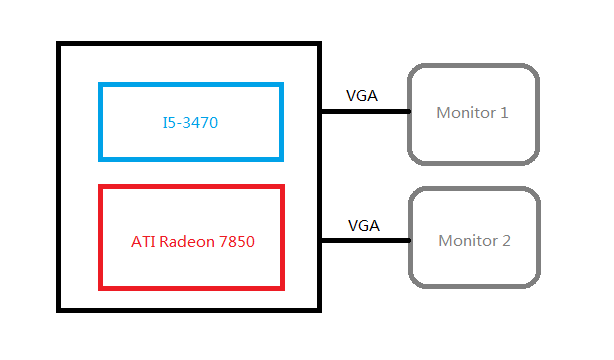
手头有两块ATI显卡,而且都有这个DVI-I接口,并且目前我的状况是两个显示器都接到了两个主板显示(集显)接口。 sldldvi 原文说需要一个75欧姆的电阻,我手里暂时只有100欧姆的,而且不多,如果强烈按照原作者的意思的话效果可能会有所不同,参考现有任意款VGA控制器原理。 [连接示意图] 来自第一个链接 vga_dummy_electronic_schema [效果图] 请无视我的背景,如果有人好奇的话,那是上篇文章的eZ430以及一包十块白沙。 QQ图片20131220001003 [结果] QQ截图20131220001602

看见第3个显示器没? 就是它了,你可以拿它做很多事,比如你有多块显卡,并且你想充分利用其性能,参考lucid mvp,效果上类似吧。--- title: "Gpu Passthrough in Xen" date: 2013-07-22 categories: - "cloud-infra"


Considering that Xen's gpu passthrough is about one year ahead of kvm, so let us try that. The process is something like kvm one as I wrote before. KVM GPU-Passthrough, VGA-Passthrough

Result: I failed in trying passthrough the graphic card to Win7 or XP. Now I'm try some patchs and re-compile Xen with my graphic card bios.bin.

HOST: CPU: i5-3470 GPU: ATI Radeon HD 7850 OS: openSuse 12.3 KDE

0. Disable Radeon Driver

echo "blacklist radeon" >> /etc/modprobe.d/modprobe.conf

mkinitrd

1. Install Xen-utils

Install Xen and its utilities via Yast.

2. Modify grub.cfg

... echo 'Loading Xen 4.3.0_06-1.3 ...' multiboot /xen-4.3.0_06-1.3.gz placeholder iommu=1 echo 'Loading Linux 3.10.1-3.g0cd5432-xen ...' module /vmlinuz-3.10.1-3.g0cd5432-xen placeholder root=UUID=da6ac064-2a5e-48c7-8834-307cbcb551c3 ro resume=/dev/disk/by-id/ata-ST500DM002-1BD142_Z3THR3V3-part3 splash=silent quiet showopts xen-pciback.hide=(00:00.0)(01:00.1) echo 'Loading initial ramdisk ...' module /initrd-3.10.1-3.g0cd5432-xen ...

Then reboot the host.

3. Bind the device

Using Scripts

File: bind_lib.sh

#!/bin/bash # # License: GPLv2 # Author: Peter Maloney # # Script to bind devices to pciback (or pci-stub)

find_new_id() { device="\(1" len=\) if [ "\(len" -eq 12 \]; then device="\)" fi lspci -n | grep "${device}" | cut -d' ' -f3 | sed -r "s/:/ /" }

bindstub() { device="$1" echo "binddevice $device"

 1
 2
 3
 4
 5
 6
 7
 8
 9
10
11
12
13
14
15
16
17
18
19
20
21
22
23
24
25
26
27
28
   if \[ ! -e "/sys/bus/pci/devices/$device" \]; then
       echo "    ERROR: Device does not exist... cancelling"
       return
   fi

   # with pci-stub, you do new\_id, then unbind, then bind

   echo "create new\_id"
   chmod +w /sys/bus/pci/drivers/pci-stub/new\_id
   new\_id="$(find\_new\_id "$device")"
   echo "    echo \\"$new\_id\\" > /sys/bus/pci/drivers/pci-stub/new\_id"
   echo "$new\_id" > /sys/bus/pci/drivers/pci-stub/new\_id

   echo "unbind"
   if \[ ! -e "/sys/bus/pci/devices/$device/driver" \]; then
       echo "    no driver to unbind"
   else
       chmod +w "/sys/bus/pci/devices/${device}/driver/unbind"
       echo "    echo -n \\"$device\\" > \\"/sys/bus/pci/devices/$device/driver/unbind\\""
       echo -n "$device" > "/sys/bus/pci/devices/$device/driver/unbind"
   fi

   echo "bind"
   chmod +w /sys/bus/pci/drivers/pci-stub/bind
   echo "    echo -n \\"$device\\" > /sys/bus/pci/drivers/pci-stub/bind"
   echo -n "$device" > /sys/bus/pci/drivers/pci-stub/bind

   echo

}

bindback() { device="$1" echo "binddevice $device"

 1
 2
 3
 4
 5
 6
 7
 8
 9
10
11
12
13
14
15
16
17
18
19
20
21
22
23
24
25
26
27
   if \[ ! -e "/sys/bus/pci/devices/$device" \]; then
       echo "ERROR: Device does not exist... cancelling"
       return
   fi

   # with pciback, you do unbind, then new\_slot, then bind

   echo "unbind"
   if \[ ! -e "/sys/bus/pci/devices/$device/driver" \]; then
       echo "    no driver to unbind"
   else
       chmod +w "/sys/bus/pci/devices/${device}/driver/unbind"
       echo "    echo -n \\"$device\\" > \\"/sys/bus/pci/devices/$device/driver/unbind\\""
       echo -n "$device" > "/sys/bus/pci/devices/$device/driver/unbind"
   fi

   echo "create new\_slot"
   chmod +w /sys/bus/pci/drivers/pciback/new\_slot
   echo "    echo -n \\"$device\\" > /sys/bus/pci/drivers/pciback/new\_slot"
   echo -n "$device" > /sys/bus/pci/drivers/pciback/new\_slot

   echo "bind"
   chmod +w /sys/bus/pci/drivers/pciback/bind
   echo "    echo -n \\"$device\\" > /sys/bus/pci/drivers/pciback/bind"
   echo -n "$device" > /sys/bus/pci/drivers/pciback/bind

   echo

}

source bind_lib.sh

modprobe xen-pciback

bindback "0000:01:00.0"

bindback "0000:01:00.1"

Using xen-tools

xl pci-assignable-add 01:00.0

xl pci-assignable-add 01:00.1

xl pci-attach Domain-0 01:00.0

xl pci-attach Domain-0 01:00.1

4. Create VM

File: win7

name="win77" description="None" uuid="db64c1a6-1f84-4eff-48df-53c4b03b389e" memory=2048 maxmem=2048 vcpus=4 on_poweroff="destroy" on_reboot="destroy" on_crash="destroy" localtime=1

builder="hvm" device_model="/usr/lib/xen/bin/qemu-dm" kernel="/usr/lib/xen/boot/hvmloader" boot="dc" disk=[ 'file:/var/lib/xen//blog/images/windowsvistax64/disk0.raw,hda,w','file:/home/lofyer/Driver.iso,hdc:cdrom,r' ]

vif=[ 'bridge=virbr0, mac=00:12:3e:6c:2f:02, model=rtl8139' ]

stdvga=1 vnc=1 vnclisten="0.0.0.0" vncconsole=0

vncunused=1

soundhw="all"

monitor=1 viridian=1 sdl=0

usb=1

acpi=1 apic=1 pae=1

usbdevice='tablet'

serial="pty"

Add by lofyer

device_model_version = "qemu-xen-traditional" gfx_passthru=0 pci_power_mgmt=1 xen_platform_pci=1 pci_msitranslate=1 hap=1 pci = [ '01:00.0' , '01:00.1' ]

xl create win7 # remote-viewer vnc://localhost:5900

Then you should see Windows boot logo in vnc for few seconds, after that it will switch to the second monitor that attached to your ATI card.

gfx_gpupassthru

As Xen wiki said:

When you specify "gfx_passthru=1" the passthru graphics card will be made the primary graphics card in the VM, and the Xen Qemu-dm emulated Cirrus graphics card is disabled. If you use "gfx_passthru=0", or don't have gfx_passthru= option at all, then the Xen Qemu-dm emulated Cirrus graphics card will be the primary in the VM, and the passthru graphics card will be secondary.

So, alter gfx_passthru to 1.

title: "mingw编译remoteviewer" date: 2012-11-17 categories: - "cloud-infra"


UPDATE 2015.3.18 fedora 21中编译: # yum install mingw* libtool* auto-buildrequires intltool glib2-devel icoutils msitools # ./autogen.sh # mingw64-configure # mingw64-make -j4 # rpmbuild -bb mingw-virt-viewer.spec 编译msi过程中,可能会提示缺少storageencryption.rng,从以下地址下载即可。 https://raw.githubusercontent.com/wido/libvirt/master/docs/schemas/storageencryption.rng

在fedora环境中,需要的有spice-gtk,libusbx,usbredir,remote-review,全部下载最新git源 spice-gtk,usbredir http://cgit.freedesktop.org/spice libusbx git://github.com/libusbx/libusbx.git remote-viewer git.fedorahosted.org/git/virt-viewer.git

libusbx和usbredir:

mingw32-configure;mingw32-make;mingw32-make install

spice-gtk: mingw32-configure --with-sasl=no --with-audio=gstreamer --enable-smartcard=no --with-gtk=2.0 --without-python 因为virtviewer要gtk2.0的,所以这也就2.0的;mingw32下没找到pygtk,图省事儿就不要python了,其他的缺啥下啥

mingw32-make mingw32-make install

virt-viewer:

mingw32-configure mingw32-make mingw32-make install

生成remote viewer.exe

安装包 运行nsiswrapper生成windows安装包

nsiswrapper --run --name "Virt-Viewer" --outfile "Virt-Viewer-for-Windows.exe" --with-gtk /usr/i686-pc-mingw32/sys-root/mingw/bin/virt-viewer.exe

缺少的dll从网上下或者windows环境中安装的virtviewer加到$PATH中 这样会缺少三个xml文件,在virtviewer/src里,直接copy过去

export PATH=$PATH:/usr/i686-pc-mingw32/sys-root/mingw/bin:.

windows client中使用usbredir: 需要libwdi或者zadig或者usbclerk 链接

todo: 只有libvirt不是最新的了,可是目前来看没影响

title: "NVIDIA GRID vGPU and KVMGT for KVM" date: 2017-10-25 categories: - "cloud-infra"


This article will tell you how to use NVIDIA vGPU and KVMGT in KVM hypervisor with mdev. I'll use NVIDIA M60 and RHEL 7.4 for testing.

1. NVIDIA vGPU

1.1. Prepare drivers and utilities

1.2. Create vGPU with command line

1.3. Passthrough vGPU to vm

2. KVMGT

2.1. Prepare drivers and utilities

2.2. Create vGPU with command line

2.3. Passthrough vGPU to vm

3. AMD vGPU

3.1. Prepare drivers and utilities

3.2. Create vGPU with command line

3.3. Passthrough vGPU to vm

Ref:

https://www.kraxel.org/blog/tag/vgpu/

title: "QEMU 3D" date: 2016-12-29 categories: - "cloud-infra"


Except from virgl(virtio-vga), KVMGT/XenGT, CUDA vGPU, I will introduce you another way of using 3D app in QEMU, c'est la XQEMU

Download prebuilt EmuCR-XQEMU-20170109

Download games!

As you can see, this is a emulator forked from QEMU to let you playing XBOX games in PC.(not interested though...)

Get XQEMU

git clone https://github.com/espes/xqemu.git

Compile XQEMU

For Mac OS X

./configure --cc=clang --enable-opengl --disable-vnc --disable-user --target-list=xbox-softmmu --extra-cflags="-march=native" --enable-debug make

For Windows

  1. Install MSYS2 x86_64: Follow all the steps on http://msys2.github.io/
  2. Open the "MinGW-w64 Win64 Shell" and run:

    pacman -S git python2 make autoconf automake-wrapper mingw-w64-x86_64-libtool mingw-w64-x86_64-gcc mingw-w64-x86_64-pkg-config mingw-w64-x86_64-glib2 mingw-w64-x86_64-glew mingw-w64-x86_64-SDL git clone https://github.com/espes/xqemu cd xqemu git submodule update --init pixman

    ./configure --cc=gcc --python=python2 --enable-opengl --disable-vnc --disable-user --target-list=xbox-softmmu --extra-cflags="-march=native" --enable-debug make

There's a bug with timers on Windows that makes it run much slower than it should. YOU should fix it for me.

For Linux

Requirements:

For Debian most build dependencies can be installed by running:

apt-get build-dep qemu apt-get install libglew-dev libtxc-dxtn-s2tc0

Building:

./configure --python=python2 --enable-opengl --disable-vnc --disable-user --enable-kvm --disable-xen --audio-drv-list=alsa --target-list=xbox-softmmu --extra-cflags="-march=native" --disable-werror --enable-debug make

Run XQEMU

XQEMU is a Low-Level Emulator, so you need to find a copy of the stuff the Xbox runs when it turns on:

Xbox MCP-X boot rom

MD5 (mcpx_1.0.bin) = d49c52a4102f6df7bcf8d0617ac475ed

If your mcpx dump has an MD5 of 196a5f59a13382c185636e691d6c323d you dumped it badly and it's a couple bytes off. It should start with 0x33 0xC0 and end with 0x02 0xEE.

Xbox 1.0 compatible bios (cromwell, 3944, 4034, 4036, ...)

You can use a retail bios or a modified 'debug' bios. Just like a real xbox, running a retail bios will not boot unofficial software.

Debug BIOS

People have reported success with the 'COMPLEX 4627' modified debug bios. It's convenient to note that this bios does not necessarily require a populated hard disk image to load an application from DVD (though an empty drive still needs to be attached), so you can skip the next step in some cases.

v1.0.2 1M dump: MD5 (Complex_4627Debug.bin) = 19b5c6d3d42a707bba620634fe6d4baf

or sometimes

1MB dump: MD5 (complex_4627debug.bin) = e8dd61cc6abdbd06aac185e371312dc1

Retail BIOS

1M dump: MD5 (3944.bin) = e8b39b98cf775496c1c76e4f7756e6ed

or sometimes

256k dump: MD5 (3944.bin) = 542c62cb976a4993c8c5027dff9638ce

Xbox dashboard files on a hard disk image

Create an Xbox hard-disk image, using xboxhdm or otherwise:

  • Create an xboxhdm cd-rom with the dashboard files
  • Create a blank hard-disk file: qemu-img create -f qcow2 xbox_harddisk.qcow2 8G
  • Run xboxhdm with qemu or something: i386-softmmu/qemu-system-i386 -hda xbox_harddisk.qcow2 -cdrom linux.iso

Launch XQEMU with something like...

xbox-softmmu/qemu-system-xbox -cpu pentium3 -machine xbox,bootrom=mcpx_rom.bin -m 64 -drive file=xbox_harddisk.qcow2,index=0,media=disk,locked=on -drive index=1,media=cdrom -bios xbox_bios.bin -usb -device usb-hub,bus=usb-bus.0,port=3 -device usb-xbox-gamepad,bus=usb-bus.0,port=3.2

On Linux, you can use KVM by passing accel=kvm,kernel_irqchip=off to -machine. This is not yet recommended.

To skip the Xbox logo animation you can pass short_animation to the -machine option (Example: -machine xbox,short_animation,bootrom=mcpx_rom.bin).

To run a game from a Xbox DVD image you must specify a file for the DVD device

title: "qemu uefi" date: 2015-06-08 categories: - "cloud-infra"


Here's a collection of kinds of bioses.

https://www.kraxel.org/repos/jenkins/

Download edk2.git-ovmf-x64*.rpm, and extract it:

(root)# rpm2cpi edk2.git-ovmf-x64-0-20150606.b1038.g5d832d6.noarch.rpm|cpio -mvid ./usr/share/doc/edk2.git-ovmf-x64-0 ./usr/share/doc/edk2.git-ovmf-x64-0/License.txt ./usr/share/doc/edk2.git-ovmf-x64-0/README ./usr/share/edk2.git ./usr/share/edk2.git/ovmf-x64 ./usr/share/edk2.git/ovmf-x64/OVMF-pure-efi.fd ./usr/share/edk2.git/ovmf-x64/OVMF-with-csm.fd ./usr/share/edk2.git/ovmf-x64/OVMF_CODE-pure-efi.fd ./usr/share/edk2.git/ovmf-x64/OVMF_CODE-with-csm.fd ./usr/share/edk2.git/ovmf-x64/OVMF_VARS-pure-efi.fd ./usr/share/edk2.git/ovmf-x64/OVMF_VARS-with-csm.fd ./usr/share/edk2.git/ovmf-x64/UefiShell.iso 22227 blocks

Run qemu with these fd bios files like this:

qemu --boot loader_type=pflash,loader_ro=yes,loader=OVMF_CODE-pure-efi.fd,nvram_template=OVMF_VARS-pure-efi.fd XXX

or

qemu -bios OVMF-pure-efi.fd XXX

title: "Add usbdevice to libvirt by modifying cgroup" date: 2013-10-31 categories: - "cloud-infra" tags: - "Libvirt" - "Device Redirection"


CGROUP means Control group. In my case, usb-redir works fine while usb-host not. https://www.kernel.org/doc/Documentation/cgroups/devices.txt

Just do it

sed -i 's/devices /#devices /'

reboot

Add fine control list

Review the rules to libvirt, and leave all the character device to it

cgget libvirt

To remove "c" device

echo c > /sys/fs/cgroup/libvirt/devices.deny

To add all the "c" devices

echo "c *:* rwm" > /sys/fs/cgroup/libvirt/devices.allow

devices.deny/allow is something like end-point.

About hierarchy

A child will not have more permission than its parent.

title: "Intel iGVT-g vGPU in KVM - KVMGT howto" date: 2015-01-22 categories: - "cloud-infra"


As previous article says, this is a vGPU solution in KVM by Intel.(All these genius)

https://01.org/zh/kvm/blogs/albcamus/2014/kvmgt-first-release

CPU: i5-4460 OS: Ubuntu 14.04 Desktop

title: "KVMGT in Linux 4.10 - 流媒体服务器、游戏、车载大屏等场景的应用技术预研" date: 2017-04-12 categories: - "cloud-infra"


UPDATE: 2018-04,现在KVMGT相关upstream基本已全部进入master,可以参考GVTg_Setup_Guide或者GVTd_Setup_Guide,如果需要本地显示参考DMA_BUF User Guide

UPDATE: 2017-08-08,Intel有了X系列处理器i9,这个核数肯定适合跑桌面了。

UPDATE:鉴于KVMGT的产品化集成难度较之前有所降低,所以最近有很多人都打算搞搞集成,那我先来集成一把吧。

果不其然,直接并进内核了(书要改吗。。当然不,本文简单增补即可。。)

4.10非常具有的代表性即是添加了Mediated Device(vfio-mdev),Intel有自家方案,nVidia也要支持,但Linux社区说你俩给个统一框架吧,要不太乱,于是就有了它。如此以来,N家的显卡便可以很快开发出对应的驱动(不要相信他们家销售说的话,14年偶尔问了一下说要支持的,都过去80年啦),可以看看N家去年(2016.9)放的PPT,02x03-Neo_Jia_and_Kirti_Wankhede-vGPU_on_KVM-A_VFIO_based_Framework

相较于之前的文章intel-igvt-g-vgpu-in-kvm-kvmgt-howto,这次的并入减少了我们的不少工作。

4.10 ChangeLog:https://kernelnewbies.org/Linux_4.10

参考https://github.com/01org/gvt-linux/wiki/GVTg_Setup_Guide

另外,RHEL 7.4也已加入了KVMGT/XenGT,可以试用一下。

来看看支持哪些CPU吧:

As a long-standing member of the open source community, Intel works upstream to ensure that full, open source implementations of Intel® GVT exist for open source virtualization hypervisors, KVM* and Xen*, known respectively as KVMGT and XenGT. KVMGT and XenGT deliver excellent virtual GPU performance in VMs across 5th and 6th generation Intel® Core™ processors (Intel® Core™ i3, Intel® Core™ i5, and Intel® Core™ i7 processors) with Intel Processor Graphics as well as Intel® Xeon® processors E3 v4 family with Intel Processor Graphics.

首先安装并编译4.10的内核:

$ git clone https://github.com/01org/gvt-linux $ sudo yum install openssl-devel ncurses-devel $ cd gvt-linux $ git checkout gvt-stable-4.10 $ echo ""|make oldconfig $ make menuconfig

搜索关键字kvmgt, mdev,vfio-iommu-type1,并将其标记为“M”。 模块标记完成后,进行编译安装。

$ make -j4 $ sudo make modules_install $ sudo make install $ sudo grub2-mkconfig -o /boot/grub2/grub.cfg

从elrepo安装的缺少模块和编译环境。

rpm --import https://www.elrepo.org/RPM-GPG-KEY-elrepo.org

rpm -Uvh http://www.elrepo.org/elrepo-release-7.0-2.el7.elrepo.noarch.rpm

yum --enablerepo=elrepo-kernel install kernel-ml kernel-ml-devel

然后修改grub文件:

menuentry 'CentOS Linux (4.10.10) 7 (Core)' --class centos --class gnu-linux --class gnu --class os --unrestricted \(menuentry\_id\_option 'gnulinux-3.10.0-514.10.2.el7.x86\_64-advanced-6a3987e2-9cb7-4b38-9a53-1642aefada46' { load\_video set gfxpayload=keep insmod gzio insmod part\_msdos insmod ext2 set root='hd0,msdos1' if \[ x\)feature_platform_search_hint = xy ]; then search --no-floppy --fs-uuid --set=root --hint-bios=hd0,msdos1 --hint-efi=hd0,msdos1 --hint-baremetal=ahci0,msdos1 --hint='hd0,msdos1' 3fc34ea6-30d7-491e-931d-d0941884fb6b else search --no-floppy --fs-uuid --set=root 3fc34ea6-30d7-491e-931d-d0941884fb6b fi linux16 /vmlinuz-4.10.10 root=/dev/mapper/cl-root ro rd.lvm.lv=cl/root rd.lvm.lv=cl/swap rhgb quiet LANG=en_US.UTF-8 i915.enable_gvt=1 kvm.ignore_msrs=1 initrd16 /initramfs-4.10.10.img }

为什么添加ignore_msrs呢?

Since some windows guest 3rd patry application / tools (like GPU-Z / Passmark9.0) will trigger MSR read / write directly, if it access the unhandled msr register, guest will trigger BSOD soon. So we added the "kvm.ignore_msrs=1" into grub for workaround.

然后继续编译QEMU,这次只要下载upstream的即可。

$ git clone git://git.qemu.org/qemu.git $ cd qemu $ git checkout v2.8.1 $ git submodule update --init roms/seabios $ ./configure --prefix=/usr \ --enable-kvm \ --disable-xen \ --enable-debug-info \ --enable-debug \ --enable-sdl \ --enable-vhost-net \ --enable-spice \ --disable-debug-tcg \ --target-list=x86_64-softmmu $ make -j4 $ cd roms/seabios $ make -j8 $ cd - $ sudo make install $ sudo cp roms/seabios/out/bios.bin /usr/bin/bios.bin


title: "Slic for qemu-kvm" date: 2013-12-25 categories: - "cloud-infra"


This article is a howto for activation-ready of Windows. SLIC 2.0 is for 2003 & XP, and 2.1 for Win7 & 2008 Original seabios reads slic table from exactly the host. However, if your motherboard(not OEM) happen to own none, you will most probably make one by your self.

Seabios

You could get the lastest code from here.

git clone git://git.seabios.org/seabios.git seabios

Or, you can download from here.

seabios-1.7.2.2.tar.gz

SLIC-BIN

Here's a collection of various slic table. SLIC 2.1 BINS

Seaslic patch

This is patch for seabios to make it slic table enabled. Download from here.

Seaslic.tar.xz, seabios-1.7.2 compatible Here's the patch content.

--- a/src/acpi.c 2013-01-19 06:44:54.000000000 +0600 +++ b/src/acpi.c 2013-05-07 01:16:30.000000000 +0600 @@ -214,6 +214,11 @@

#include "acpi-dsdt.hex"

+#define CONFIG_OEM_SLIC +#ifdef CONFIG_OEM_SLIC +#include "acpi-slic.hex" +#endif + static void build_header(struct acpi_table_header *h, u32 sig, int len, u8 rev) { @@ -226,6 +231,10 @@ h->oem_revision = cpu_to_le32(1); memcpy(h->asl_compiler_id, CONFIG_APPNAME4, 4); h->asl_compiler_revision = cpu_to_le32(1); + #ifdef CONFIG_OEM_SLIC + if (sig == RSDT_SIGNATURE) // only RSDT is checked by win7 & vista + memcpy(h->oem_id, ((struct acpi_table_header*)SLIC)->oem_id, 14); + #endif h->checksum -= checksum(h, len); }

@@ -827,6 +836,15 @@ ACPI_INIT_TABLE(build_srat()); if (pci->device == PCI_DEVICE_ID_INTEL_ICH9_LPC) ACPI_INIT_TABLE(build_mcfg_q35()); + #ifdef CONFIG_OEM_SLIC + void *buf = malloc_high(sizeof(SLIC)); + if (!buf) + warn_noalloc(); + else { + memcpy(buf, SLIC, sizeof(SLIC)); + ACPI_INIT_TABLE(buf); + } + #endif

1
 u16 i, external\_tables = qemu\_cfg\_acpi\_additional\_tables();

Compile

You don't have to apply the seaslic patch with patch.sh, you can do that by hand. Before you start, do this:

xxd -i /sys/firmware/acpi/tables/SLIC | grep -v len | sed 's/unsigned ch ar.*/static char SLIC[] = {/' > seabios.submodule/src/acpi-slic.hex

Or,

xxd -i DELL.BIN | grep -v len | sed 's/unsigned ch ar.*/static char SLIC[] = {/' > seabios.submodule/src/acpi-slic.hex

After applying the patch, you can compile the bios.bin, and copy that to /usr/share/qemu-kvm/my-bios.bin or rewrite bios.bin instead. Here's my bios.bin with Dell[DELL-QA09-NVDA]2.1.BIN from SLIC BIN

my-bin.tar.xz

Qemu-cmd

qemu-kvm XXX -bios /usr/share/qemu-kvm/my-bios.bin -acpitable file=Dell[DELL-QA09-NVDA]2.1.BIN

In the guest, you could see that SLIC by /sys/firmware/acpi/tables/SLIC in Linux or SLIC_Toolkit in Windows.

title: "GPU Passthrough, VGA Passthrough in KVM" date: 2013-05-23 categories: - "cloud-infra" - "linux-admin"


To inspire you, I've got a video from someone else. Better mutt the volume by the way. Arch Linux KVM Crysis HD Gpu Passthrough Or you can download it to see. Download the video in HD

Here's the links I refer to: http://thread.gmane.org/gmane.comp.emulators.kvm.devel/71981 https://bbs.archlinux.org/viewtopic.php?id=162768 https://docs.google.com/document/d/1ef_nfl652L0HLn_wGvnpgjsBJd9LZzaV_-rIcEEoK8Y/edit?pli=1 http://www.linux-kvm.org/page/VGA_device_assignment http://www.linux-kvm.org/page/How_to_assign_devices_with_VT-d_in_KVM

Result: VGAPassthrough: success in host F19, guest Windows7 GPUPassthrough: success in Fedora-Rawhide

HOST: CPU: Core i5 3470 GPU: ATI HD Radeon 7850 OS: Fedora-Rawhide QEMU: qemu-1.5.1 kvm-vgapassthrough So, here's the steps

0. Enable the mainboard VxT, iommu and alter the video device to Intel HD

1. See what we have got now.

lspci;lspci -n

We have output below

... 01:00.0 VGA compatible controller: Advanced Micro Devices, Inc. [AMD/ATI] Pitcairn PRO [Radeon HD 7850] 01:00.1 Audio device: Advanced Micro Devices, Inc. [AMD/ATI] Cape Verde/Pitcairn HDMI Audio [Radeon HD 7700/7800 Series] ...

... 01:00.0 0300: 1002:6819 01:00.1 0403: 1002:aab0 ...

You can see the pci bus and vendor.

2. Modify the kernel parameter, morprobe.d and libvirt.conf

Add follow parameters to grub.conf

intel_iommu=on pci-stub.ids=1002:6819,1002:aab0,vfio_iommu_type1.allow_unsafe_interrupts=1

NOTE: If you have got an AMD cpu, please replace "interl_iommu=on" with "iommu=pt iommu=1" Add modprobe.conf to /etc/modprobe.d/ with this content:

blacklist radeon options kvm ignore_msrs=1 options kvm allow_unsafe_interrupts=1 options kvm-amd npt=0 options kvm_intel emulate_invalid_guest_state=0 options vfio_iommu_type1 allow_unsafe_interrupts=1

change the following options in /etc/libvirt/qemu.conf:

The user ID for QEMU processes run by the system instance.

user = "root"

The group ID for QEMU processes run by the system instance.

group = "root"

......

If clear_emulator_capabilities is enabled, libvirt will drop all

privileged capabilities of the QEmu/KVM emulator. This is enabled by

default.

Warning: Disabling this option means that a compromised guest can

exploit the privileges and possibly do damage to the host.

clear_emulator_capabilities = 0

Reboot.

3. Using scripts below

Version 1: VFIO-Passthrough

File: vfio-bind

!/bin/bash

modprobe vfio-pci for var in "\(@"; do for dev in \((ls /sys/bus/pci/devices/\)var/iommu\_group/devices); do vendor=\)(cat /sys/bus/pci/devices/\(dev/vendor) device=\)(cat /sys/bus/pci/devices/\(dev/device) if \[ -e /sys/bus/pci/devices/\)dev/driver ]; then echo \(dev > /sys/bus/pci/devices/\)dev/driver/unbind fi echo $vendor $device > /sys/bus/pci/drivers/vfio-pci/new_id done done

Bind the device

./vfio-bind 0000:01:00.0 0000:01:00.1

Start VM

!/bin/bash

sudo modprobe vfio-pci

sudo qemu-system-x86_64 -no-user-config -nodefaults -m 2048M -smp 4 -boot menu=on \ -net nic -net user -enable-kvm -monitor stdio -vga qxl -global qxl-vga.vram_size=67108864 \ -spice port=6000,ipv4,disable-ticketing \ -device intel-hda,id=sound0,bus=pcie.0,addr=0x4 -device hda-duplex,id=sound0-codec0,bus=sound0.0,cad=0 \ -drive file=Windows7.iso,if=none,id=drive-ide0-1-0,readonly=on,format=raw -device ide-cd,bus=ide.1,unit=0,drive=drive-ide0-1-0,id=ide0-1-0 \ -drive file=/home/lofyer/gpu_passthrough/f17.qcow2,if=none,id=drive-virtio-disk0,format=qcow2,cache=none,werror=stop,rerror=stop,aio=threads -device virtio-blk-pci,scsi=off,bus=pcie.0,addr=0x7,drive=drive-virtio-disk0,id=virtio-disk0,bootindex=1 \ -device virtio-balloon-pci,id=balloon0,bus=pcie.0,addr=0x8 \ -M q35 \ -device piix4-ide,bus=pcie.0 \ -device ioh3420,bus=pcie.0,addr=1c.0,multifunction=on,port=1,chassis=1,id=root.1 \ -device vfio-pci,host=01:00.0,bus=root.1,addr=00.0,multifunction=on,x-vga=on \ -device vfio-pci,host=01:00.1,bus=root.1,addr=00.1 \ -fda virtio.vfd

Version 2: PCI-Passthrough

Bind device

!/bin/bash

modprobe pci-stub for id in 6819 aab0; do echo 1002 $id > /sys/bus/pci/drivers/pci-stub/new_id done for pci in 0000:01:00.{0,1}; do echo \(pci > "/sys/bus/pci/devices/\)pci/driver/unbind" echo $pci > /sys/bus/pci/drivers/pci-stub/bind done

Start VM

!/bin/bash

qemu-system-x86_64 \ -hda ../f17.qcow2 \ -cdrom /run/media/lofyer/Cache/OS_ISO/cn_windows_7_ultimate_with_sp1_x64_dvd_u_677408.iso \ -m 2048 -balloon virtio -smp 4 -enable-kvm \ -device pci-assign,host=01:00.0


title: "kvm perfermance test, including periphery virtual device" date: 2013-09-14 categories: - "cloud-infra" - "linux-admin"


I mean test, not profiling.

To virtual server and virtual desktop, we should inspect them from different standards.

For an server: response time, throughput, concurrent, utilization For and desktop: response time, video/audio latency, utilization

Tools we can use to test

CPU:

SPEC(open, but not free) Unixbench Super PI Compile linux kernel pcmark(not open, not free, but cracked can be found..) ffmpeg convert

graphic:

3dmark

fs,hd:

hdparm iozone blogbench dbench

net:

iperf

ram

ramspeed

How to start

Initial host env: i5-3470, 8G, gentoo-linux-3.11+, qemu-1.6.0 Kernel para:

TBD

他们都不见了

我是一个只会流浪的瞎子 游荡在拥挤着灵魂的房间里 这里很吵闹,但于我来说并不讨厌

哇哇的孩子贴上母亲的乳房后便不再吵闹 伤心的女儿埋头伏在父亲胸前泣诉不会归来的人 犹豫的铁匠靠着窗户,喃喃低语着什么

我忽然觉的不知所措 尽管我是瞎子 我还是能感受到别人的眼神

我昂起头 离开了座位 忽然想去找寻一份安静

因为路上没有什么障碍 我可以放心的迈出脚步 直到我听见后面仓促的呼吸

是什么呢 是蒙着面的哥布林强盗 还是越狱的杀人犯?

我从走变成了小跑 从小跑变成了狂奔 我宁可不回头

我脚下一空失去重心 想去用手支地 可怎也够不着

就这样我就来到了这里 我觉的快乐就是这样 而恰巧这里的一切都有我需要的意义存在

那一天这里来了另外一个人 他说他也是个瞎子 我从来不曾看见的人啊

你身上链锁当当 我不相信你是个罪人 我也和你一样沉浸在自由中

我觉得 我认为 他们也说

你说其实再往前走就可以找寻久违的光明 可我只是听说光明很温暖 恰如我现在所拥有的自由

我待的久了 便渴望走向下一个地方 我不该停下的脚步

天寒 略显诡异的空气没有安宁废旧城市的居民 倒下的灯塔下满是触礁者的残骸

我不清楚这是怎么一种状态 可是我知道有些决定会影响到北极熊孩子的寿命 我想这便是这个世界本该有的状态

你的脚步声临近 像预言中一样 我从此跟随

人间的战争曾经让无辜的人失去他们珍惜的 但这些都不可避免 所以我说你有天赐的怜悯

我仿佛丢失了不该丢失的指环 你赠予我玫瑰的下午 我不知道要怎么做

你俯首 收下你谦卑的诚意 我屁颠屁颠的很乐意

这个时候应该停下来 因为天气很好 我有时会太过忙碌而没有静心享受这世界给我准备的礼物

如果我记得 我是可以进入你的世界 一个围绕我转动的星球上 只有春秋

可是 我也喜欢夏冬风景 虽然我看不见 但我能体验到这两个界线明显

阴雨天气 略有泥泞的路上 或者些许惆怅 不曾迷路的瞎子

无主之地

已经是一片沙子吞噬的废墟中,走过一列驼队,他们看起来像几个世纪之前的人。

在战争之前,这片地方是个纪念馆,纪念第六次世界大战中死去的人类。如今E3星系的人已经在地下安家,地球自转和公转周期都被调成了与他们家乡一致,也就是说,在太阳落山之前,驼队还有大概三百六十个小时的旧制时间赶到传教士居所而没有E3人来阻碍,当然,机器人不算。

地球的再次毁灭淘汰了地表以及地下百分之九十九的人类,剩下的一批大多数是一千年前志愿基因改造的后裔。可是,人类仍然好战。残余的人类各自结盟,形成红派和黑派两大阵营,其中红派利用E3人的科技,在第十二次世界大战中完胜了黑派。但是E3做事总是留一手,他们在所有的设施中都嵌入沉睡的机械生命体,在大战结束后的一个星期时间内逐渐苏醒,并控制了地球。红派不得不移居至其他星球,分散在各个星系,留守下来的人类躲避着E3人的视线生存。

大约一个星期后,驼队到达了传教士居所,他们在太阳风暴那天逃过雷达进入撒哈拉,来到昔日古文明碎片最大发掘地。E3人对所谓的古文明并不感兴趣,他们否认经验的重要性,认为真理本就在那。

how to lock/unlock/root nexus 5

今日入手Nexus5美版(D820) blahblahblah... 好吧,开始unlock以及root

先下载这个包,里面包含CM的镜像,unlock/lock的apk http://cloud.lofyer.org/public.php?service=files&t=af14640b4f32d2e491d80a117db2bbe9

下载完成后,同时按住音量上下键再按开机,进入bootloader的前奏(相当于bios选项),此时电脑上应该会有所表示(比如windows的弹出要安装驱动啦,没驱动下个sdk搜索一下,比如linux的dmesg啦)

解压下载的文件,运行里面的root-$YOUROS(win、mac、linux)脚本,然后你看到请求unlock的选项,选择unlock并按电源键确认,此时pc上的脚本也会让你下一步; 下一步就是出现红色的机器人,说正在写脚本以及镜像,在写的时候pc上的脚本再下一步就可以自动让它退出了,然后稍等几分钟让它重启,重启的时候你会看到google标志下面的锁标志。

出于莫名其妙的安全感,在root以后可以安装压缩包里面的apk文件将bootloader再次锁上,这样,就这样。

title: "wrt54g v5添加usb" date: 2012-10-12 categories: - "devices"


1.dd-wrt.com下载固件包及源码包

2.编译添加或者配置usb存储支持

3.按接口图添加usb

http://www.home-wifi.com/forum.php?mod=viewthread&page=1&tid=3962

注意焊点位置,两个数据线左边D+,右边D-,下边的472是4.7k的下拉电阻,右边两个电阻是另一组USB口。所以直接引线就可以,但是我的优盘经常不能识别,就又在USB座上把两条数据线对地接了10k的下拉电阻,相当于和图上的472并起来,现在使用很正常。 bh

使用5V 3A电源给路由器供电,不用安装7805了,电源线直接接到电源插座

lbh

dd


title: "eZ430-Chronos入手" date: 2013-12-16 categories: - "devices"


IMG_20131216_160008

入手的是433Mhz,相当于国际版。 关于官方介绍可至eZ430-chronos查阅。 下载Control Center for Windows 下载Control Center for Linux

然后将toolkit的USBRF插入PC,选择控制台中的ACC标签并“start ap,腕表选择“#”号键至ACC,再按下键即可于控制台中显示加速度传感器数值。 同样PPT为按键映射,SYNC为时间设置,TFBSL尚未使用。

编程 TBD

论身体的重要性

高二的时候买了系列的哲学小本,里面有个叫做《自由意志》的册子,已经忘了作者是谁。因为当时正好读过歌德的谈话录,所以在阅读《自由意志》的过程中总会想到歌德口中的“精灵”,再后来通过“蝴蝶效应”结识了“混沌”,一直觉得它们是同一个东西,至少于意识。 我要表述的也是这个问题,许多试验已经表明意识确实能对身体产生物理的影响,而现在所谓的交际原则中也认为身体不经意的动作可以反应出这个人性格的某一面。 高僧说一副皮囊,他们的话不无道理,大家的身体结构基本相同,骨骼清奇的已经被烧死或者扔进黑暗(参考雾都孤儿里的那个“怪物”,剑风传奇里更多了),皮囊所包裹的是身体与意识。原生动物有意识么,非条件反射应该算吧。一只猫的皮囊包裹下的是精巧的身体以及难以去体验的意识系统(听说已经有科学家可以做到“体验”别人的意识了),假设抽去这身体,我们残忍地把皮囊留下,你应该会看到什么? 扁桃体炎,我刚经历过教科书式的“3-5天低寒高热”,接下来是让炎症消下去的日子了。

油画:猫

高原,湖边,木屋。 伦敦事件已经过去十年整了,人们对它的记忆却犹如911一样深刻。他也花了将近十年去建造一个系统,一个建立在自然秩序之外的系统。所有从博物馆“凭空消失”的作品他都烧了,只在床前留下一幅十七世纪未名画家的油画:一只可爱的暹罗猫,从木盒子里小心翼翼的探出头,烛光落在它厚厚的前脚掌上。

事件后一个月,他有些心神不宁,花光了所有积蓄从全球各地的实验室偷购材料,从已成为科技先驱的google那取得了所有数据库访问权,甚至高价从“火星人海森”那购买N-12-82星球的文明碎片。工程准备完妥后,他就开始了梭罗一样的生活,每天早上陪牧民放牧,有时也会在湖边钓鱼,当然,没鱼钩;下午从牧民那吃完饭回来后,在二楼休息四个小时,便乘电梯到地下五层工作。

在地下一楼与地下二楼共一千二百平的空间里,整齐的排满了他喜爱的书籍,其中大部分都是用来每半年和别人交换。他打算系统启动之前将这些书都交给牧民,因为他不想冒险让这个世界永远忘却他。地下三楼和四楼的更大空间里,是满满的“Part of the World”,他称之为如此。地下六楼则承载着这栋建筑的动力源,从反应堆搭建到235提炼都是他在伦敦事件之前亲手完成。

他喜欢制作一些挂件,脖子上就带着一只饿死的雪豹的牙齿,上面刻了用“明天的记忆”书写的一个人名,他在小学时就发明了这套符号。那时候,他就喜欢“奇奇怪怪”的世界,以至于在日记里创造了一套完整的“异星人统治的史前时代”世界观,可是星际十字军压缩并吸收了他的村庄后,他便不愿去想这些了。

二十年来与十字军的战争从未停息,银河系方面因为科技落后于十字军五百年水平,所以已经有些沮丧而甘为人奴,至少已经有部分国家开始放弃抵抗哪怕是小撮十字军士兵的进攻了。十五年前在参与当地联盟军的一次反抗中,他又目睹了十字军的残忍————他是唯一生还者,代价是缺氧导致的左臂间歇性麻木。其后他领导了“伊恩”联盟军五年,在与十字军战斗的同时,偶尔也会参与一些所谓的“独立战争”。然后便消失了五年,直到十年前的伦敦事件。

他又在日记里写,不要忘记自己,因为还未远去,明天,我要再看一眼太阳。

LeapMotion相关

LeanMotion入手

卖家太给力了,昨天就顺丰发货,今天下午我冒着炎炎烈日去取货,激动。。

先来张盒子,看着就感觉那帮老外工业设计功底深厚。 DSC_0003

开箱:Leapmotion一台,数据线两根(一长一短),说明书一张 DSC_0006

看着感觉好爽的样子~ DSC_0008

我拍的一段简单使用视频。


LeapMotion记录(2017-07)

已经在官网注册并下载了sdk(windows、linux,我没Mac),设备不出意外下个月到。 等到了再更新文章,到时会更新sdk配置,与arduino交互的相关代码。 可控的目前想到了飞行器、机械手(夹持器 - -)。

title: "LeapMotion controlled X4" date: 2013-09-15 categories: - "devices" tags: - "LeapMotion"


两者都入手已经一个月了,可平时有些忙(惰者多忙),也就只零零散散准备了一些资料,还没开始整合。 整个流程大概是这个我用文字描述的粗略的样子:

空间建模:获取飞行器初始坐标,与leapmotion的可视区域进行map。 一级控制:leapmotion获得的手掌运动信息(可预处理)进入arduino通过nfr2401发送给X4,进行粗略运动指令传达。 二级控制:根据摄像头采集的飞行器位置数据与手掌位置信息对比,进行二阶指令传达。 回馈控制:在二级控制的基础上进行微调。 错误返回:如果超出leapmotion可视范围,则进行回馈控制将X4返回初始位置(0,0,0),超出摄像头范围,则需。。。人工重置。

title: "Leapmotion 相关" date: 2013-08-02 categories: - "devices" tags: - "LeapMotion"


在Windows中

夹持器与四轴飞行器都是Arduino-Based,通信就用串口。 代码放在git.lofyer.org 感觉VS好难。。试试在gentoo下驱动leapmotion

在Gentoo下使用,这个方式应该适用于所有非debian系

先下载sdk包,下载后解压。 看到里面有个deb的包,用alien转化为tar包

alien -t Leap-0.8.0-x64.deb tar xf leap-0.8.0.tgz cp -irf usr/* /usr/local/ cp -irf lib/udev/rules.d/25-com-leapmotion-leap.rules /etc/udev/rules.d

然后将普通用户加入plugdev组

sudo usermod -a -G plugdev $USER

刷新组关系,注销当前用户也可

exec su -l $USER

运行leapd与LeapControlPanel即可

在64位机器上缺少32位库文件 freetype.so.6, libasound.so.2

sudo emerge -avt app-emulation/emul-linux-x86-xlibs sudo emerge emul-linux-x86-soundlibs

实例:编译MotionVisualizer

Make -C Builds/Linux